Well, a little more progress on my other current build today - Jeremy's Mahogany Les Paul. Again today I was attacking wood with sand paper - 120 and 180 grit on mahogany to be exact. Two hours I laboured, using paper over both my cork sanding block and my eraser, with the end grain at the heel, and the concave sections (especially the cutaway) proving their usual pain in the arse.
I'm not sure why these two areas, in particular, attract the majority of machining marks, but every guitar body I've worked on has had issues here. The cutaway I can imagine is a problem area - the factory presumably uses a sanding wheel or similar to give the tight cutaway a rough finish prior to binding. But the heel? It's out there for all to see, and it's way convex. There's no excuse. If only they ran a 120 grit sanding wheel over it before doing the binding! Grrr...
Anyway, on a positive note, one thing I did do this time around was hit all the glue spots with some Goof-off glue remover from Bunnings. It didn't remove all the glue completely, but boy did it make a difference when it came time to sand those glue spots off! I can highly recommend giving this stuff a try on your own builds. I did 3 passes of the stuff on each spot before starting to sand. No wire brushes required this time!!
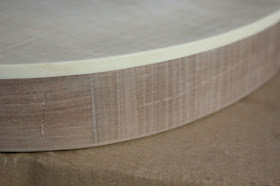
With the usual machining marks from the factory estimated (in my mind at least) between 20 and 80 grit, unfortunately it just takes time and elbow grease to remove them with 120 grit. It's a bit of a trick to try and remove these machining marks without sanding through the binding, but I think I managed it mostly OK. Unfortunately, there are two marks (cracks) on the heel of the body which aren't going to sand out - no matter what the grit.
With the 120 grit paper I was able to remove all the glue around these cracks that the factory had obviously used to try and patch them. Believe me they look much better than when I started! Hopefully once the dye and clear coats go on, these cracks will all but fade into the background. If not, they will have to be put down to "character" in the final build. It's just the way with these cheap kits - there's never a perfect body to be found. We amateur luthiers just have to do our best with what we've been given.
Next step for this bad boy is to continue sanding with 240 grit and 360 grit. Once the 360 comes out I can actually start on the front veneer, but it'll only be the lightest of licks. There's no way I'm risking sanding through on this project! Stay tuned...
I'm not sure why these two areas, in particular, attract the majority of machining marks, but every guitar body I've worked on has had issues here. The cutaway I can imagine is a problem area - the factory presumably uses a sanding wheel or similar to give the tight cutaway a rough finish prior to binding. But the heel? It's out there for all to see, and it's way convex. There's no excuse. If only they ran a 120 grit sanding wheel over it before doing the binding! Grrr...
Anyway, on a positive note, one thing I did do this time around was hit all the glue spots with some Goof-off glue remover from Bunnings. It didn't remove all the glue completely, but boy did it make a difference when it came time to sand those glue spots off! I can highly recommend giving this stuff a try on your own builds. I did 3 passes of the stuff on each spot before starting to sand. No wire brushes required this time!!
With the usual machining marks from the factory estimated (in my mind at least) between 20 and 80 grit, unfortunately it just takes time and elbow grease to remove them with 120 grit. It's a bit of a trick to try and remove these machining marks without sanding through the binding, but I think I managed it mostly OK. Unfortunately, there are two marks (cracks) on the heel of the body which aren't going to sand out - no matter what the grit.
 |
| Two small cracks on the heel of the body. These won't sand out. |
Next step for this bad boy is to continue sanding with 240 grit and 360 grit. Once the 360 comes out I can actually start on the front veneer, but it'll only be the lightest of licks. There's no way I'm risking sanding through on this project! Stay tuned...
No comments:
Post a Comment