Showing posts with label Ash Thinline. Show all posts

Tuesday, 5 May 2015

Thinline Cabronita: Wired and Making Noise!

Well, she's finally finished - the Ash Surf-abilly Thinline Cabronita. I'm very, very happy with the final results - much better than I ever imagined that they would be. The seafoam green flames over the Bali green base work really nicely, and give a nod to the rockabilly set. All that chrome hardware from GFS also works nicely too, as does the retro Cabronita pickguard.


The seafoam and Bali greens are very difficult to photograph. Depending on the light, the photo you end up with is either a washed out olive green, or a light blue like the photos below. You'll just have to take my word for it - this baby looks seafoam in the flesh. That is to say, really bloody awesome!


As usual, the acrylic clear coats came up beautifully. The White King spray cans of gloss acrylic really are the easiest way to get a beautiful gloss finish on your axe - I cannot recommend them highly enough.

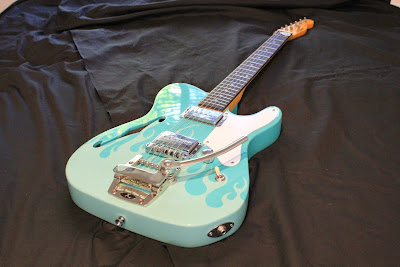

While the Thinline retains the classic lines of the Telecaster, the semi-hollow body removes most of the weight, resulting in a guitar that is very easy to handle. The body resonates really nicely too and you can almost play it like a hollow body (almost). Certainly there's a deal more noise coming from the guitar than a straight solid body Ash Telecaster.


All in all, I'd have to say that the Thinline Cabronita is very nearly the perfect guitar. Doing away with the control plate, it's got super-cool looks, it feels nice and light in the hands while remaining balanced on the strap, and it sounds really great unplugged. And with a couple of GFS Mean 90s on board, the package is even better!

These pickups sound really nice in clean mode - delivering just enough single coil twang for surf and rockabilly riffs. When you crank up the distortion, the pickups meet the challenge head on and really live up to their "mean" moniker. These babies rocks as hard as the best of them! So too, the xTrem tremolo from GFS is a really nice addition. It has a nice fluid feel, and combined with the roller bridge and roller string trees, doesn't seem to create any tuning stability problems. All in all a great little package that I'm having a hard time putting down!

Saturday, 25 April 2015

Cabronita Thinline: Clear Coats & Assembly

After a few sessions baking under the IR lamp, the chemical smell has finally gone from the White King Acrylic clear coats and my Surf-abilly Thinline Cabronita is finally ready for its final cut and polish! As usual I started the process with a good wet-sand with 1500 grit, wet and dry paper. It took a while, but finally all the orange peel was removed and the surface was nice and matte with no shiny low spots. With this complete, I moved up to 2000 grit. After all the effort required to level all the orange peel with 1500, the 2000 took no time at all and the surface really started to take on a shine.

With the wet-sanding completed down to 2000 grit, it was time to cut and polish with Meguiars Ultimate Compound. This is when the shine really starts to deepen! After two passes with the compound - rubbing it in with small circular motions and then wiping it off - the surface looked amazing. There's no visible height transition between the flames and the background colour (the surface is completely flat) and the shine is awesome.


First pass with Meguiars Ultimate Compound.
With the polishing complete it was time for the long awaited assembly. The pre-drilled screw holes made it a snap to re-attach the neck and get the bridge and tremolo locked down without marring the finish at all.The pickups required a bit of finagling to get them lined up and screw holes drilled, but it was finally managed.

Hardware went back on like a dream.
Neck is still straight, with the strings running nicely from the tremolo,
over the bridge to the nut.
All that is left for me to do now to get the body finished is to cut a new pick guard out of plain white 3-ply material (the kit came with black) and to finish the wiring using shielded wire. Even with the bridge flat on the deck the strings are a good 5mm away from the 22nd fret, so the neck will need a shim before I do a fret level and complete the other setup tasks. First though - get this bad boy making noise! Can't wait to hear these GFS Mean 90s in action.

Wednesday, 8 April 2015

Cabronita Thinline: Hot Rod Flames

OK, it's decided - subtle hot rod flames it is for the Thinline Cabronita. Here's how I go about adding simple flames to a paint job. Caveat: please remember that I am an amateur who knows very little about the art of spray painting, airbrushes or anything of the like. This is a very simple approach that I have found that I can handle with my limited skills and the tools at my disposal!

Enough of the caveat, let's get to it! The first step it to take my design and transfer it on to a sheet of artists frisket. I have found that it's a good idea to trace it as thin as possible to avoid any errors during cutting.

Tracing my original flames design onto a piece of artists frisket
The next step is to cut out the design using a combination of scissors and a craft blade. This is the toughest part of the process and it can be very hard at times to create a nice smooth line. There are many places on this effort where my blade work was not up to snuff, but we can only do out best!

Cutting around the outline to leave the flames only.
Once the design is cut out, the backing is removed and the design is stuck down to the surface. There's not much danger of the frisket removing the original paint as it's usually very low tack (sometimes too low tack!).

The front design is peeled away from the backing and stuck down.
The back design is exactly the same as the front.
Once the frisket is stuck down on all 4 sides, any remaining areas are masked off with painters tape and butcher's paper. Be careful not to stick the tape to the original paint (it usually isn't low tack!) and also make sure you don't miss a spot! Taking the masking off only to reveal a spot of paint you didn't intend is a real prick let me tell you!

Additional areas are masked with butchers paper and painters tape.
With the additional masking complete, the new colour can be put down. This colour will become the new background colour - leaving the existing colour for the flames. I find that 2 coats should be more than enough to get even colour coverage but not create a large height difference between flame and background.

For my new background colour, I'm using MTN94 Bali Green. It's the next grade in the turquoise (seafoam green?) colour chart. I think it looks pretty good and will provide a subtle contrast to the MTN94 Luminous Green used for the flames.

The flame colour (left) is the original MTN94 Luminous Green.
The body colour (right) will be MTN94 Bali Green.
And so, after two coats of Bali Green the masking was ready to come off. I'm pretty happy with the results! The actual colour isn't quite as blue as it appears here. I managed to get all the frisket off without tearing the new paint. Gently does it!!

The front and under-edge with the frisket removed.
The back and top-edge with the frisket removed.
The body is now hanging in my bathroom under the IR lamp, getting ready for Acrylic clear coats. I can't wait to see this baby all assembled. Once the paint is cured I might do a sneak peak assembly to see how she is looking!

Postscript 08/04/2015:
Got the hardware on to the body for a quick peek - I just couldn't help myself!

A sneak peak with the chrome hardware. Looking great!
 

Tuesday, 31 March 2015

Cabronita Thinline: Hot Rod Flames?

I've been looking hard at the Thinline Cabronita build over the last few days with its large expense of seafoam green and only a very small pickguard.

That's a lot of green maybe?
Of course there's lashings of chrome to go on there too, but maybe, just maybe, there's a little too much seafoam. My Surf Monster Telecaster, which I absolutely love, used exactly the same shade of MTN94 paint, but nearly half is covered in pickguard! I'm slowly coming to the conclusion that this Cabronita might need something else.

So the question is what? I've been browsing the interwebs looking at racing stripes and other simple paint modifications, but nothing in that area seems to speak to me. Really, given the decided rockabilly-surf-crossover vibe of this build, wouldn't hot rod flames be the go? If you're not a fan of the rockabilly scene and the style it brings, then maybe flames might seem a bit tacky, but I kinda have a soft spot for them. To be honest, I think they worked really well on my son's BC Rich Avenge build - even if I do say so myself. Maybe I could give them another go?

Here's my first go at a concept for the paint job. I've sketched around the pickguard, but have ignored the placement of pickups, bridge and tremolo.

Hot Rod flames concept art ready for frisket if the mood takes me.
In terms of colour, I'm not thinking of anything nearly as drastic as with the Avenge paint job. I was thinking that this time around I could do a a very subtle flame made up of the current body colour, with a background colour only one shade darker.

Here's some colour quickly splashed over my concept art using photoshop. Of course the black edges around the flames would not be there in the final paint job. What do you think?

White or black pickguard? Black looks good with the outlines flames but..
I'm liking the idea, but I'm still not sold. I'm going to ruminate on this for a few days and see how I'm feeling after that.. I've got some MTN94 Bali Green in the post, so maybe a test or two with that will make my mind up for me.

Friday, 27 March 2015

Thinline Cabronita: Colour Coats

With the Ash Stratocaster still on the bench awaiting a bone nut blank, I had a chance to get back to the Thinline Cabronita which has been languishing with a single coat of primer for the last week or so.

After a very light wet sand with 800 grit wet/dry paper, I gave the body 2 more coats of primer and hung it overnight. Man, that body looked and felt pretty nice I can tell you! I could have stopped at matt white for this build without any qualms at all.

Wet sanding with 800 grit and a last coats of primer
With the primer dry I gave these last coats another light wet sand and then it was time for the colour coats. Just like I did for my Surf Monster Telecaster build, I have decided to go seafoam green for this Cabronita. That means getting the cans of MTN94 Luminous Green back out of the cupboard. I gotta say I really do love this colour, and it was a pleasure to be spraying it again!
The first coats of MTN94 RV6027 - Luminous Green
As usual, the MTN94 didn't disappoint. The first coat I laid down was a mist coat with much of the primer showing through. After drying for an hour in front of the IR lamp, I was able to lay down a second, more substantial coat. The results (shown above) are pretty damn pleasing I must say. That green just pops, and will look even better with some clear and a white pickguard :).

Anyway, the body went back under the IR lamp for the rest of the afternoon. I'm gonna let these coats lie for a couple of days now to make sure they are completely dry. I don't want any problems when the clear coats go on! One more coat of colour and I'll be able to lightly wet sand some of the orange peel away, then a final coat before moving to clear! That will be in a couple of days time. Hopefully!!

Friday, 13 March 2015

Thinline Cabronita: Bridge and Tremolo

With bad weather making more clear coats on the Ash Stratocaster build impossible today, I got on and positioned the roller bridge and tremolo on the Ash Cabronita build. Firstly, I consulted the Stewmac Fret Position Calculator to determine the correct location of the bridge posts. With a scale length of 648mm (324mm from the nut to the middle of the 12th fret), the distance of each bridge post from the nut was quickly established - the bass post being 1.5 to 3mm further than the treble post for the purposes of compensation.

The bridge is placed for correct intonation and the Tremolo is fitted.
To determine the lateral position of the bridge posts (side to side) the two E strings were installed across the bridge and up the neck. The bridge was moved side to side until the strings travelled straight up the neck equidistant from each side of the neck. With the position of each post established, a transfer punch marked the correct location and the post holes were drilled using a Brad Point bit in my electric hand drill. The trick is to keep the drill as straight as possible in both dimensions whilst drilling.

Looking amazing - even the white undercoat.
The posts were carefully hammered home with the bridge in place (to stop the posts going in crooked) and soon everything was in. That left just the tremolo to position, and I did this by eye, making sure the strings travelled straight from the tremolo and over the bridge rollers, and that the tremolo itself was perpendicular to the base of the guitar.

In addition to the bridge and tremolo, I also got the headstock vinyl decal installed. A few coats of Tru-Oil will be required to lock the decal in place, but the headstock is basically done now.

The decal is on the headstock and she's looking hot.
The 10 coats of Tru-Oil that I've laid down on the neck are feeling very nice indeed. This baby is going to play beautifully. All in all I'm really liking the look of this build - even with the white undercoat. I'm still deciding on colours, but it's clear that the solid colour was a great choice. I'm really excited about seeing this build come together. The xTrem from GFS feels really nice (much more fluid than my Bigsby B70) and all the chrome really pops.

Saturday, 21 February 2015

Thinline Cabronita: Primer

I just got back from Europe yesterday and went straight to the man cave - jet lagged and all. After 2 weeks away, I just have to get something done on something! Turns out, that something was the Thinline Cabronita, which I have decided to paint a solid colour. The decision was kinda made for me when my initial sanding attempts showed that the factory had filled all the grain with some kind of vinyl sealer. Rather than try to sand it all out to allow the stain to take, I opted for a solid paint job. I'm still thinking about colours, but I'm looking at a 50s rockabilly palette, so maybe Studebaker Green or 50s fender light yellow. Something like that anyway.

In the meantime, I set about getting the body ready for paint, and that meant primer. I got out the tried and trusted Rustguard white primer and laid down 2 coats. She's already looking great. Tomorrow I'll give her a light wet-sand with 800 grit and lay down a couple more coats and then see what I have.

White primer is looking great and brimming with possibilities.
Just looking at my primer, I think my decision for to use a solid colour on this axe was a good one :).

While the primer was drying, I also started sanding the neck with 240 grit. Here again I found that the factory had sealed the neck already, but half an hour with 240 grit paper finally removed the last of it. I really want to give the neck some amber stain, so removing the sealer here was really worth the effort.

The neck sans sealer is now ready for 360, 400, 600 and 800 grits.
With the sealer removed, the neck now just needs finer sanding down to 800 grit before the stain and Tru-Oil can go on. I've just now realised that I've primed the body without drilling the post holes for the roller bridge (bummer), so that will have to be done before more primer coats go on. Ahh the impetuousness of the jet-lag addled brain!