Showing posts with label Black ColorTone Dye. Show all posts

Monday, 12 June 2017

Bareknuckle Super Strat - Grain Filling & Colour

I found an hour today while the wife walked to dog to actually get some building done in a makeshift man-cave that I've set up. There's no lighting, but I've got some rubber mats and some carpet down on a temporary bench.  I got the body sanded down to 360 grit, with a few water wipes to raise the grain and 400-grit cutting back. Pretty happy with the smoothness - this is a nice piece of wood! With the surface prepared, and time running out (is that the patter of dog feet I hear?) I slapped on a slurry of ebony timbermate to fill the grain.

Ebony Timbermate applied. Just gotta let it dry completely.
Fast forwad one weekend hence, and it was time to sand the Timbermate back and get some colour on. After agonising over the flames idea, I've turfed it into the too-hard basket and decided to go with straight black stain. I sanded off the Timbermate with 400 grit, and the body is now smooth as a baby's wossname. It might be even too smooth to take colour. Hmm.

Timbermate sanded off, and grain filled nicely.
I got out the Colortone black dye and applied a first stain coat. I've been tossing around colours for the last fortnight, but trans black finally won out. I'm certainly a creature of habit! The stain is drying as I type and soon I'll be able to apply a second round. It's starting to look good, although there's a couple of spots where the dye hasn't taken as well as I'd like. Always seems to happen with black dye (well mine anyway). Too much sanding I'll wager. I may need to hit these with a stronger dye soluton, or add some Colortone to the Tru-Oil when the time comes.

First coat of Colortone Black dye

Monday, 23 January 2017

Scratch Pine Toronado: Body Finish Do-over

Due to a catastrophic clear coat fail, the scratch Toronado build languished in the corner of the man-cave.  After a hiatus of almost 12 months, I've finally gotten around to resurrecting it. I couldn't rightly abandon my first (and only!) scratch body build, now could I?

The cause of this build's untimely demise was yet another issue with Acrylic as a finish. Once my current builds are done I vow never again to cross Acrylic's dark path! Everything seems OK with an acrylic finish until you try to assemble the thing. But, as soon as you screw into the acrylic, chances are it will lift from the surface in a bubble and you'll hurl the thing across the room. And it seems to be worse the thicker the clear coats are. Grrrrr! Maybe poly will serve me better in the future.

Anyway after dusting the body off I sanded it back completely, added a whole new coat of black dye, and got the Tru-Oil going. After 5 coats things are looking good already. I didn't apply the dye as darkly this time around, opting for more of a trans-black look. The pine grain is standing out nicely although the colour is looking a little blotchy. That's to be expected with pine, and truth be told I'm not that fussy.

Lots of grain in the pine to see, but some blotchy patches too.
Honestly, any variation in the finish is good with me; whether it's beautiful grain or colour blotches. I'm not even sure whether I'll even bother getting the body up to a full gloss this time around. I'll just keep applying layers of TO until I'm happy, but I'm kinda digging the satin oiled look the early layers of Tru-Oil give. I might leave the shiney to the chrome and pickguard for this bad boy.

The Toronado is a really nice shape, am I right?
I gotta say, coming back to this build I forgot how much I love this body shape. It's a little Tele, little Jazzmaster, and a little Jaguar-esque all mixed into one. I think after this one is done I'll get on and start another, this time maybe just in a simple Amber or Yellow. I will have to start from "scratch" again though as my MDF template is ruined.

Friday, 29 January 2016

Jazz Bass: None More Black

There's not much happening in the man cave at the moment, what with 3 builds hanging with un-cured Acrylic clear coats. Luckily there is still another build that can progress while I patiently wait.

Over the last week I sanded the body of the JB-1 Jazz Bass build down to 400 grit and applied a trans-black dye job using Black Colortone stain. To pop the grain this time around, I didn't sand back the first coats to remove most of the colour. Instead, while the dye was still wet, I used a clean wet rag to literally drag the colour out of the surface; leaving the deeper grain still coloured. I repeated this several times, re-applying the black and dragging it back out, until I was happy with the overall effect. It's not a technique that will work if you want grain popped in another colour (eg black under blue etc) but for the same colour pop it works extremely well.


Trans-black finish shows the grain nicely

With the dye on, I was able to begin the clear coats on this bad boy as well. Make that 4 builds now hanging in the drying room (ie my shower recess). But at least this one needs plenty more coats.

In terms of assessories etc. I'm currently considering an all black look - black pickguard and black control plate cover. It may be a little over the top, so I'm reserving judgement for the moment. I'm also considering a custom 3-ply black pickguard that also covers the control plate area. Something like this:

An interesting pickguard option. Seriously considering!
Not sure I'm up for the fiddly edging required but again it's on the list for consideration.

Thursday, 10 December 2015

12 String Telecaster: None more Black

With the glue spots fixed on the veneer of the 12 String Telecaster, it was time to finish the sanding on the rest of the body and get the black dye on there. Having already sanded the body comprehensively to 180 grit I proceeded to sand with 240 and 320 grits until she felt really smooth all over. I then raised the grain with water a couple of times, knocking the raised grains off with some 400 grit.

With the body smooth, out came the black Colortone. I gave the body 3 rounds of dye before I was satisfied with the coverage. There are a couple of places on the end-grain that aren't accepting as much dye as the rest (this usually happens on the horns and in the cutouts) but overall I'm pretty happy. There's also a patch around the ferrule holes that is taking more stain than the rest of the body. It's very possible that this area didn't get as good a sand as the rest. Let's chock that up to a little DIY character.

The back is a bit patchy, but black dye is like that.
After I was satisfield with the back and sides I went back to the front veneer. Here I played with a little more dye, trying to get it into the flame figure as much as possible. I did this by applying some colour, letting it soak for a little while, then pulling it back out with a clean wet rag. Trouble is, pulling dye back out again is a bit of a balancing act - teetering between popping the flame and making the rest if the grain too lifeless and grey. I think I managed to get a good balance in the end. I also attempted a subtle black burst around the edge.

A subtle black burst? Can you see it?
All in all I'm very happy. I'm very interested to see what the lacquer does to the grain here. Hopefully it will pop it even more and give me a little chatoyance. Fingers crossed! I took the tape off the binding to let the body hang and dry completely, and man - she looks even better with the stark white strip around the top. The only thing that could have been better is two strips of binding top and bottom!

Much better without the tape.
Tomorrow I'll start to spray White Knight Clear Gloss Acrylic and we'll really get to see what she's going to look like. While I wait for the coats to dry I'll be able to get started on the neck which is going to get the Fender Vintage yellow treatment - fretboard and all.

Tuesday, 7 October 2014

Black Ash Telecaster: Headstock Shaping & Neck Dye

Today I put the body to one side for a while, and started finishing the neck of the Black Ash Telecaster. I decided to go for a traditional Fender "yellow neck" look to contrast with the black body. Using my usual 'modern Telecaster' headstock pattern from the headstock templates pdf, I quickly got the headstock shaped and the whole neck sanded with 180, 240, 360 and 400 grit paper. At 400 grit, I raised the grain a couple of times and knocked it back down again with a gentle wipe of 400.


For the colour coats I used a weak solution of Colortone Vintage Amber, and applied it to the headstock, neck and fretboard. This is the first time I have dyed a fretboard, so it's kind of an experiment. I love the look, but have never been able to work out how to seal it effectively and still provide a good playing surface.


For clear coats I used two products. On the headstock and neck I applied my tried and trusted standby - Tru-Oil from Birchwood-Casey. On the fretboard I didn't want to use Tru-Oil (I've read some horror stories of fretboard wear and tear with Tru-Oil applied). Instead, I used some Dingotone Guitar Wax - hopefully this will be effective in sealing in the dye and providing a nice playing surface.


I have always loved the way Tru-Oil necks feel to play. The Dingotone Wax already feels really nice on the fretboard, so the combination of the two should result in a beautifully smooth playing axe. Expectation is now very high! A few more coats of Tru-Oil on the neck and this baby will be ready to assemble...

Monday, 6 October 2014

Black Ash Telecaster: Tru-Oil Coats


After a relaxing 3 week holiday in Middle Earth, I have finally got back to the man cave! Feeling the pangs of withdrawal from my building addiction, I was immediately rushed to the man cave for a little guitar building therapy. Whew..!

Before I went away, I managed to sand the body of the black Ash Telecaster back with 180, 240 and 320 grit to remove the remainder of the glue spots mentioned in my previous post. Another coat of black Colortone dye was then applied and the glue spots all but disappeared. However, no matter how much I sanded, I just couldn't remove those small "grain" marks on the front of the body!

Leaving these marks for the moment, I applied a soak coat of Tru-Oil to the body followed by 5 more thin coats. I then applied two more thin coats of Tru-Oil with black Colortone dye (concentrate) mixed in. It turns out, at least in the case of black dye, that this works unbelievably well! In fact, the resulting mixture smelled remarkably like Wudtone. Hmm, I might be on to something there ;). The marks on the front of the body have been substantially reduced using the coloured oil and I'm pretty bloody happy with the result.

Anyway, back in the man cave today I lightly wet sanded the oil with 800 grit sand paper and applied two more thin coats of un-dyed Tru-Oil. The resulting finish is really starting to look good.


To be honest, I don't think the body is going to need much more. I really like the way the ash grain texture can still be seen and felt, and the semi-gloss finish really enhances this effect. Time to get started on the neck!

Thursday, 11 September 2014

Black Ash Telecaster: Trace Dye & Glue Spots

Having finally sanded the body of the Black Ash Telecaster with 180, 240 and 360 grit, she was ready to accept some colour. And so, without further ado, it was on with the first pass of black Colortone dye.


In general the colour looked great and was showcasing the grain nicely, but a couple of areas required immediate attention. These amounted to glue spots and other irregularities that just weren't accepting colour. The glue spots could be sanded out quite easily with 180 grit paper.


However, those lines on the front (photo 3) didn't seem to be glue. Do be honest I dont know what they were. They kinda following the grain and have proven to be very stubborn. No amount of sanding could budge them! I'm thinking that I might hit these with a little dye mixed with the Tru-Oil when it comes time for the clear coats. Did you know you could mix Colortone dye with Tru-Oil?? Well you can, but that's for the next installment!

Thursday, 17 July 2014

Scratch Pine Toronado: 4 Layers of Tru-Oil

After getting the body dyed black with Colortone dye, I have been steadily laying down coats of Tru-Oil in an effort to pop the grain in this pine body before spraying it with Acrylic lacquer. I gotta say, the combination of black dye and Tru-oil is truly spectacular. Definitely a combination to explore in more depth in future builds.


Basically the body is ready for clear coats now. I'm just waiting for a fine day with no wind so that I can start spraying. Stay tuned!

Tuesday, 15 July 2014

Scratch Pine Toronado: Sanding for Black Dye

With all the woodworking finally completed on the Toronado scratch build, it was time to start on the final finishing. That meant sanding - a lot of sanding. With the end grain in particular sporting some vicious machining marks, I started at 180 grit and worked them all out. A few dings needed filling with Timbermate along the way but I took these in my stride. It was my first attempt at routing a body after all. Sanding out my own machining marks made me realise that I haven't been sanding nearly enough on my previous kit builds. I now know what those light white patches on the end grain actually are - machining marks (or sanding scratches) filled with saw dust!!

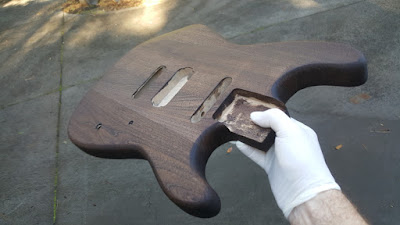
After the 180 grit I moved up to 240 grit, and gave the body another good going over. I again concentrated on the end grain, and the results were smooth and clean. After the 240 grit sanding it was time to apply the first coat of black dye. The aim of this dye pass was to act as a trace - to get into the grain and highlight it. I'll be sanding the top layer back off when it's dry, and hopefully the dye will stay in the grain and accentuate it nicely.

It took a little while to saturate the wood with dye, but I used quite a dark mix and it's looking really nice. What I would like to achieve is a nice dark finish, but with wood grain still showing through as even darker black. I think I'm definitely movingin that direction. Here's what the first pass looked like after I finished applying:


The dye has blotched just a touch, as pine is want to do, but I think all-up it's looking pretty awesome. My other option for a black body, if all else fails, is to spray the body with a solid acrylic paint - but I want to avoid this if at all possible. From the looks of the first dye pass, I have made the right decision going with the dye. From here on out it can only look better and better!


You can see that the wood grain is already standing out in the background, giving a nice "trans-black" effect. After a few more passes, taking the top coat off with 360 grit sandpaper,  the grain should be highlighted nicely and the overall colour will be dark enough to start the clear coats. The plan at the moment is to then apply a 3 or 4 coats of Tru-Oil to soak into the grain and enhance it further before spraying with Acrylic clear.

Yesterday I ordered a sheet of pearloid red pickguard material to go with the black, so I can't wait to see what the two look like together. If the red is no good, I also have white perloid and tortoiseshell as options also. I'm hoping for a real shoe-gazer look similar to (but even better than) this:


Awesome huh? :)