Wednesday, 30 April 2014

Surf Monster Telecaster: Paint Going On!

The Surf Monster Telecaster is really looking like something now. I sanded the body down to 400 grit, filled the pores with Timbermate and then sanded again down to 800 grit. Smooth as a baby's wassname. I didn't take a photo, but the wood looked really nice with the pores filled. Some really nice grain there. Looked almost like ash or alder - if this stuff is only basswood then i'll be buggered. Very nice! I admit that I did stop for 15 minutes to debate whether to change the finish to a stain, but I decided to forge ahead with the original plan.

After the sanding I hit the body with 3 coats of white primer, wet sanding the small imperfections with 1200 grit after each coat. No spray booth here in Holgate, so unfortunately the odd small bug got stuck in the finish. At one stage I did the unthinkable and tried to get rid of the bug with my finger in the wet finish. That's a paddling...! Anyway, with the sanding between coats it eventually came up very nice and smooth.


After the primer, it was time to shoot the colour. So far I've got one coat of Ironlak 'Linz Iceberg' on there and it's looking pretty sweet. A little too much colour for a perfect seafoam green, but I'm pretty darn happy with it anyhow! Should look great with the simple plain white pickguard. Or should I swap it out now for a perloid one??


There were a few issues with the first coat. Unfortunately, the Ironlak's spray can nozzle was spitting out drips like you wouldn't believe. These will need to be sanded out before the next coat. I have some replacement nozzles here (low volume thin line ones) so I may try one of them with the next coat, although a thin line nozzle really isn't the best for this application. I'll also sit the can in warm water for 10 minutes before spraying to help with the atomization.

This week I also received a set of GFS 63 Tele Vintage Wound Professional Series Pickups for this baby from Guitarfetish. Can't wait to get them in and hear what they sound like. Before that can happen, there's acrylic clear coats, the long wait until it cures, and the hours of buffing to get through.

I've also got 52 Tele Vintage Wound Professional Series Pickups waiting to go into the Flamed Telecaster, so it will be great to hear the difference between them!

Tuesday, 29 April 2014

Solid Body PRS: Headstock and Control Cavity Cover

A bit more progress on the PRS today. I traced the control cavity on the back of the guitar and cut a cover out of a pickguard blank for it. Successive trimming on the bench sander allowed me to get a reasonable fit. Not perfect, but not bad. It's very hard without the original routing template to go by (at least that's my excuse)!


I also got the headstock sprayed black and a couple of layers of Minwax Wipe-on Poly applied. It's not my best headstock attempt, but it will do in a pinch. I really should have sprayed it *before* applying the Wudtone to the neck (like I did for the Stone Roses Tribute) but I did the best I could under the circumstances. Lesson learned for next time > do all your staining and spraying before touching any Tru-oil or Wudtone!


335 Semi-hollow Bass: Dying the Neck

Today I finally got around to putting some Colortone dye on the neck of the 335 Semi-hollowbody bass. It's been a long time coming! Next time I must do all the dying at the same time while the original colour concentrations are in the pots.


The burst on the headstock and sides of the neck turned out ok. I'm satisfied with it, and it matchs the body pretty well. I'm planning to use some Wudtone neck top-coat over the Colortone dye on the neck. I've never done this before, so to be honest I'm not even sure it will work. Dyed wood is just like raw wood right? The only thing missing is the Wudtone base coat. Should be ok right? Well, we will soon see...

Friday, 25 April 2014

Stone Rose Tribute: Poly Fails == Do-over

Ok so I made the difficult decision today to stop adding the poly to the Stone Roses Tribute and to give up on the finish. Although the paint job looked awesome when first completed, subsequent layers of both Minwax Wipe-on Poly and Cabots Polyurethane had muddied the colours to such an extent that I just didn't like looking at it any more. It was muddy and green and horrible.

Well, C'est la vie. Out comes the scraper..


I haven't had a solid colour build that hasn't involved a do-over. I had hoped that this build would be the exception, but unfortunately not. And I was sooo happy with the paint job on this one too !!! Oh well...

I will be repainting the body in exactly the same manner as before. The difference this time is that I wont be shooting for a level, or even a gloss finish. Just a few layers of satin clear over the paint and I'll leave it at that.

Wednesday, 23 April 2014

Solid Body PRS: Surf-90s are Here!

My GFS Surf-90 Pickups with white surrounds arrived today for the PRS and they look awesome! Finally I get to see what this funky axe is going to look like all put together! What do you think? I reckon it's going to look killer..


Just a few more coats of Tru-Oil for the body and a last coat of Wudtone top-coat for the neck and I can start to think about the headstock. I'm really digging the vintage yellow neck with the greenish body!


Currently I'm considering just spraying the headstock black. The thought of matching the Colortone dye from the body and then applying all those coats of Tru-Oil really doesn't excite me much. The black will provide a great contrast for my headstock decal anyway. Onward!

Tuesday, 22 April 2014

Stone Roses Tribute: Fucking Minwax Wipe-on Poly

Ok, so I'm pretty fucking pissed off. After 5 coats of Minwax Wipe-on Poly, there has been a distinct change in the colours on my Stone Roses Tribute guitar. The colour scheme I had worked so hard to create is now changed beyond repair. The whites in particular now look off-white or "aged". Not sure if you can pick it up in the photos, but under normal lighting the difference between the white of the pickguard and the now yellowing white paint is enormous. What a fucking disappointment.


With hindsight, maybe I shoud have known this would happen. The Minwax product is a "wipe-on" product meant to be rubbed on much like oil finishes. For this reason it isnt surprising that the poly has a very slight amber tint. You dont see it with the first coat or even the third, but by the fifth it's pretty fucking obvious.


This being said, a can labelled [Clear Gloss] is at the very least misleading. Fuckers.  I've since bought another brush-on poly from Cabots that also professes to be "Clear". Dare I continue putting on coats? I've no fucking idea..

Monday, 21 April 2014

Flamed Telecaster: Spraying Acrylic Clear Coats

A really amazing day today. It was a long hard road to get there, but I finally managed to get 3 reasonable coats of acrylic clear on my flamed telecaster build. It took quite a bit of trial and error to get the spray gun dialled in. At first the weather here in Holgate was too humid (I think). To help overcome this issue I added a water trap to the bottom of the gun. Next, the clear was drying the instant it hit the wood (like sandpaper). The reason was too much pressure and too little fluid. To help overcome this issue I added a pressure regulator to the bottom of the gun, reduced it to about 18psi and increased the fluid control. The resulting gun setup looks like this:


It's some kind of supercharged hot-rod affair! With the gun now ready and dialled in (I hoped), it was time to get on and spray. Retiring to my high-tech spray booth (a saw horse outside the garage) I was able to lay down 3 nicely wet coats; waiting 15 minutes in between for the coats to tack off.


Thankfully, a friend of mine recommended a good quality Sundstrom mask to keep the fumes out of my lungs. It worked unbelievably well and I would highly recommend them to anyone. The end result of the spraying was pretty good for my very first attempt. There is a bit of orange peel, (I'll deal with that later), but some decent coverage has been laid down. I'm planning to sand this flat before applying 3 more finishing coats tomorrow.


The good news from today's success is that it seems acrylic clear can definitely be sprayed over Tru-Oil without any ill effects (or so it seems). This is great news for those of us that like to use Tru-Oil to enhance the chatoyence of the figured timber before adding the clear coats over the top. Roll-on the buffing and admiring!!

Tuesday, 15 April 2014

Stone Roses Tribute: Video Build Diary #6

The sixth installment of my video build diary for the RC-1 Stone Roses Tribute is now on YouTube. This installment deals with the actual Pollocking of the front, back and sides of the guitar body and headstock. This is the fun part of the build and I get some help from my son Eben.


You can't quite see it in the video, but that very first chuck of light-blue paint was a little too enthusiastic and most of it went all over me. Nice one Eb!

Monday, 14 April 2014

Flamed Telecaster & Surf Monster Telecaster Decals

I received my vinyl telecaster headstock decals today from Andy at City Signs & Print in Port Lincoln SA. As usual they look freakin awesome! If you need any vinyl decals made, give Andy a call or email him on citysigns@internode.on.net. You wont be disappointed!


I bunged them on both my current telecaster builds and was able to get a top coat of Wudtone natural neck finish on over the top. Only 2-3 more top coats to go and both necks will be ready for fret levelling. Two telecaster builds in parallel? Priceless..!

Solid Body PRS: 3 Coats of Tru-Oil

Well, I've now got 3 coats of Tru-oil on the PRS. Unfortunately, the amber hue of the oil has turned the once turquoise colour more towards green. Nonetheless she's still looking pretty sweet - the flamed figure is really starting to pop, and the chatoyance is deepening more and more.


For the neck finish, I've decided to go with a Wudtone Vintage Yellow neck kit. With the rock maple neck sanded to 400 grit, I've currently got one application of the Wudtone base coat on and drying. I'll post a pic of the neck when the base coats are done. The face of the headstock will get turquoise Colortone and Tru-oil like the body.

Sunday, 13 April 2014

Stone Roses Tribute: Psychedelic Pollocking Complete

Well today I finally finished the Pollock inspired colour coats on my Stone Roses Tribute build. With the last splatter coat in place on the sides, this boring piece of basswood has been transformed into a masterpiece of psychedelia :P. In the end the paint job came out very close to what I was shooting for and I think it looks awesome! I just can't stop going back to look at it!


All the masking went exactly to plan. There was quite a bit of paint on the top of the binding, and it took some very careful work with an exacto blade and my binding scraper jig to get it all clean. But, in the end, it's clean as a whistle and looking very professional indeed ;).


Next step is to decide on a way to get this bad boy clear coated. I am strongly leaning towards Minwax wipe-on poly for this one as it will be simple to apply and may well fill some of the valleys between splatter pretty nicely.

Friday, 11 April 2014

Stone Roses Tribute: 14th Colour Layer

Well the final colour layer went on today - the 14th! I'm loving how it looks now. I still have white and black on the plan, but I'm not sure whether I should bother risking a change to what looks so good now!


The headstock in particular I have no plans to change anymore. Consequently I was able to rip off the masking and take a look at the finished product.


Wow! I really love the contrast between the colourful front face and the natural Wudtone neck finish. It's going to look really great sitting above the guitar body. I'm still a little unsure about the side of the guitar. I never paid them enough attention during the font and back painting phases and consequently they look very empty. I was thinking maybe I should mask off the front and back and try to add more paint there..? Hmm not sure.

Solid Body PRS: 2nd Turquoise Dye Pass

This morning I set about improving the dye job on the basswood body of the PRS. I sanded back in places where the dye was heavy and then gave the whole this a pretty concentrated hit with the 1:1 mix of green and blue Colortone. The body has come up much better now, although the basswood figure is still very pronounced on the back. I'm liking it (looks more green with the flash - without it looks blue!)


On the front veneer I took the concentrated dye and created a subtle burst. I thought about adding some black to the mix to darken the burst, but the black just muddies the colour in my opinion so although I would have liked a darker burst, I think I'll keep it as it is now.


You can really see the difference in colour depending on whether I use the camera flash or not! Anyway - darker burst or no - I'm pretty happy with how it's looking. Wonder what the Tru-Oil will do to the colour?

Thursday, 10 April 2014

Solid Body PRS: Turquoise Dye

Today the PRS was sanded to 400 grit, the grain raised, and the first wash of turquoise dye applied to the front veneer and basswood body. To pop the grain in the veneer I used a variation of the one-pass dye method I have used in the past. In this method, you get a first pass of dye over the entire body, then while it is still wet, keep washing over with more dye, not letting it settle in any one place. The theory is that  dye is taken up more by the figure than the plain wood. Today I varied this process by bringing in a clean cloth to soak up the excess dye from the non-figured wood after each subsequent dye wash, allowing more to be put in the figure only. The technique seemed to work well. Here is  how the flame veneer came out:


The "turquoise" colour created using a 1:1 mix of blue and green Colortone dye is very hard to photograph. Without the flash it looks blue, with the flash it looks green. To the human eye the colour sits somewhere in between the two. I've included both versions for you to compare.

The basswood was another story completely. I managed to get a pretty weak wash coat of dye over the entire body.


The colour, however, is pretty weak so far and it will need at least one more going over with a much stronger mix. It is interesting how the various figures in the basswood have popped with the Colortone huh?

Tuesday, 8 April 2014

Solid Body PRS: Installing the TOM Bridge

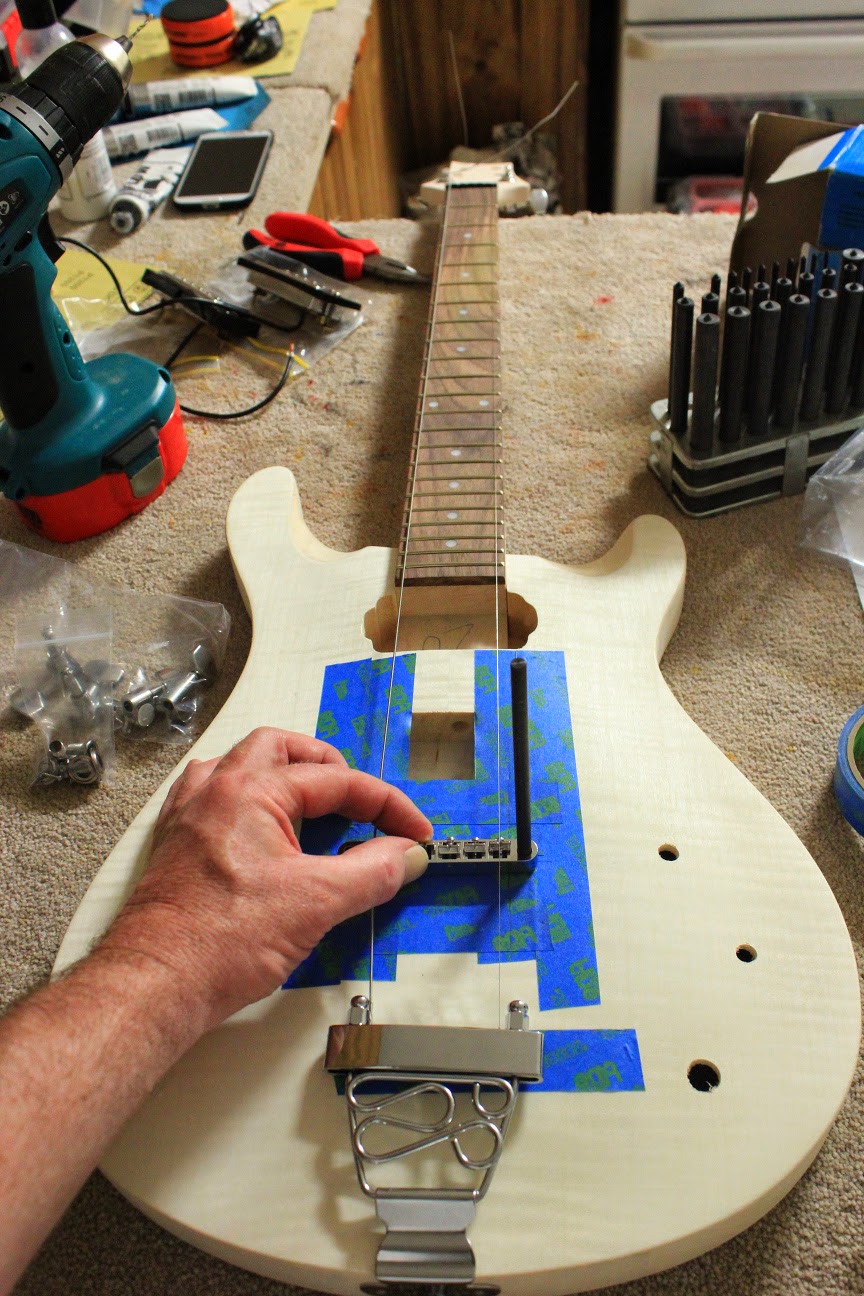
Got the TOM-bridge installed today with a little help from the Stewmac fret position calculator. I measured the scale length (2x distance from nut to middle of 12th fret) as 626mm - the same as every other kit I've ever put together. With 22 frets, Stewmac calculated the position of the treble and bass bridge posts at 627.5mm and 629.5mm from the nut respectively.


With these measurements in hand, it was a simple case of seating the bridge, finding its lateral position across the guitar with each post centred at these distances from the nut and checking the alignment of the E strings down the neck.


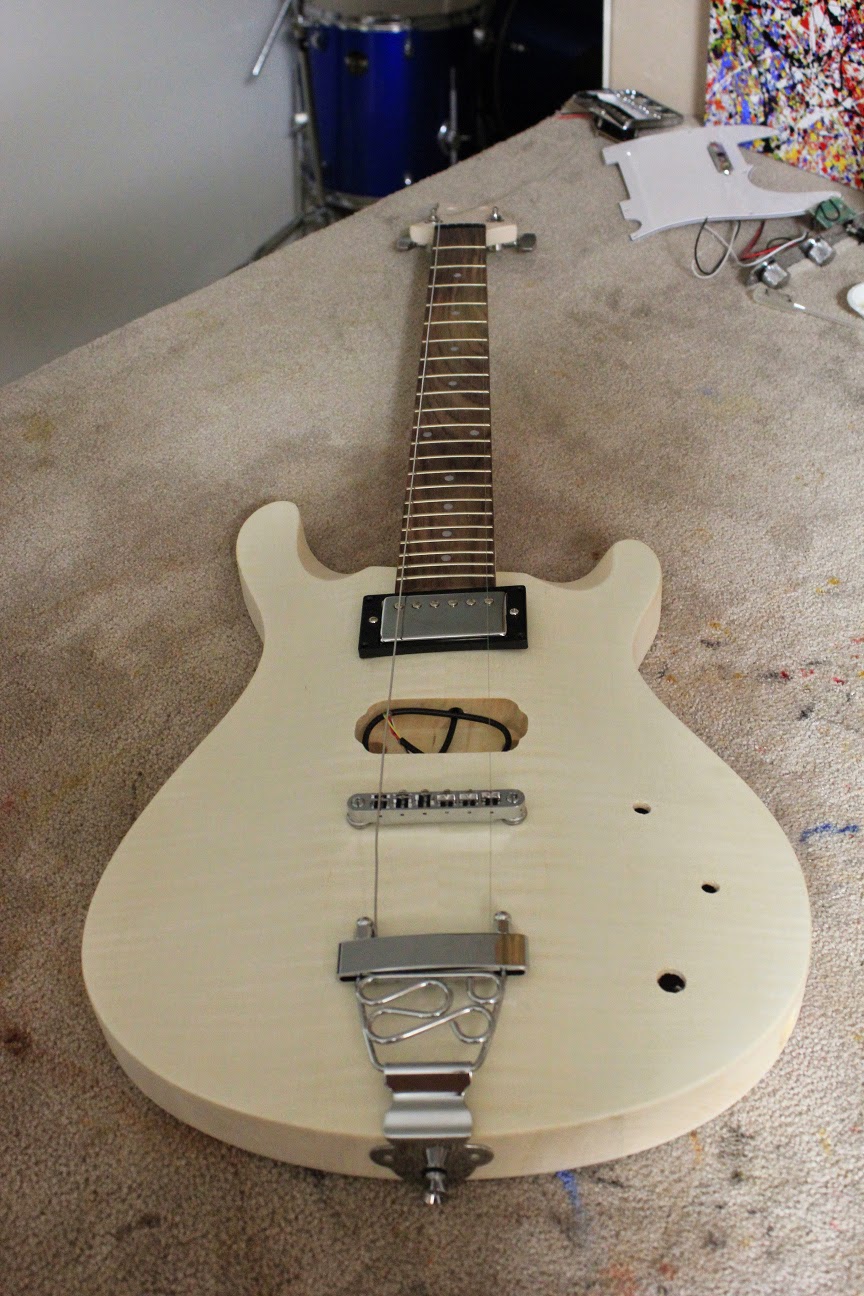
Using a transfer punch to mark the location of each post and a brad-point drill bit to drill the hole, the post holes were quickly drilled and the posts hammered home. One final test of string alignment and all was complete!


I've decided to go with a short trapeze tailpiece with the swirly-swirly design on it. I had a short and a long one with this same design lying around. I would have liked to use the long one (I really think the long tailpieces look better) but the top of the trapeze was just a smidge too close to the bridge's final position for my liking.


With the last of my wood-working complete, I'm now free to concentrate on the finish. First a round of sanding - down to about 600 grit, taking care not to sand through the maple cap. I think I'll do a trace dye at 360 grit to check for glue spots and to pop the flame maple figure.

Stone Roses Tribute: Pollocking Along...

Ok, Eben and I have finished the 9th and final colour in the first round of Pollocking. Unfortunately I got the colour balance a little wrong with the dark grey, and so the body is looking rather more drab than I intended. The reds, blues and yellows have disappeared almost completely!


After 9th Colour layer - black

In the next round of colours I intend to put these bright colours back front and centre in the mix. Basically I will repeat the first 5 colours. So hopefully the top will look something like we saw before...:

Remember how colourful the first 5 layers were?

... well, here's hoping anyway.

Monday, 7 April 2014

Surf Monster Telecaster: New Spray Colour Arrives

After a few days testing and considering the "Studebaker Green" I had previously ordered for the seafoam green telecaster build, i decided that I really wasn't happy with it. The colour was too blue for me and I wanted a touch more green in the mix. And so it was back to OzGraff to choose a new colour.


What I ended up with was 'Linz Iceberg' from the 'Ironlak' range of spray enamels. Sounds kinda seafoamy I guess. The colour on the can is a little more aqua that I was hoping for, but I'll have to see how it looks out of the can. We can never get exactly what we want it seems! This will definitely be what I end up going with however - there won't be any more changes again, I can't afford it!

Sunday, 6 April 2014

Solid Body PRS - Headstock Shaped

Hello out there in google-blogger-land. Today it's raining in Holgate so instead of mowing the lawn and chainsawing firewood and the miriad other chores that the weekend brings, I could work on my PRS instead! Two tasks remain before I can begin the finishing proper on this little beasty, and the first of them - shaping the headstock - I was able to get completed today.

The headstock blank supplied with the kit from DIY Guitars was nicely shaped to permit a facsimille of the standard PRS headstock. This, then, is what I went for.


It was a fairly easy shape to produce, requiring only a quick freehand sketch and some work with the jigsaw and belt sander to get it 95% complete. The majority of the time, though, was taken getting the last of the belt-sander induced burn out of the top cutaway with 240 grit sandpaper. I think it looks the business!

Stone Roses Tribute: Colours are Building

The colours are continuing to build on the Stone Roses Tribute build. I'm up to colour 8 of 9 now and the white background is starting to be in the minority. The brighter hues are disappearing, but they will make a come back with the second cycle through the colour list.

After the 7th colour layer - Dark Grey

After the 8th colour layer - White

The look has definitely changed since layer 5. Each colour brings something new to the mix. I'm not that happy with the current incarnation, but the point at the moment is to build background. In that respect it's definitely coming along. I definitely went overboard with the dark grey in layer 7 and I'm kicking myself for it, but I'm hoping that when I re-visit the blues and red that will be largely painted over.

Wednesday, 2 April 2014

Stone Roses Tribute: Five Layers of Splatter

I'm 5 layers of colour into the pollocking of the Stone Roses Tribute. It's looking a bit average (read: shitty) at the moment. Just a bloody mess. I'm hoping things will only improve from here the more paint I get on there.


I think in general my son Eben and I are not using enough paint per layer. The guitar body is larger than my prototype and we need to be mindful of this. Will have to just keep at it and see what develops.

Postscript: 3/4/2014
With the fifth layer well and truly dry, I chucked the hardware on there to see how the build is really looking. See for yourself. I have revised my original opinion - I think this is shaping up really nicely!


The more colour I can get on this body, the better it is going to look. I haven't even got to the black lines yet - and in my opinion they help to bring structure to the overall design. Just have a gander at some of Pollock's actual work to see what I mean!

Tuesday, 1 April 2014

Surf Monster Telecaster: Shaping the Headstock

Time to shape the headstock on the Surf Monster Telecaster. Thankfully, this task is made easy by our old friend the inter-web! Many of the Fender headstock shapes can be found here: http://pdfcast.org/pdf/fender-headstocks. This pdf file contains headstock templates at a 1:1 scale. All you need to do is print out the page you need (make sure you use 1:1 scale) and off you go.

Alternately, if you are having trouble accessing pdfcast, templates can be found in a number of other places. Here are a couple of other pdf documents for Fender headstocks, both hosted by Google:

Google GuitarPlansCollection link 1
Google GuitarPlansCollection link 2

With the PDF in virtual hand, I decided to use the 'modern' Telecaster design shown below as the basis for my headstock, as it's the one from the pdf that most closely aligns with my headstock blank.


Anyway, a quick trip to the laser printer, printed at 1:1 and everything was ready to get the shape traced on to the blank. You can see that the blank doesn't quite match the traditional shape towards the bottom where it meets the neck. The best I could do was to line up the tuner holes and take it from there.


Using a clutch pencil, I carefully traced around the cutout giving a guide for the jigsaw. The corner near the lowest tuner hole (where the neck meets the headstock) will have to be rounded off some to approximate the original shape, but otherwise it looked pretty good.


And then came the east bit! Using the jigsaw I cut around the design - staying reasonably close to the line, especially in the concave sections. Why especially the concave sections? Well because I don't have a bobbin sander! Once the cut was completed, the convex portions of the headstock were easily finished off down to the line on the belt sander. Unfortunately the concave portions could suffer no such luxury and had to be finished off using a bastard file and 180 grit sandpaper.


In the end it all came out nicely and the whole neck is now ready for some sanding and some Wudtone neck finish.Still deciding whether to go with the Vintage Yellow Wudtone neck kit, or the colourless finish over Vintage Amber Colortone dye. Hmmm decisions, decisions...