Showing posts with label Jeremy's Mahogany Les Paul. Show all posts

Monday, 28 November 2016

Jeremy's Mahogany Les Paul: Neck Re-radius and Re-fret

Hi ho everybody, I'm continuing my run of posts with an update on my Les Paul build for Jeremy over at http://guitargas.com. Unfortunately, with the build nearing the home straight, I somehow messed up the fret levelling and ended up with frets that were all over the place. I have subsequently found out that there was a very subtle twist in the neck that I could not see, but hey- no excuses pal!

Anyway, with the frets munged beyond repair (well, by me that is ;) ), I enlisted the help of luthier extraordinaire Dingobass at Pitbull Guitars to bring the neck back from the dead. I commissioned a fret replacement and sent the neck to WA for DB to work on. By the time DB received the neck, however, it was in an even worse state than even I could have put it in. Even with a metric fuckload of bubble wrap, good old Australia Post managed to break the corner off the fretboard. Grrrr - you fuckers!!!

Why Australia Post? Why do you suck so fucking hard??
To my relief, DB assured me that he could reverse this travesty and set to work weaving his magic on the fretboard. The results were nothing short of spectacular.


With a wave of his wand, DB restores the fretboard.
With the fretboard repaired to better then new, DB set about doing a re-fret, level and re-crown on the entire neck. The results speak for themselves. An infinitely better result than muggins here could achieve with his two hands full of thumbs. Thanks DB, you're the real deal and you saved my ass.

With DB's re-fret the fretboard looks superb!
With the neck back in my hot little hands, it was time to get it set and finally move ahead with this bad boy. With some Titebond, some clamps and some prayer (all hail the Flying Spagetti Monster) the neck was soon attached and the axe was finally looking like something.

It's a guitar Jim!
To be honest with you, I'm really loving how this baby is looking. This just could be my nicest looking build to date. I think Jeremy will be pleased (I hope so anyway). Hardware assembly is next on the list, so cross fingers for no more issues!

Monday, 14 March 2016

Jeremy's Mahogany Les Paul: Clear Coats and Pin Holes

Jeremy's Les Paul has finally cured to the point where I can start looking at it again. Unfortunately, after flattening the clear with 600 grit I noticed that the acrylic clear coats have dried over the mahogany and left several annoying pin holes in the finish. Nothing for it but to drop fill them from the can. It's pretty straightforward - just spray come finish into the lid and use a bamboo skewer to put a drop of clear on top of each hole.

Lid from the Acrylic Spray and a Bamboo Skewer

Pin Holes filled. Now to let them set and then level off.
With each hole covered by a drop of clear, it's then a matter of time to let these drops dry sufficiently before they can again be leveled off with paper. In this case, with the help of my trusty outdoor heater the back was cured again in a week and ready for sanding down with 1500 grit. Having done this, and liking what I saw, I went straight on to the 2000 grit and Meguiars Ultimate Compound. The results are pretty great if I do say so myself.


A great deal of shininess is now on show. The next step is to get the neck glued on and the hardware installed. I'm getting pretty excited about this build now!

Thursday, 14 January 2016

Jeremy's Mahogny Les Paul: Final Clear Coats & Tru-Oil

Some more progress on Jeremy's Les Paul today. With the acrylic clear coats having hung for a month of more drying, it was high time I flattened them in preparation for final coats and polishing. With some 600 grit sand paper, I wet sanded the White Knight acrylic finish until all the orange peel had been removed and the entire surface took on an even matt finish. Soooo smooth!

Acrylic flattened with 600 grit ready for final coats
The body was then ready for two more acrylic coats, in preparation for a month of curing. She's looking nice and glossy at the moment - I'm very interested to see how she looks after the final polish.

Last clear coats on and now ready to cure.
With the body hanging to cure, I was also able to get another coat of Tru-Oil on the neck. There are over 15 coats on there now, and today I started wet sanding it with 600 grit. From now on I'll be applying coats of Tru-Oil thinned 1:1 with Minural Turps. You know when it's time to start thinning the Tru-Oil as you start to see streaks in the finish, and this tends to coincide with the first round of wet sanding.

Wet sanding with 600 grit and thinned Tru-Oil coats have begun on the neck.
About 5 more coats of Tru-Oil, with successively finer wet sanding, and the neck should be ready for a final polish. The neck is feeling really nice and smooth now, so she should give the final axe a really nice feel.

Friday, 4 December 2015

Jeremy's Mahogany Les Paul: Clear Coats!

A week has past since my last post on Jeremy's Mahogany Les Paul build. In the intervening days, the body has been receiving regular coats of White Knight Gloss Acrylic, and Tru-Oil has been slowly building on the neck. This is the first time I've sprayed acrylic clear directly onto a dyed flame-maple top and I gotta say that I'm pretty bloody happy with the results! I wasn't sure how much the flame maple would pop without a bit of oil soaked into the figure, but I needn't have worried. The flame maple is looking really really great! There's even a crap-load of chatoyance visible in the grain, and I really didn't expect that! I think Jeremy's gonna be pretty pleased with how she's looking.

Acrylic clear coats building nicely and popping that flame figure.
The thin coats of Tru-Oil are building much more slowly on the neck, but already the grain is looking really nice here too. I'm giving it a smooth down with 0000 steel wool every 3 coats or so, so after another hundred or so coats she'll be feeling really nice indeed :). After 3 or 4 more coats of acrylic I'll give the body a smooth down with 600 grit, bung on a couple of top coats and leave it to cure.

Friday, 27 November 2015

Jeremy's Mahogany Les Paul: Headstock & Body Colour

Well my run of luck continued today with Jeremy's Les Paul build. Maybe rather then luck it's care and attention to detail? Hmm, doesn't sound like me. Whatever it is, Jeremy's axe is shaping up to be one of the nicest builds I've ever done touch wood. When all this is over I may have to go back and make myself one!

With the flame maple cap dyed a couple of days ago, it was time to get on and colour the rest of the guitar. Before I could dye the neck, however, I had to spray the headstock black. The reason I wanted to do this before dying the rest of the neck was so that I could use sand paper to clean up the side of the headstock where the paint meets the wood. If the dye was already on there, then sanding the edge clean would have easily ruined the dye job.

Anyway, I filled the pores of the headstock face with a Timbermate slurry and sanded it off flat with 400 grit. Straight on to this went 4 coats of black auto paint. I forwent the obligatory primer coats because I didn't want a white line around the edge where the paint meets the wood. It really wasn't necessary. After 2 coats I cleaned up the sides and then wet sanded with 600 grit. After the 4th coat I did the same this time wet sanding with 1500. What I ended up with was a nice flat paint job ready for clear coats.

Ready for clear after 4 coats of paint and two rounds of wet sanding
With the sides nice and tidy, the painters tape went back on and I laid down 4 coats of acrylic clear. The main purpose for doing this now (I reasoned) was to get a protective coat on there so that I could manhandle the neck during subsequent finishing without taking colour off.

Four coats of acrylic clear. Now I can get back to the dye.
The acrylic went on very easily, and after 4 coats I was satisfied that the face was adequately protected. I left it to cure overnight and then cleaned up the side of the headstock with 600 grit. At last I was ready to get the dye out again!

To colour the neck and body I used a 4:1 ratio of Colortone Vintage Amber and Red Mahogany. In the last stages of the burst I actually used a 1:1 mix of same, but with the mahogany neck and body being a naturally darker wood than the maple cap, considerably less red was needed to match the colour. I actually had to guess at this ratio, but managed to fluke a good match between burst and body on the first try.

The dye itself went on smoothly (preparation pays off kids!), although I do wish I had protected the dyed veneer before starting - juggling the body with a mind to not damaging the burst wasn't much fun. I made about 4 passes of dye on both pieces and hung them up to dry. The grain in both the body and the neck is pretty damn nice on this kit I must say!

Some amazing grain in this body. Tru-Oil will get it to pop.
The colour match between the body and burst is great.


Once the body was completed I went on to do the neck. Getting the stain on to the sides of the headstock without damaging (or even disturbing) the black was a little stressful, but I got there in the end. I'm really happy with the results and, as with the body, the grain on the mahogany neck has become a thing of beauty!

Neck is now all dyed. More amazing figure.
I hung the body and neck to dry a few hours in the patented Turner drying room (our shower recess ;) to make sure the wood was completely dry. I then applied my first coat of Tru-Oil to both the neck and body. The neck is going to be finished in Tru-Oil so this is the first coat of many for it. The body on the other hand will be clear coated with acrylic. The Tru-Oil on the body is only there to help pop the grain which it does sooo well. Lacquer on its own just can't hope to emulate what the oil does in the figure. When mixing TruOil and lacquer, you just have to make sure that you don't make the surface shiny at all. For this body there will be only a few coats, and I definitely won't be sanding between coats.

First coat of Tru-Oil on the body has really popped the grain.

As the Tru-Oil went on, the grain really started to leap out from these pieces, and I'm really pleased with how the body is looking. I'd like to do the same (Tru-Oil) for the front face of the guitar as well, but I'm worried that the oil will drag some of the colour out from the glue spots I fixed earlier in the week. It definitely isn't worth the risk IMO. A couple more coats of Tru-Oil on the body, and a week or two for the smell to go completely, and the body will be ready for final clear coats. In the meantime I'll get start on the Tru-Oil coats for the neck!

Tuesday, 24 November 2015

Jeremy's Mahogany Les Paul: Fit to Burst

It's crunch time for Jeremy's Les Paul build - today's the day that the front veneer receives its colour. After weeks of sanding, from 180 through 240, 320 and 400 grits, the body is finally ready to be dyed with Colortone dye. Before the dye could go on though, the grain had to be raised, and that meant several applications of a wet rag to swell the fibres followed by a light sand with 400 grit to cut them off again flat. All in all it took 4 such cycles to get the surface nice and smooth.

With that out of the way, the Colortone dye could be applied with impunity. I started by wetting down the whole surface of the guitar. This makes the first dye pass go on much more evenly; reducing the risk of the dreaded tide-lines forming. This was closely followed by the colour layer - Colortone Lemon Yellow. My god it was bright!

Layer 1 - Colortone Lemon Yellow.
I made a few passes with the Yellow to maximise the amount of pop from the flame maple figure. Despite my best efforts, including using a clean wet rag to try and drag colour out of the surface grains to maximise contrast, the flame figure was still only subtle at this stage. The next colour to go on, and the start of the burst proper, was Colortone Vintage Amber. In the beginning the contrast between Yellow and Vintage Amber was again very subtle, but the Amber did help to enhance the contrast with the flame even more.

Layer 2 - A subtle burst of Colortone Vintage Amber.
Next came the Colortone Red Mahogany layer. Using a combination of Vintage Amber and clean rags to blend the Mahogany into the previous layers, the results were really starting to take shape. Particularly pleasing was the way the flame figure took on the darker tones of the Mahogany when the colour was applied in an area and then taken off again during the 'merge'.

Layer 3 - Colortone Red Mahogany.
Lastly came a little Colortone Tobacco Brown to darken up the edges. To be honest the Tobacco didn't have as much of an impact as I was expecting, but I think by this stage the veneer was well and truly saturated and was refusing to take any more colour.

Layer 4 - Colortone Tobacco Brown, but to little effect.
All in all a pretty satisfactory burst. Except, that is, for the fucking glue marks along the top edge that made their sudden appearance half-way through the Red Mahogany layer. I could have cried when I saw them materialise out of thin air. At the time there was nothing for it but to finish the burst and leave the problem to be fixed later.

Glue spots. Where the fuck did they spring from??
So what to do?  Well apart from weeping into my after-lunch coffee, I let the surface dry under the fan and pondered my next steps. Armed with some friendly and poignant advice from the forumites at the BuildYourOwnGuitar forum, I grabbed my wire brushes, mixed up a 50:50 concoction of Vintage Amber and Red Mahogany and carefully set to the glue spots. The idea was to scratch each spot with the wire brush, pop some dye over the spot, and then blend it in with the rest of the burst. After 3 passes of this process, the burst had darkened substantially but the glue marks were a lot less obvious then previously.

Mischief managed. Wire brush an extra dye to the rescue.
If you know where to look you can still see the glue spots faintly lurking behind the finish. But really it's a hell of a lot better than when I started. I'm tempted to stop here and call it a day. No point tempting fate too far! I'll see how I feel tomorrow when I colour the rest of the body, but I'm pretty happy with how she looks right now.

Friday, 28 August 2015

Jeremy's Mahogany LP: Sanding, Sanding

Well, a little more progress on my other current build today - Jeremy's Mahogany Les Paul. Again today I was attacking wood with sand paper - 120 and 180 grit on mahogany to be exact. Two hours I laboured, using paper over both my cork sanding block and my eraser, with the end grain at the heel, and the concave sections (especially the cutaway) proving their usual pain in the arse.

I'm not sure why these two areas, in particular, attract the majority of machining marks, but every guitar body I've worked on has had issues here. The cutaway I can imagine is a problem area - the factory presumably uses a sanding wheel or similar to give the tight cutaway a rough finish prior to binding. But the heel? It's out there for all to see, and it's way convex. There's no excuse. If only they ran a 120 grit sanding wheel over it before doing the binding! Grrr...

Anyway, on a positive note, one thing I did do this time around was hit all the glue spots with some Goof-off glue remover from Bunnings. It didn't remove all the glue completely, but boy did it make a difference when it came time to sand those glue spots off! I can highly recommend giving this stuff a try on your own builds. I did 3 passes of the stuff on each spot before starting to sand. No wire brushes required this time!!

With the usual machining marks from the factory estimated (in my mind at least) between 20 and 80 grit, unfortunately it just takes time and elbow grease to remove them with 120 grit. It's a bit of a trick to try and remove these machining marks without sanding through the binding, but I think I managed it mostly OK. Unfortunately, there are two marks (cracks) on the heel of the body which aren't going to sand out - no matter what the grit.

Two small cracks on the heel of the body. These won't sand out.
With the 120 grit paper I was able to remove all the glue around these cracks that the factory had obviously used to try and patch them. Believe me they look much better than when I started! Hopefully once the dye and clear coats go on, these cracks will all but fade into the background. If not, they will have to be put down to "character" in the final build. It's just the way with these cheap kits - there's never a perfect body to be found. We amateur luthiers just have to do our best with what we've been given.

Next step for this bad boy is to continue sanding with 240 grit and 360 grit. Once the 360 comes out I can actually start on the front veneer, but it'll only be the lightest of licks. There's no way I'm risking sanding through on this project! Stay tuned...

Sunday, 12 July 2015

Jeremy's Mahogany LP: Headstock and Tuner Holes

This week, I finally got some more time to get back to Jeremy's Mahogany Les Paul build. Before I can start sanding this bad boy, there are a couple of modifications needed to support Jeremy's hardware choices. First and foremost, the existing tuner holes need to be reduced in diameter to support the 8.5mm tuner bushings to be found on his awesome Kluson tuners.

The first step in the process was to fill the existing tuner holes with dowel. Using some 12mm hardwood dowel from Bunnings, I reduced it down to around 11mm using 80 grit sand paper, then cemented it into the existing holes with Titebond. 

Dowel plugs sanded down from 12mm to fit
Once the glue was dry, It was a matter of using the dremel to roughly sand each plug down flat wth the headstock, and then filling around each with a little Timbermate. The result was one completely smooth - although kinda shitty looking - headstock.

Plugs glued in. Some sanding will be required!
Plugs sanded flat and the edges filled.
It was then time to locate the centres of the new 8.5mm tuner holes. This turned out to be harder than I initially thought due to the ridiculous locations of the original holes. With a little measuring, these were revealed to be unevenly spaced in the vertical, and badly placed with respect to both the centre line and the edges in the horizontal. The whole headstock is misshapen such that I can't have the new holes both equidistant from the edges and the centre-line. A choice was required - either situate the holes the same distance from the edge, or use the centre-line for reference. After an hour of indecision, I decided to drill horizontally equidistant from either edge, with the holes the same distance apart in the vertical.

Fuck, the original holes positions were ridiculous.
The resulting centres were not quite the same as the originals (ie each piece of dowel) but I reasoned that any offset should be hidden by the black headstock face and the rather large square backs of the Kluson tuners.  Finally, a little fiddling with the drill press got the new 8.5mm holes in and done.

The new holes fit the Kluson bushings just like a bought one!
With the new tuner holes completed (phew!), it was time to get on and cut the headstock shape. Using my usual Les Paul template (http://www.australianlespaulforums.com/download/Headstock.pdf) I traced, I cut with a scroll saw, and I sanded back with my flap wheels to finally arrive at a pretty good "open book" headstock shape.

Tracing the template
The completed headstock shape.
Awesome! Now the headstock can be finally sanded up through the grades ready for dye and finish. Now that I look at it, the curves on each side do look a little wonky, but I'm not sure what to do about it. With the tuners in place the irregularities may not be very noticeable me thinks. But then again, maybe a little time on the flap wheels could even out the curves a little. I'll ponder it once I start sanding and see how I feel. What I don't want to do is risk stuffing the whole thing up! Stay tuned.

Saturday, 27 June 2015

Jeremy's Mahogany Les Paul: Mock Build - Part 2

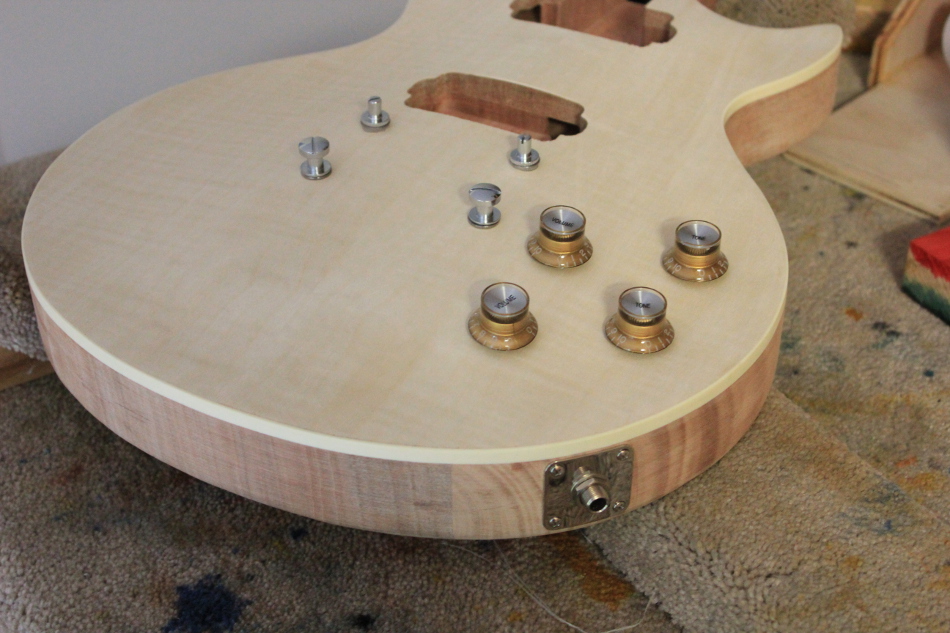
With some more hardware arriving and a little time on my hands, I was finally able to get going on the mock build of Jeremy's Mahogany Les Paul. The first order of the day was getting the pots sorted out. Jeremy supplied me some authentic Gibson 500K pots that are a little bigger than the mini-pots supplied with the kit. To get them to fit, I needed to enlarge the pot holes from 8mm to 10mm - taking it easy with successively larger drill bits. With the holes enlarged, I also needed to extend the cavity around the two high-side (volume) pots using the Dremel and a sanding wheel.

A little time with the Dremel and the Gibson pots now fit in the cavity.
After verifying that the pots fit nicely through the body (which they did!), I got the nuts tightened down just to make sure the heights looked good (which they also did!). I chucked Jeremy's gold top-hat knobs up onto the shafts and they fit OK, although the split shafts deformed a little and aren't turning perfectly. Might need to think about specific knobs for split shafts in the future.

Pots fit nicely through the body and the top-hat knobs kinda work on the split shafts.
With the pots mounted, it was time to fit the output jack and jack-plate - drilling the holes for each of the 4 screws, and making sure it sat nice and straight with respect to the binding. The hole for the jack has not been drilled dead centre by the factory, but it still looks reasonably good. All in all a piece of cake once I got the plate oriented correctly - it's nice and square and you can see the results in the photo above.

With smaller hardware fitted, it was time to test fit the important pieces - the stop bar, bridge and neck. Jeremy bought a beautiful TonePros nickel tune-o-matic bridge and stop bar for this build and it really looks the business. Even with the "export" sized mounting posts however, the holes drilled by the factory are just a smidge too large for both the stop bar and bridge posts.


Interestingly, the TonePros (adjustable) bridge screws were able to successfully fit into the stock bridge posts. I quickly decided to go with this configuration, as the stock part can't be seen with the bridge in place. The stop bar, however, is another story. The stock posts and the nice nickel stop bar supports are completely incompatible. In the short term I used the posts and the supports from the kit to mount the TonePros stop bar. The trouble is, the chrome posts are glaringly obvious against the nickel TonePros part. At the end of the day I'm going to have to dowel and re-drill the existing holes to accommodate the TonePros posts.

Anyway, with the bridge and stop bar in place (for now), the neck was clamped down and the E strings used to gauge the straightness of the neck.

The neck looks straight and the E-strings equidistant from the fretboard edges.
With my previous ministrations cleaning up the neck heel, the neck clamped down nicely in the pocket and the E strings travelled straight and equidistant from the edges of the fretboard right up to the nut. As usual, it's another nicely built kit from the guys at Pitbull. Phew!

So, with this done, there are still a couple of issues to be solved before the finishing can begin. Firstly, Jeremy's set of awesome Kluson tuners need to be fitted - and that's going to require the dowelling of the existing factory tuner holes and re-drilling them to fit. After that, the stop-bar posts holes will need the same treatment. So, a little bit of pain before the fun of sanding, sanding and more sanding can begin in earnest. Stay tuned!