Documents the various guitar builds and ongoing adventures in luthiery that is Fires Creek Guitars in Holgate, NSW, Australia.
Showing posts with label Les Paul. Show all posts
Friday, 24 April 2020
Thursday, 14 January 2016
Jeremy's Mahogny Les Paul: Final Clear Coats & Tru-Oil
Some more progress on Jeremy's Les Paul today. With the acrylic clear coats having hung for a month of more drying, it was high time I flattened them in preparation for final coats and polishing. With some 600 grit sand paper, I wet sanded the White Knight acrylic finish until all the orange peel had been removed and the entire surface took on an even matt finish. Soooo smooth!
The body was then ready for two more acrylic coats, in preparation for a month of curing. She's looking nice and glossy at the moment - I'm very interested to see how she looks after the final polish.
With the body hanging to cure, I was also able to get another coat of Tru-Oil on the neck. There are over 15 coats on there now, and today I started wet sanding it with 600 grit. From now on I'll be applying coats of Tru-Oil thinned 1:1 with Minural Turps. You know when it's time to start thinning the Tru-Oil as you start to see streaks in the finish, and this tends to coincide with the first round of wet sanding.
About 5 more coats of Tru-Oil, with successively finer wet sanding, and the neck should be ready for a final polish. The neck is feeling really nice and smooth now, so she should give the final axe a really nice feel.
| Acrylic flattened with 600 grit ready for final coats |
| Last clear coats on and now ready to cure. |
| Wet sanding with 600 grit and thinned Tru-Oil coats have begun on the neck. |
Friday, 4 December 2015
Jeremy's Mahogany Les Paul: Clear Coats!
A week has past since my last post on Jeremy's Mahogany Les Paul build. In the intervening days, the body has been receiving regular coats of White Knight Gloss Acrylic, and Tru-Oil has been slowly building on the neck. This is the first time I've sprayed acrylic clear directly onto a dyed flame-maple top and I gotta say that I'm pretty bloody happy with the results! I wasn't sure how much the flame maple would pop without a bit of oil soaked into the figure, but I needn't have worried. The flame maple is looking really really great! There's even a crap-load of chatoyance visible in the grain, and I really didn't expect that! I think Jeremy's gonna be pretty pleased with how she's looking.
| Acrylic clear coats building nicely and popping that flame figure. |
The thin coats of Tru-Oil are building much more slowly on the neck, but already the grain is looking really nice here too. I'm giving it a smooth down with 0000 steel wool every 3 coats or so, so after another hundred or so coats she'll be feeling really nice indeed :). After 3 or 4 more coats of acrylic I'll give the body a smooth down with 600 grit, bung on a couple of top coats and leave it to cure.
Labels:
Acrylic Clear Coats,
Clear Coats,
Guitar Kit,
Jeremy's Mahogany Les Paul,
Les Paul,
Mahogany Les Paul,
Pitbull Guitars,
White KNight,
White Knight Acrylic
Location:
Holgate NSW 2250, Australia
Tuesday, 24 November 2015
Jeremy's Mahogany Les Paul: Fit to Burst
It's crunch time for Jeremy's Les Paul build - today's the day that the front veneer receives its colour. After weeks of sanding, from 180 through 240, 320 and 400 grits, the body is finally ready to be dyed with Colortone dye. Before the dye could go on though, the grain had to be raised, and that meant several applications of a wet rag to swell the fibres followed by a light sand with 400 grit to cut them off again flat. All in all it took 4 such cycles to get the surface nice and smooth.
With that out of the way, the Colortone dye could be applied with impunity. I started by wetting down the whole surface of the guitar. This makes the first dye pass go on much more evenly; reducing the risk of the dreaded tide-lines forming. This was closely followed by the colour layer - Colortone Lemon Yellow. My god it was bright!
I made a few passes with the Yellow to maximise the amount of pop from the flame maple figure. Despite my best efforts, including using a clean wet rag to try and drag colour out of the surface grains to maximise contrast, the flame figure was still only subtle at this stage. The next colour to go on, and the start of the burst proper, was Colortone Vintage Amber. In the beginning the contrast between Yellow and Vintage Amber was again very subtle, but the Amber did help to enhance the contrast with the flame even more.
Next came the Colortone Red Mahogany layer. Using a combination of Vintage Amber and clean rags to blend the Mahogany into the previous layers, the results were really starting to take shape. Particularly pleasing was the way the flame figure took on the darker tones of the Mahogany when the colour was applied in an area and then taken off again during the 'merge'.
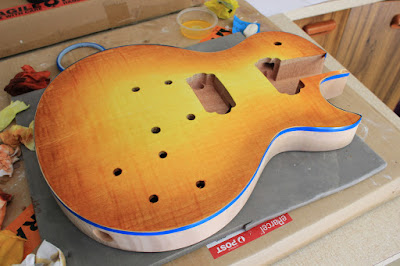
Lastly came a little Colortone Tobacco Brown to darken up the edges. To be honest the Tobacco didn't have as much of an impact as I was expecting, but I think by this stage the veneer was well and truly saturated and was refusing to take any more colour.
All in all a pretty satisfactory burst. Except, that is, for the fucking glue marks along the top edge that made their sudden appearance half-way through the Red Mahogany layer. I could have cried when I saw them materialise out of thin air. At the time there was nothing for it but to finish the burst and leave the problem to be fixed later.
So what to do? Well apart from weeping into my after-lunch coffee, I let the surface dry under the fan and pondered my next steps. Armed with some friendly and poignant advice from the forumites at the BuildYourOwnGuitar forum, I grabbed my wire brushes, mixed up a 50:50 concoction of Vintage Amber and Red Mahogany and carefully set to the glue spots. The idea was to scratch each spot with the wire brush, pop some dye over the spot, and then blend it in with the rest of the burst. After 3 passes of this process, the burst had darkened substantially but the glue marks were a lot less obvious then previously.
If you know where to look you can still see the glue spots faintly lurking behind the finish. But really it's a hell of a lot better than when I started. I'm tempted to stop here and call it a day. No point tempting fate too far! I'll see how I feel tomorrow when I colour the rest of the body, but I'm pretty happy with how she looks right now.
With that out of the way, the Colortone dye could be applied with impunity. I started by wetting down the whole surface of the guitar. This makes the first dye pass go on much more evenly; reducing the risk of the dreaded tide-lines forming. This was closely followed by the colour layer - Colortone Lemon Yellow. My god it was bright!
| Layer 1 - Colortone Lemon Yellow. |
| Layer 2 - A subtle burst of Colortone Vintage Amber. |
| Layer 3 - Colortone Red Mahogany. |
| Layer 4 - Colortone Tobacco Brown, but to little effect. |
| Glue spots. Where the fuck did they spring from?? |
| Mischief managed. Wire brush an extra dye to the rescue. |
Thursday, 15 January 2015
Ash Les Paul: Looks Great, Sounds Even Better
Well, my rock beast is finally complete! This morning I filed a new bone nut and got the action at the 1st fret as close to perfect as I dared to go. Whether or not I could have gone down any further, playing open chords now feels oh-so-sweet! With the nut sorted, I focused next on the bridge height and brought it down until just before the height where the strings started to buzz. There's still the slightest amount of buzz on the E and A strings, but it helps playability so much and its not enough to come through to the amp. All along the neck, the strings are now nice and low on the fretboard and she feels
really, really wonderful to play!
With the action sorted, on went the truss rod cover and that was the entire build completed. What do you guys out there in inter-web land think? Compared to my Epiphone Les Paul Standard that I've had for 20 years, she doesn't even compare in look or in playability. Colortone dye + Tru-Oil really is a simple and effective means to obtain a professional looking finish cheaply and easily! I recommend anyone out there thinking about finishing their own guitar to give this combo a try.
I really love the ash veneer on this Pitbull kit. Filling the ash grain with Walnut Timbermate was definitely the right decision - especially with the Tobacco burst over the top. It has really popped the grain beautifully and helps to spread the dark tobacco theme out over the entire top. The dark filled grain even makes the wood look a little scorched don't you think? Maybe it's just me ;) .
How about those Entwistle zebra pickups - they just scream ROCK! It makes this LP look a bit like the Slash signature model from Gibson. You can't get more rock than that!
In terms of the headstock, I really like the way the burst headstock complements the body so well. When I first did the headstock I had serious doubts that it was good enough, but now I wouldn't change a thing.
The grain on the sides and rear of the body also looks great with the Walnut Timbermate fill. It has come up a little like Mahogany in that respect. It's really allowed what figure there was in the body pieces to come to the fore, even though there wasn't much there to begin with.
The Entwistle HDN pickups are the hotest pickup I've ever heard. I've been playing the guitar all day, and I've found that for my playing style the sweet spot volume-wise is about 7 on both the knobs. I've never needed to adjust the volume on a guitar before! When the volume is at 10, the guitar really drives the amp - the neck pickup especially. If I could squeal lead notes, then this baby would be on fire. Even better, lifting the volume knobs performs a coil tap on each pickup, modifying the sound of the guitar to give that more hollow single-coil sound. Just another awesome aspect to these amazing pickups.
All in all this LPA-1 is an amazing kit from Pitbull Guitars (Build Your Own Guitars), and I think I've done it justice. The set neck went on perfectly without issue or shim, and the resulting neck height is exactly matched to the height of the tune-o-matic bridge. For a perfect action, the bridge is raised about 2mm from it's lowest setting. No shim, and no bridge sticking out off the body. The end result of all my ministrations looks amazing (in my humble opinion) and is a real pleasure to play.
I'll try to get a sound demo recorded in the coming days - just as soon as I learn a song that will do this baby justice!
With the action sorted, on went the truss rod cover and that was the entire build completed. What do you guys out there in inter-web land think? Compared to my Epiphone Les Paul Standard that I've had for 20 years, she doesn't even compare in look or in playability. Colortone dye + Tru-Oil really is a simple and effective means to obtain a professional looking finish cheaply and easily! I recommend anyone out there thinking about finishing their own guitar to give this combo a try.
I really love the ash veneer on this Pitbull kit. Filling the ash grain with Walnut Timbermate was definitely the right decision - especially with the Tobacco burst over the top. It has really popped the grain beautifully and helps to spread the dark tobacco theme out over the entire top. The dark filled grain even makes the wood look a little scorched don't you think? Maybe it's just me ;) .
How about those Entwistle zebra pickups - they just scream ROCK! It makes this LP look a bit like the Slash signature model from Gibson. You can't get more rock than that!
In terms of the headstock, I really like the way the burst headstock complements the body so well. When I first did the headstock I had serious doubts that it was good enough, but now I wouldn't change a thing.
The grain on the sides and rear of the body also looks great with the Walnut Timbermate fill. It has come up a little like Mahogany in that respect. It's really allowed what figure there was in the body pieces to come to the fore, even though there wasn't much there to begin with.
The Entwistle HDN pickups are the hotest pickup I've ever heard. I've been playing the guitar all day, and I've found that for my playing style the sweet spot volume-wise is about 7 on both the knobs. I've never needed to adjust the volume on a guitar before! When the volume is at 10, the guitar really drives the amp - the neck pickup especially. If I could squeal lead notes, then this baby would be on fire. Even better, lifting the volume knobs performs a coil tap on each pickup, modifying the sound of the guitar to give that more hollow single-coil sound. Just another awesome aspect to these amazing pickups.
All in all this LPA-1 is an amazing kit from Pitbull Guitars (Build Your Own Guitars), and I think I've done it justice. The set neck went on perfectly without issue or shim, and the resulting neck height is exactly matched to the height of the tune-o-matic bridge. For a perfect action, the bridge is raised about 2mm from it's lowest setting. No shim, and no bridge sticking out off the body. The end result of all my ministrations looks amazing (in my humble opinion) and is a real pleasure to play.
I'll try to get a sound demo recorded in the coming days - just as soon as I learn a song that will do this baby justice!
Labels:
Ash Les Paul,
Ash LP,
Bone Nut,
Burst,
ColorTone,
Colortone dye,
Entwhistle Pickups,
Entwistle HDN,
Gluing Neck,
Guitar Kit,
Les Paul,
LPA-1,
Pitbull Guitars,
Tobacco Burst,
Zebra Humbuckers
Location:
Holgate NSW 2250, Australia
Subscribe to:
Posts (Atom)
