Showing posts with label Chatoyance. Show all posts

Monday, 4 August 2014

Burley 335: 1st Coat of Tru-Oil

Well, after finishing the sanding of the Burled Birdseye Maple 335, I debated long and hard about what colour to dye it. I was thinking of a dark walnut colour, and then an amber and red mahogany burst like my 335 Bass,  but just couldn't bring myself to pull the trigger on the dye job. I slept on it last night, and this morning decided to leave the top natural as I had originally intended.


With this decision made, the first "soak" coat of Tru-Oil went straight on the veneer. All I can say is wow! The Tru-Oil revealed details in the grain that I never knew existed, and the amount of chatoyance - even with a single coat - is amazing. I'm very pleased with how this is shaping up!

I still haven't decided what to do with the back and sides. My current thinking is to go natural just like the veneer. But hey, all that might change come tomorrow morning ;). A dark walnut colour could also contrast very nicely with the natural top!

Tuesday, 18 March 2014

Les Paul Florentine: She's Finished!

I made the finishing touches to the Florentine build today - with the custom truss rod cover being finally screwed into place. The cover still isn't as "cream" as I would have liked (I was aiming for the same colour as the Dream 180s) but in a pinch it will do.


I think that this build turned out beautifully - with that cherry quilted maple and all gold fittings really catching the eye. The Pit Bull Guitars kit (ES-2T) is a great kit - with a quality maple cap - at a very reasonable price compared to other semi-hollow kits. The guitar is very nice to play as the semi-hollow body is very light compared to your typical mahogany Les Paul. To be honest it's a revelation! The tone that the semi-hollow body it creates is warm, even without the guitar plugged in, and in conjunction with the Dream 180s it can really scream when it wants to.


All in all I couldn't be happier with this build. I'm seriously considering purchasing another one of these to finish in a different colour (tobacco-amber burst?). There's so many different kits out there to explore, but I've particularly enjoyed this one every step of the way.

Anyway, let me know what you think peoples! I think it's stunning, but how about you??

Sunday, 16 March 2014

Flamed Telecaster: 8th Coat of Tru-Oil

8 coats of Tru-Oil are now on the flame maple telecaster. Starting to look really nice. The colour is a little dark for me, and there isn't enough of a burst along the edge, but not bad for a first attempt. I can see now that the trace-dye coat I did was too dark using just Red Mahogany. A mix of Vintage Amber and Red Mahogany (maybe 70/30) would have been much better! The flame would have have been more subtle, but this would have allowed much more of the Amber colour to come to the fore in the centre of the burst. On the plus side, the Tru-Oil has soaked into the grain and enhanced the chatoyance nicely.


I am especially happy with the back of the guitar. No chatoyance here, but the pores of the mahogany filled very nicely with Timbermate and the Vintage Amber / Red Mahogany burst is more pronounced. Yes the burst could have been better, but all in all it came up nicely.


Overall I'm pretty happy with how the build is progressing. The mahogany body should sound really good with the GFS 52' professional series pickups I've bought for it, and the custom perloid pickguard also looks the business.

A couple more coats of Tru-Oil and I'll be ready to start wet sanding.

Saturday, 15 March 2014

Les Paul Florentine: Sound Demo

OK, so for those of you interested in how this beat sounds with the semi-hollow body and the GFS Dream 180 pickups, I have done a quick sound demo. Please excuse the crap playing. The guitar is being played through a Fender Reverb amplifier with no additional pedals or effects other than those provided by the amp itself.


In addition to the Dream 180s, I have added a bone nut, switchcraft jack and 3-way switch, CTS pots and orange-drop caps. The entire demo is with the tone all the way up.

I gotta say, I love the way this baby sounds. Quite a large tonal range to play with, and the light body fells great in the hands. It looks so awesome, and sounds so good, I'm sorely tempted to make myself another one!

I've still got the custom truss-rod cover to go before I call this one completely finished. Just waiting on some supplies from eBay!! 

Wednesday, 12 March 2014

Flamed Telecaster: Bursting!

Today, with the trace dye completely dry, I sanded the Flamed Telecaster back with 360 and 400 grits on the orbital sander. I was in constant fear of sanding through the veneer, but thankfully I got it done without that particular catastrophe striking again.

After sanding it was time to apply the burst. I started with a weak mix of Vintage Amber Colortone dye and applied this over the whole top. I followed this up with a much darker strength Vintage Amber to help pop the grain even further. With the amber on. I started to create a burst around the edge with more Red Mahogany, alternating between Mahogany, clean and Amber rags until I was pretty satisfied with the results.


 And then it was the back's turn. I pore filled the mahogany body with a slurry of Walnut Timbermate and sanded back with 400 grit. I then applied a layer of Vintage Amber dye all over the back and sides (to match the front) and then proceeded to burst again with Red Mahogany. I made sure I got plenty of Red Mahogany on the sides to provide an even transition between the cap and the back burst.


What do you think? I reckon it's pretty sweet. The flame maple has come up a treat and there is a good deal of chatoyance to be seen. Will be even more once some coats of Tru-Oil go on. The edge could probably do with a little more red mahogany, but overall I'm stoked with the results. This is the first burst I have ever done, and my message to those out there considering trying it? GO FOR IT. It isn't as hard as you might think. If I can do it, then anyone can.

Wednesday, 5 February 2014

Les Paul Florentine: All Soldered Up

With new heat shrink in hand, today I soldered the pickups and switch connections to the wiring harness. Viola! There were no issues at all with the wiring harness, despite the violence metered out to it at times yesterday in my attempts to get it seated properly.


Now this baby makes some serious noise! There's a lot of wire in the cavity (if you look from the right direction you can see it) but who's worried about that? I'm not about to fool with it at this stage. I guess I *may* go back and trim the wires up at a later date, but who am I kidding?

I still have a couple of things to do before I can call this build finished. I have a full fret level and re-dress to do. Also, I need to create a bone nut for this baby. I have ordered a new tool from Stewmac - the 'Safe Slot Nut Guard' so I'll wait for that to arrive before I get started on the bone blank. I also need a truss-rod cover that is fitting for this baby. I am thinking of a hand-cut cream perloid cover, but I'll have to find the right pickguard material. Sounds like i have some ebay trolling to do!

Wednesday, 15 January 2014

Les Paul Florentine: Thinning Tru-Oil with Shellite (Naptha)

A few weeks ago I posted a quick article about how to resurrect your Tru-Oil when it gets old and cruddy. The secret was to stick a bit of Shellite (Naptha) in it and give it a shake. Well, today I decided I'd try to thin my Tru-Oil down using Shellite rather than the usual Mineral Spirits. I wet-sanded for a couple of hours with 1500 grit (it needs more but that's another story) and then thinned some Tru-Oil about 70:30 with Shellite.


The thinned oil wiped on smooth and had soon settled into a new streak-free layer. I would even say that the thinned oil went on easier (smoother?) than when using Mineral Spirits, but I'm not 100% sure. Let me do it a bunch more times and I'll let you know the conclusion. All I know right now is that it went on nicely and the results speak for themselves! The shine is really starting to pick up on this sucker now. Just wet-sanding with 2000 grit to go.

Postscript 16/01/2014
Well, the oil dried and guess what? There were streaks in it where it hadn't settled. With hindsight this is not surprising given that Shellite (Naptha) evaporates much faster than Mineral Turpentine. Obviously the Shellite is evaporating way too fast. So in conclusion, thinning with Shellite is a very bad idea! Stick with Turps instead and save yourself the agony of having to wet-sand all over again...!

Saturday, 30 November 2013

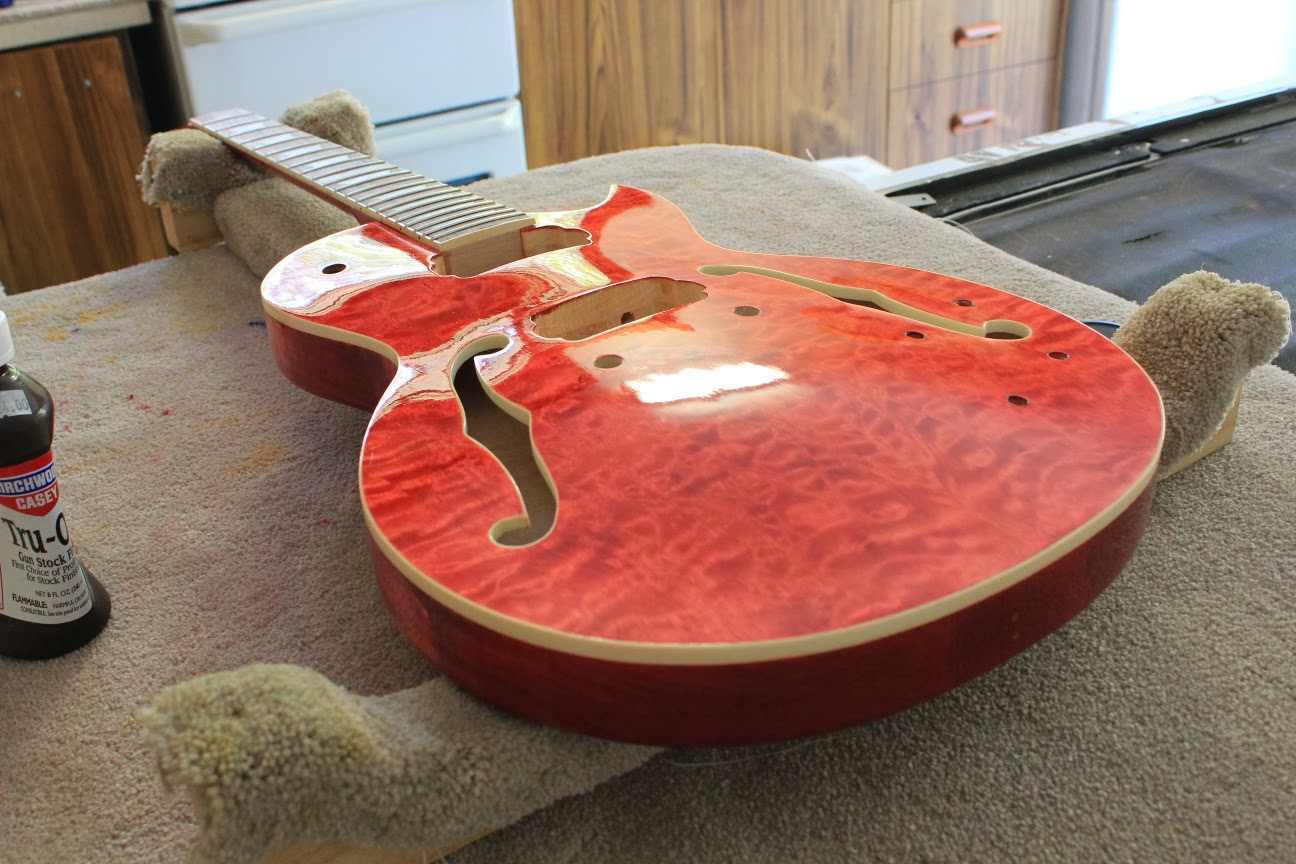
Les Paul Florentine: Finalizing Quilted Maple Colour

Today I put the finishing touches on the dye job for the quilted maple guitar top of the Les Paul Florentine. I used two colours in the end as part of the job - a 100% Colortone Cherry, and a 90% Cherry + 10% Blue 'Wine-Red' mix. The Cherry was wiped on first as the 'base' colour for all the non-figured parts of the grain. The wine-red mix was wiped on next to highlight the more figured parts of the quilting.

I have used this technique before in my other dye jobs and it seems to work well. What happens is that the base colour settles into the wood where there is no figure. These wood fibres remain saturated with stain, whilst the figured parts of the grain soak in the dye and are ready for more. When the second colour is applied (usually a more concentrated solution of the first) it is wiped lightly across the surface and is taken up by the figure only. Of course this only happens whilst the first pass is still wet. If you take too long, or do too many passes with the more concentrated colour then the whole surface slowly begins to darken. 

I certainly can't take any credit for this method of applying dye to figured maple. I learned about it from this youtube video from Bill of Canadianbreed Guitars. It's a great video and a great technique - I recommend you check it out if dying guitars interests you.
 
Basically this is how I worked today, but after the initial pass with the darker shade I kept temporarily changing back to the 100% Cherry to touch up any areas that looked too purple. In the end I got the dark red I was looking for (or at least a close approximation of it).


I'm sure it could have been achieved with other colour mixes, but the Blue as darkening agent worked well enough for me in this case. The photo shows a little lighter and 'redder' than the colour is in real life, but it does show the figure standing out quite nicely. The next step will be 3 or 4 coats of Tru-Oil to really get into the grain and bring out the 'chatoyance' (oo la la) of the quilted figure.