Showing posts with label Cherry. Show all posts

Tuesday, 18 March 2014

Les Paul Florentine: She's Finished!

I made the finishing touches to the Florentine build today - with the custom truss rod cover being finally screwed into place. The cover still isn't as "cream" as I would have liked (I was aiming for the same colour as the Dream 180s) but in a pinch it will do.


I think that this build turned out beautifully - with that cherry quilted maple and all gold fittings really catching the eye. The Pit Bull Guitars kit (ES-2T) is a great kit - with a quality maple cap - at a very reasonable price compared to other semi-hollow kits. The guitar is very nice to play as the semi-hollow body is very light compared to your typical mahogany Les Paul. To be honest it's a revelation! The tone that the semi-hollow body it creates is warm, even without the guitar plugged in, and in conjunction with the Dream 180s it can really scream when it wants to.


All in all I couldn't be happier with this build. I'm seriously considering purchasing another one of these to finish in a different colour (tobacco-amber burst?). There's so many different kits out there to explore, but I've particularly enjoyed this one every step of the way.

Anyway, let me know what you think peoples! I think it's stunning, but how about you??

Wednesday, 5 February 2014

Les Paul Florentine: All Soldered Up

With new heat shrink in hand, today I soldered the pickups and switch connections to the wiring harness. Viola! There were no issues at all with the wiring harness, despite the violence metered out to it at times yesterday in my attempts to get it seated properly.


Now this baby makes some serious noise! There's a lot of wire in the cavity (if you look from the right direction you can see it) but who's worried about that? I'm not about to fool with it at this stage. I guess I *may* go back and trim the wires up at a later date, but who am I kidding?

I still have a couple of things to do before I can call this build finished. I have a full fret level and re-dress to do. Also, I need to create a bone nut for this baby. I have ordered a new tool from Stewmac - the 'Safe Slot Nut Guard' so I'll wait for that to arrive before I get started on the bone blank. I also need a truss-rod cover that is fitting for this baby. I am thinking of a hand-cut cream perloid cover, but I'll have to find the right pickguard material. Sounds like i have some ebay trolling to do!

Wednesday, 15 January 2014

Les Paul Florentine: Thinning Tru-Oil with Shellite (Naptha)

A few weeks ago I posted a quick article about how to resurrect your Tru-Oil when it gets old and cruddy. The secret was to stick a bit of Shellite (Naptha) in it and give it a shake. Well, today I decided I'd try to thin my Tru-Oil down using Shellite rather than the usual Mineral Spirits. I wet-sanded for a couple of hours with 1500 grit (it needs more but that's another story) and then thinned some Tru-Oil about 70:30 with Shellite.


The thinned oil wiped on smooth and had soon settled into a new streak-free layer. I would even say that the thinned oil went on easier (smoother?) than when using Mineral Spirits, but I'm not 100% sure. Let me do it a bunch more times and I'll let you know the conclusion. All I know right now is that it went on nicely and the results speak for themselves! The shine is really starting to pick up on this sucker now. Just wet-sanding with 2000 grit to go.

Postscript 16/01/2014
Well, the oil dried and guess what? There were streaks in it where it hadn't settled. With hindsight this is not surprising given that Shellite (Naptha) evaporates much faster than Mineral Turpentine. Obviously the Shellite is evaporating way too fast. So in conclusion, thinning with Shellite is a very bad idea! Stick with Turps instead and save yourself the agony of having to wet-sand all over again...!

Wednesday, 8 January 2014

Les Paul Florentine: She's Got Neck

So, who says that I can't glue a set-neck? Not me. Well, not anymore at least. Today, after 2 days of waiting, I released the clamps holding the neck joint on the Florentine. The Titebond glue seems to have produced a very strong join, although to be honest I haven't driven my car over it.


One thing that did worry me is that upon inspection the angle of the neck seemed quite shallow compared to my Epiphone Les Paul. Worried that I might end up with action out the wazoo, I immediately fitted the trapeze tailpiece and the E strings to check the string height. Thankfully, using the bridge but without the bridge posts fitted, the E strings are just touching the neck at the highest fret. I'm hoping that once the bridge posts are in, this will leave just enough wiggle room to allow a nice action to be achieved. That's the big trouble with these set-neck builds - once it's in, it's in! Not being able to shim the neck to fix the action brings me out in a cold sweat..

Anyway, apart from the neck angle (which is, well, fine actually) everything else looks good. With correct bridge post placement, the two E strings can be aligned so that they sit over the outermost pickup poles and travel nicely up the neck to the nut. Yippee!! The next job is to drill the bridge post holes (carefully, carefully!!) and then finalise the finish so that the wiring can begin. She's slowly nearing completion, although her wiring promises to be a real pain in the grunions. Fun times ahead - stay tuned for that one!

Sunday, 1 December 2013

Les Paul Florentine: Dying the Back and Sides

Well, I finally got the dye on the sides and back of the Les Paul Florentine. I used the same wine-red colour that I mixed up for the front - 90% Cherry and 10% Blue Colortone dye.


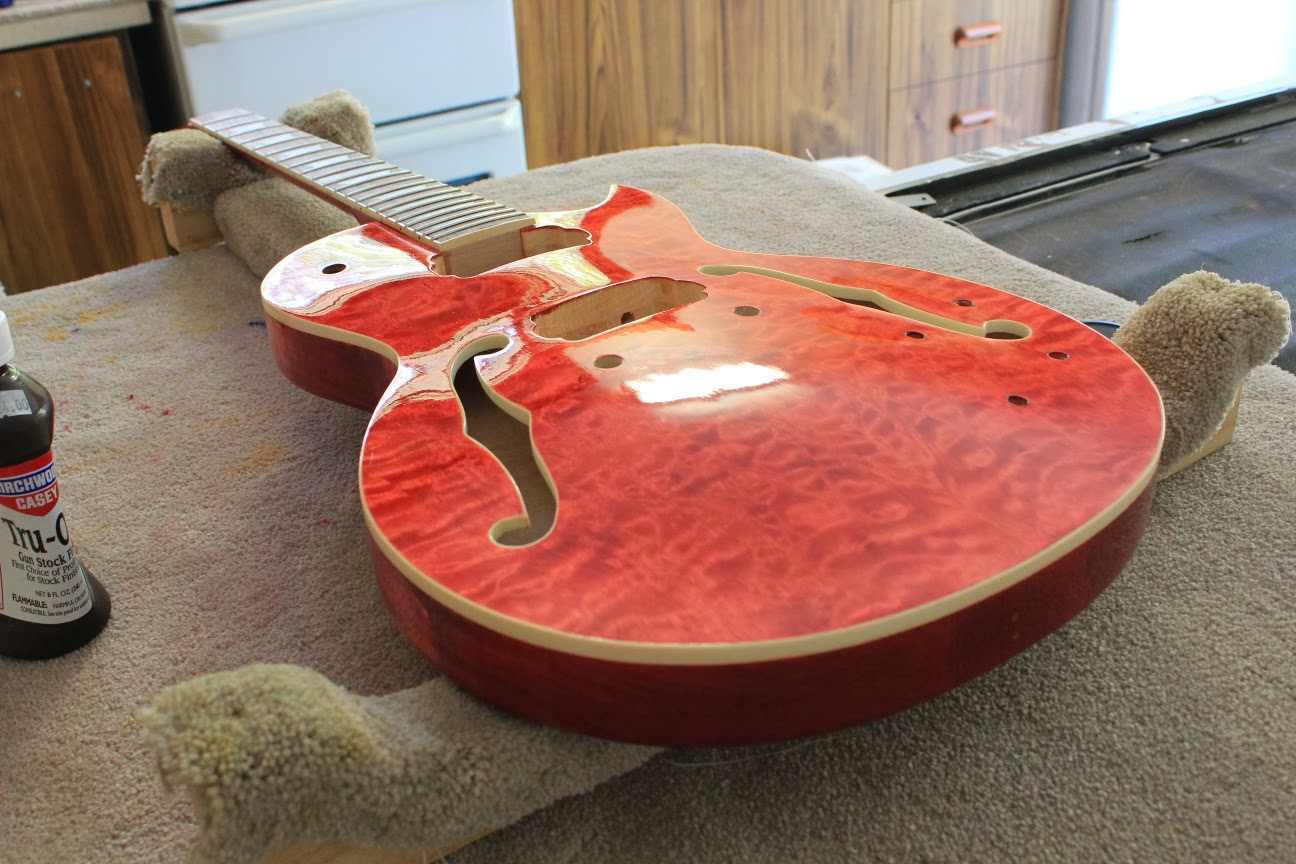
The grain on the back of the guitar has come up really nicely, and the contrast with the front of the guitar (I wanted the back of the guitar a little darker) is good. It's amazing that even though this is only basswood, there's some real flame figure happening there! The colour is looking rather pink on the front now that it is fully dry, but both will darken up a quite bit as the Tru-Oil goes on.


The dye went on without incident (it's uniform at least), although there were one or two minor glue spots that I missed during sanding. For these I'll have to do a bit more sanding and then patch up the dye job.


Once the dye is finished, the next job is to scrape the binding, both in the f-holes and around the top edge. For me, that's the most stressful part of this whole process. Stay tuned!

Saturday, 30 November 2013

Les Paul Florentine: Finalizing Quilted Maple Colour

Today I put the finishing touches on the dye job for the quilted maple guitar top of the Les Paul Florentine. I used two colours in the end as part of the job - a 100% Colortone Cherry, and a 90% Cherry + 10% Blue 'Wine-Red' mix. The Cherry was wiped on first as the 'base' colour for all the non-figured parts of the grain. The wine-red mix was wiped on next to highlight the more figured parts of the quilting.

I have used this technique before in my other dye jobs and it seems to work well. What happens is that the base colour settles into the wood where there is no figure. These wood fibres remain saturated with stain, whilst the figured parts of the grain soak in the dye and are ready for more. When the second colour is applied (usually a more concentrated solution of the first) it is wiped lightly across the surface and is taken up by the figure only. Of course this only happens whilst the first pass is still wet. If you take too long, or do too many passes with the more concentrated colour then the whole surface slowly begins to darken. 

I certainly can't take any credit for this method of applying dye to figured maple. I learned about it from this youtube video from Bill of Canadianbreed Guitars. It's a great video and a great technique - I recommend you check it out if dying guitars interests you.
 
Basically this is how I worked today, but after the initial pass with the darker shade I kept temporarily changing back to the 100% Cherry to touch up any areas that looked too purple. In the end I got the dark red I was looking for (or at least a close approximation of it).


I'm sure it could have been achieved with other colour mixes, but the Blue as darkening agent worked well enough for me in this case. The photo shows a little lighter and 'redder' than the colour is in real life, but it does show the figure standing out quite nicely. The next step will be 3 or 4 coats of Tru-Oil to really get into the grain and bring out the 'chatoyance' (oo la la) of the quilted figure.

Friday, 29 November 2013

Les Paul Florentine: Second Trace Dye Sanded Back

Today I sanded back the second trace dye with 360 grit paper and polished off with 400. Now that the dye is dry it is much lighter and the colour looks even more purple (pink even!) but it should darken up again when the Tru-Oil goes on.


The next step is to put the last dye coat on. It will be a more Cherry colour than the trace dye (the trace dye is 20% blue). I have not decided whether to use straight Cherry, or whether to mix in 10% Blue. It may well be that the trace dye will be enough to darken the Cherry enough. Hmm... needs some thought before I commit.