Showing posts with label Stewmac Polish. Show all posts

Sunday, 2 February 2014

Les Paul Florentine: Polishing Done, Hardware Installed

Well today was a big day for the Gibson Florentine. First the polishing was finished using the 'fine' and 'swirl remover' ColorTone compounds from Stewmac. The finish has come up nicely indeed. Not sure I'm going to be able to use my right arm for a couple of days, but hey - that's what it costs!

As soon as the polishing was complete it was on to the shielding of both pickup cavities using my old friend copper foil with conductive adhesive. The ground wire was added to the bridge post, the bridge post hammered home and the ground wire soldered to the bridge cavity wall. Additionally the neck and bridge cavities were joined eletrically with a second lengh of wire soldered at both ends to the cavity walls.


After the shielding was complete, it was time to install the three-way switch. The switch was soldered to some 4-core shielded cable from Stewmac and then placed inside the body using the tried and trusted 5mm aquarium pipe method. You can see how this works in the photos below.


Amazingly, the switch went in relatively easily - it only took three attempts!! Once the switch was in, I just had to get the rest of the hardware in to see what it looked like. I had to widen the hole from the bridge cavity to the outer body to accomodate all the wires, but everything fitted in the end.


I think it is looking pretty damn good, don't you? The gold hardware really sets off the cherry dye job. Anyway, just the wiring to go now. I'm planning on using 50's vintage wiring with the independent volume and treble bleed mods - just like I did with my 335 12 String build. Should sound great with these Dream 180 humbuckers from GFS!

Saturday, 1 February 2014

Les Paul Florentine: Polishing Tru-oil

After applying my Tru-oil coats in conjunction with wet sanding down to 2000 grit, I've finally finished the clear coats and have allowed them to cure for a couple of weeks. Now it's time to give the clear some polishing to deepen the shine.

I use Colortone polishing compounds from Stewmac - 'medium', 'fine' and 'swirl remover' grades.


After applying the medium grade compound I'm already liking the depth of shine I have been able to create. Take a look and see what you think:


Just another few days and the finish on this bad boy will finally be complete (phew). It has been a long, long run for this one! Then it's just a matter of shielding and wiring. Hmm, hang on, the wiring on this puppy is going to be a challenge - just like the 335 12 string!

Friday, 20 December 2013

Les Paul Jnr Double Cut: Clear Coats Complete

Finally the clear coats are finished on the double-cut Jnr. I used Minwax Wipe-on Poly - about 4 coats - to help bring up the shine and to protect the finish a little more. To tell you the truth I just wasn't happy with the amount of clear that went on from the Wudtone bottle. Just 3 very thin coats! It didn't feel to me like it would survive the first bump.

So anyway, it's done and even without applying the Colortone polishing compound the poly has  really come up nicely.


Now to let the poly cure completely and then give it a quick buff with Colortone compounds. Should look killer when all that elbow grease has been applied.

Wednesday, 20 November 2013

Jackson-Style Flying V: Poly and Shielding

The Jackson-Style Flying V was my first kit; a project that was not only a learning experience, and one that produced a great guitar, but which cemented new love for guitar building. All those months ago, in those naive early days of my burgeoning new hobby, my knowledge on the subjects of finishing, electronics, and many other aspects of the luthier's craft was sadly wanting. Consequently, there are a few things about the build that, with hindsight, I could have done a good deal better. Whilst the guitar came out remarkably well given my lack of knowledge and wood working skills, there were 3 key areas in which the guitar could have been improved.

The first was in the finish itself. I used Behlen vinyl sealer and nitro lacquer to apply clear coats over the automotive acrylic colour coats. Whilst this is not in and of itself a bad idea, my execution was found wanting. The clear coats were very thin and after sanding through a couple of times, I was too timid at the end of the day to polish them properly to give the mirror finish the paint job deserved.

Secondly, although the electrics were all professionally wired and soldered (I can at least wield a soldering iron with some confidence) the wiring was not properly grounded to the bridge and there was no shielding at all in any of the cavities. In my naivety I tried to solder the ground wire to a bridge post (which I eventually suceeded in doing) but the act of hammering in the post cut the wire. As far as shielding was concerned, I didnt even realize such a thing was done, let alone how important it was for noise elimination. Despite the noise introduced by the combination of these two factors, the Entwistle Dark Star pickups really sounded excellent. But alas the noise was there buzzing away in the quiet moments.

Lastly, although the action straight out of the box was impressively low and comfortable, I did not perform a fret level and re-crown on the neck. In addition, the neck was badly in need of a shim as the tune-o-matic bridge had already been reduced to its lowest setting leaving no room for fine tuning.

And so, desiring one of my beloved guitars to play and sound even better, I thought it high time that the Jackson-style V went back on the bench and receive the finishing touches that it so richly deserved.

First came the poly. Using minwax wipe-on poly, I applied around 15 coats, wet sanding every 2 coats with incrementally decreasing grit sizes: 1200, 1500 and 2000. The body now has a nice thick build up of clear on it, and the sparkle in the metallic auto paint is dazzling. After the wet sanding I went on to the polishing compounds, with Stewmac Medium, Fine and Swirl Remover called in to apply the final touches. The V now has a lovely mirror finish!


Second came the shielding. I used copper foil with conductive adhesive to coat both the pickup and control cavities. Even the plastic control cavity cover got the treatment (this is important if you want to create a complete Faraday cage around the controls). The shielding in each cavity was soldered to the next using joining wires, and the wire from the bridge post was correctly inserted (with vertically hanging bare wires this time) and the connection duly tested with a multi-meter.


The next step for this bad boy will be the re-wiring of the pickups and controls, as I had to completely un-solder all the components to remove them for shielding. After the body has been completely re-assembled and re-wired, the frets can be levelled and this baby can sing again. Stay tuned for the next instalment! I may even make a bone nut if I'm feeling particularly enthusiastic. Yes, I think I will. That's something else I've had experience with since moving on to other building projects and the V could definitely benefit from it.

Wednesday, 23 October 2013

Siena's Stratocaster - It's Finished!

I finally got the stratocaster polished and assembled today. Gotta say it looks awesome. I was able to achieve a mirror finish using my Colortone polishing compounds, and since i did a mock build right at the beginning of the project, everything went together very easily without any mishaps or scratches.

After adding some copper foil to overlap the edges of the pickup cavity (so it could contact the shielding on the back of the pickguard), the only thing left to do in terms of electrics was to ground the cavity shielding to the back of the volume pot, solder the ground wire to the back of the tremolo hook, and solder the output jack. I had a few tense moments during which the output jack kept grounding out, but a bit of heat-shrink insulation sorted it out.


Despite being the one of the cheapest kits on the market, this strat plays really nicely and sounds oh-so sweet. The full range of strat tones are there, and it was made to cry the blues. This build was for my niece Siena, and I gotta say I will be sad to see it go. It looks so nice hanging on my wall right now! Obviously the thing to do is build one for myself. Yes. I must. The colour in real life is a lot more aqua than it appears in the photos. It is weird how much the camera's flash brings out the green, but if i don't use the flash the colour looks blue!


If you've been thinking of building a kit, then the Stratocaster kit from your online supplier of choice is a great place to start. These kits are cheap, there's minimal wiring to be done, and the finished product looks good, sounds good, and is a pleasure to play. Come on, you know you want to!

Rock on. \m/ \m/

Monday, 14 October 2013

Siena's Stratocaster - Clearcoats & Polishing

Finally finished the Wudtone clear coats a week ago and have been waiting (im)patiently for the finish to cure. Ok, so I waited a week. A month would have been better, but hey, who can wait that long?? Anyway after 6 coats of clear the body was looking pretty good. There were a few subtle streaks in the clear finish (I probably put it on too thick) but in general it set strong, hard and flat. The finish wasn't a 'mirror' finish by any stretch but it was, um, shiny. From what I've read this is not uncommon with Wudtone gloss finishes - you get some shine but more work is required to buff it out. Not a problem! With my trusty Stewmac ColorTone Polishing Compounds to hand, I set to work.


I successively applied the Medium, Fine and Swirl Remover to the body using good old elbow-grease and a piece of old t-shirt. My shoulders were aching (god) by the end, but the result was worth it. The finish is quite a deal better than the one I started with. Ok, I admit - it's mirror-bloody-awesome!

The next step is to add a coating of poly to the body. To be honest, I'm pretty happy with the finish as it is, but a few coats of poly will protect the finish a lot better during it's life to come. As I found with Eben's flaming monster, you can't have enough protection on a kid's guitar. It's hard to get a guitar through the doorway when it's on the strap and you've got a peanut butter sandwich in one hand and a laptop in the other. It's basic physics.

Thursday, 8 August 2013

12 String 335 - Vintage 50s Wiring Harness

I got the wiring harness for the 335 wired up today based on the "Vintage 50s Wiring" scheme used by Gibson in the (unsurprisingly) 50s and 60s. This wiring scheme attaches the tone capacitor (and therefore tone pot) to the output of the volume pot rather than the input as is the case for so-called "Gibson Modern Wiring" that is used in all 335, Les Pauls and SGs today.


I'm hoping that this wiring scheme, in combination with my GFS Surf-90 pickups, will lend the guitar a very 50s jangly sound.

Everything went together fairly easily using 500K CTS pots and 0.022 uF orange caps from Stewmac. Because my push-pull CTS pots wont fit through the f-hole in the 335 body, my planned series/parallel and coil tap modifications had to be scrapped for this build. Hopefully in a later build I will be able to explore the plethora of wiring modification possibilities.


At present I satisfied myself with a simple modification to the 50s Vintage wiring scheme to allow the volume pots to operate independently. The problem with both 50s Vintage and Modern wiring is that when both pickups are selected, turning one one of the pickup volume pots to zero grounds out the entire signal from the 3-way switch (including any signal generated from the other pickup). A simple modification swaps the volume pot input and output lugs, placing the pickup input wire onto the pot's swing arm.  When the pot is turned to zero, only the hot wire from the pickup in question is grounded rather than the whole circuit, allowing the other pickup to continue to supply signal to the 3-way switch as normal.

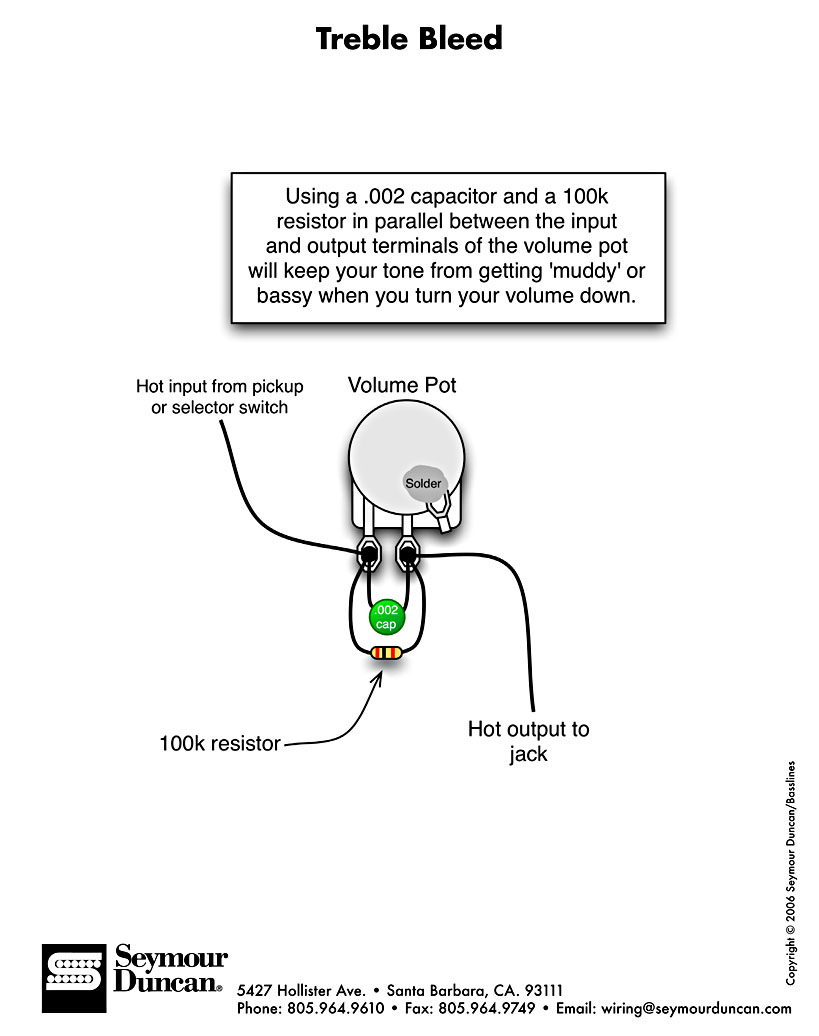
A second simple modification I am considering is the addition of a "treble-bleed" circuit to each of the volume pots so that the high-end jangle is not muddied as the volume is turned down. This simple circuit involves a resistor and capacitor wired in parallel across the volume pot "hot path" to allow high signal frequencies to bypass the increasing resistance as the volume is turned down.


As the pot is turned and the resistance increases, the resulting signal, while attentuated for the majority of the frequency range, is not reduced for the higher frequencies. These higher frequencies stay in the signal and the resulting output retains the high jangly tones even as the volume is rolled off.

Monday, 29 July 2013

BC Rich Avenge - Poly, Poly, Poly

Slow progress on the rockabilly death metal beast that is Eben's hot-rod flamed guitar. We are in the process of applying layers of Minwax wipe-on poly in between homework, music lessons and other after school activities.


I gotta say though, this wipe-on poly is the shit man. It's basically idiot proof - goes on easily with a piece of old tshirt, doesn't seem to run or misbehave, and dries in 24 hours ready for the next coat. A little 0000 steel wool gets rid of any little greebles that may have settled on the surface in between.

We are trying to get to about 10 coats before we finally wet-sand and polish this bad-boy with Stewmac polishing compounds. More updates to come!