Showing posts with label Gibson 335. Show all posts

Wednesday, 30 July 2014

Burley 335: Sanding the Figure

I started sanding the top of my 335 with the Birdseye burl maple top today. Man what a bitch!! I started with 240 grit and quickly realised that this was too coarse - the grit quickly scored deep scratches all over the veneer. This stuff has grain going all over the place so it's very difficult to 'sand with the grain'. I'm sanding top-to bottom like I always do, but this stuff is more like end grain to sand than anything else!

Anyway, I quickly skipped to 360 grit, and this has made things much better - I've been able to remove most of the original scratches from the veneer and the top is slowly getting smooth. One of the big issues I'm now facing is glue spots. I am thinking now that I might like to dye the top veneer, but large patches of glue exist in and around each of the burls. The factory has quite kindly filled the burls with some kind of bog to give the veneer a much flatter surface. Unfortunately, in doing so the area surrounding each burl is one large glue spot (or so it seems).


I'm slowly going around each patch of glue and sanding it out. It's very slow going with 360 grit I can tell you. Here's a couple of patches that I've cleaned up.


I reckon it's going to take me a week just to get the 360 grit done. Still, that's what I signed up for with this guitar building lark, so nothing to do but to revel in it and savour every new piece of wet and dry! It will all be worth it in the end. I'm thinking a darker wood tone for this one now, maybe a caramel or red mahogany with some kind of burst. I'm looking around the interweb for examples to inspire me..

Monday, 23 June 2014

335 Semi-hollow Bass: She's a Stunner!

The 335 bass is now officially complete. The headstock decal went on this morning, and she finally got a fret level and re-dress. Nothing short of amazing now to play. What started out as an ESB-4 kit from Pitbull Guitars is now a rockin' instrument. Now all I have to do is learn a few more bass riffs!


I am so happy with how this kit came out, and oh-so happy with how she feels to play. So much so,  that I am seriously considering building another one. I can see this beauty in trans-black hanging on my wall. Sounds good doesn't it??

Postscript 8th July 2014:
I've just been informed by the good folks at Pitbull guitars that this little beastie has taken out Pitbull Guitar of the Month for July. Woohoo! Thanks guys!

Saturday, 14 June 2014

335 Semi-hollow Bass: 50s Vintage Wiring - Tweaked!

In the process of creating my wiring harness for the 335 bass, I have re-examined how to go about laying out the wiring harness for a semi-hollow build so that it is both simple, and will survive the installation process. For my other semi-hollow builds (the 12 String 335 and the Les Paul Florentine) I used the following circuit. It's a Gibson 50s Vintage wiring scheme, with the independent volume mod added for good measure.


While this orientation is perfect for wiring those big arse oil-caps into small Les Paul control cavities, when you are talking about mounting in a semi-hollow body those capacitors wired "inline" between the volume and tone pots are devilishly hard to secure. You end up attaching wires to one or both ends of the capacitor legs, and then lashing this to another of the joining wires for stability. All in all, it's a hack at best!

Instead, there is actually no reason why the capacitors couldn't be mounted to the back of the tone pots instead. You see this orientation very often in Fender wiring schemes, and in other single volume / single tone configurations. It's actually a very convenient way of mounting the tone capacitors, especially for semi-hollows! Taking the wiring diagram above, it's a simple matter of shifting the capacitor from before the variable resistance in the tone circuit to "after" it instead. The result is electrically equivalent and much easier to secure and install.


In this configuration we need only piggyback the tone caps to the back of the tone pots. No additional wires need be soldered to the capacitor legs, and no lashing is required to secure the capacitor in place. It's so simple and elegant, why the hell didn't I think of it before??

Anyway, the sucker is wired up. With the volume pots at the top and tones at the bottom the wiring harness is surprisingly neat.

Friday, 13 June 2014

335 Semi-hollow Bass: Strings!

The clamps came off the set-neck this afternoon and the strings went on for an acoustic test of the semi-hollow 335 bass. While the action is a little high, I'm really loving how the finish has come out. She looks so awesome - if I do say so myself ;).


Suffice to say, there was more than a little bit of acoustic dum-dum-dumming here in the man-cave once she was all tuned up. I so wish I could play bass! Now it's just the electronics to go. Did I say *just* ? I'm sticking with the original kit-supplied pots for this one (not the larger CTS pots or their ilk) so I'm hoping it won't be as much of a struggle getting the wiring harness into the cavity. First though, I need a wiring harness!!

Wednesday, 11 June 2014

Burley 335: Unboxing

A spanking new kit dropped on my doorstep this morning courtesy of DIY Guitars Australia. It's the new ATH-26, a semi-hollow 335 style kit, topped with a burled, birds-eye maple veneer and powered by two P90s. I had high hopes for how this baby would look and I wasn't disappointed! The top veneer really looks amazing. There will be no dye needed for the top of this baby - some clear coats is all it will take to make her look spectacular.


The grain has been filled in a couple of places (most notably inside the burls) at the factory, and there are a few places where some quite open grain still exists in the veneer. I'll have to find some kind of clear grain filler for these. The rest of the grain on the back and sides looks great, without any visible glue spots or other blemishes. The neck also looks good - with some nice maple grain down it's  length and on the headstock.


The fretboard looks good with no machine marks or scratches. There is a small issue with the width of the neck at the heel - it is a very tight fit into the neck pocket (this is a set-neck kit). In fact it is so tight that I can't get the neck all the way down into the pocket. Looks like I'll have to sand a little off each side of the neck heel before it will reach the bottom. No sweat - at least this will guarantee a tight fit and that's perfect for a set-neck build.


Despite this small issue, all in all I'm very, very happy with the kit and I think it looks awesome - I'm really looking forward to this build!


First thing will be the mock build to make sure everything fits (including sanding the neck heel) and then I'll be able to start the finishing process. I have a real soft-spot for hollow and semi-hollow guitars, especially the 335 body shape. Whist this baby will be the 4th semi-hollow kit I have attempted, it's the very first with P90s. I really can't wait to hear their vintage growl coming from a 335. Total awesomeness!

Tuesday, 25 March 2014

335 Semi-hollow Bass: Amber Burst

This morning I took the plunge and attempted my second burst using ColorTone dye - a so called "poor man's burst". The target of my ministrations was my ES335 Bass (EB-4) from Pitbull Guitars. My first attempt on my Flamed Telecaster build was moderately successful, although I would have liked more distinction between colours.

I prepared the body with a light sand down of 360, 400 and 600 grits. At 600 grit I did a single pass of grain raising using Metholated Spirits, but the maple hardly need it.

This time around I didn't perform a 'trace-dye' on the wood to check for glue spots. I was instead prepared to stop dying if any glue surfaced and perform a sand back to remove it. Amazingly, this Pitbull Guitars kit exhibited no glue spots at all around the binding or veneer join. What a great kit!

The steps to produce the burst were as follows:

Step 1: I wiped clean water over the entire top. This helps the dye take up evenly across the surface and prevents and streak or wipe marks in the dye.

Step 2: Using ColorTone Vintage Amber as a base, I applied this to the entire body.

Step 3: In an attempt to pop the flame maple further, while the first pass was still wet I proceeded to lightly wipe a 70:30 mix of Vintage Amber / Red Mahogany over the top.

Step 4: I applied Red Mahogany to the edges in successive passes, using the Vintage Amber to feather the edges. Several times I used a clean rag to help feather the edges as well.

Here's the result - I'm pretty damn pleased with it!


The edges are nice and dark with the red mahogany bleeding into the flame maple as it reaches for the centre of the guitar. The centre has retained it's bright Amber hue and has not been muddied with brown. With the masking removed from the binding, you can see what a great job the 3M 471 pin-striping tape has done to keep the stain off. I love this 471 tape!!

All in all an almost perfect result - I'm right chuffed with myself. And now for the back, which was completed with much the same technique, although the lack of flame maple veneer made it a little harder to accomplish an even burst IMO. I think it came out OK though. Almost as good as the front.


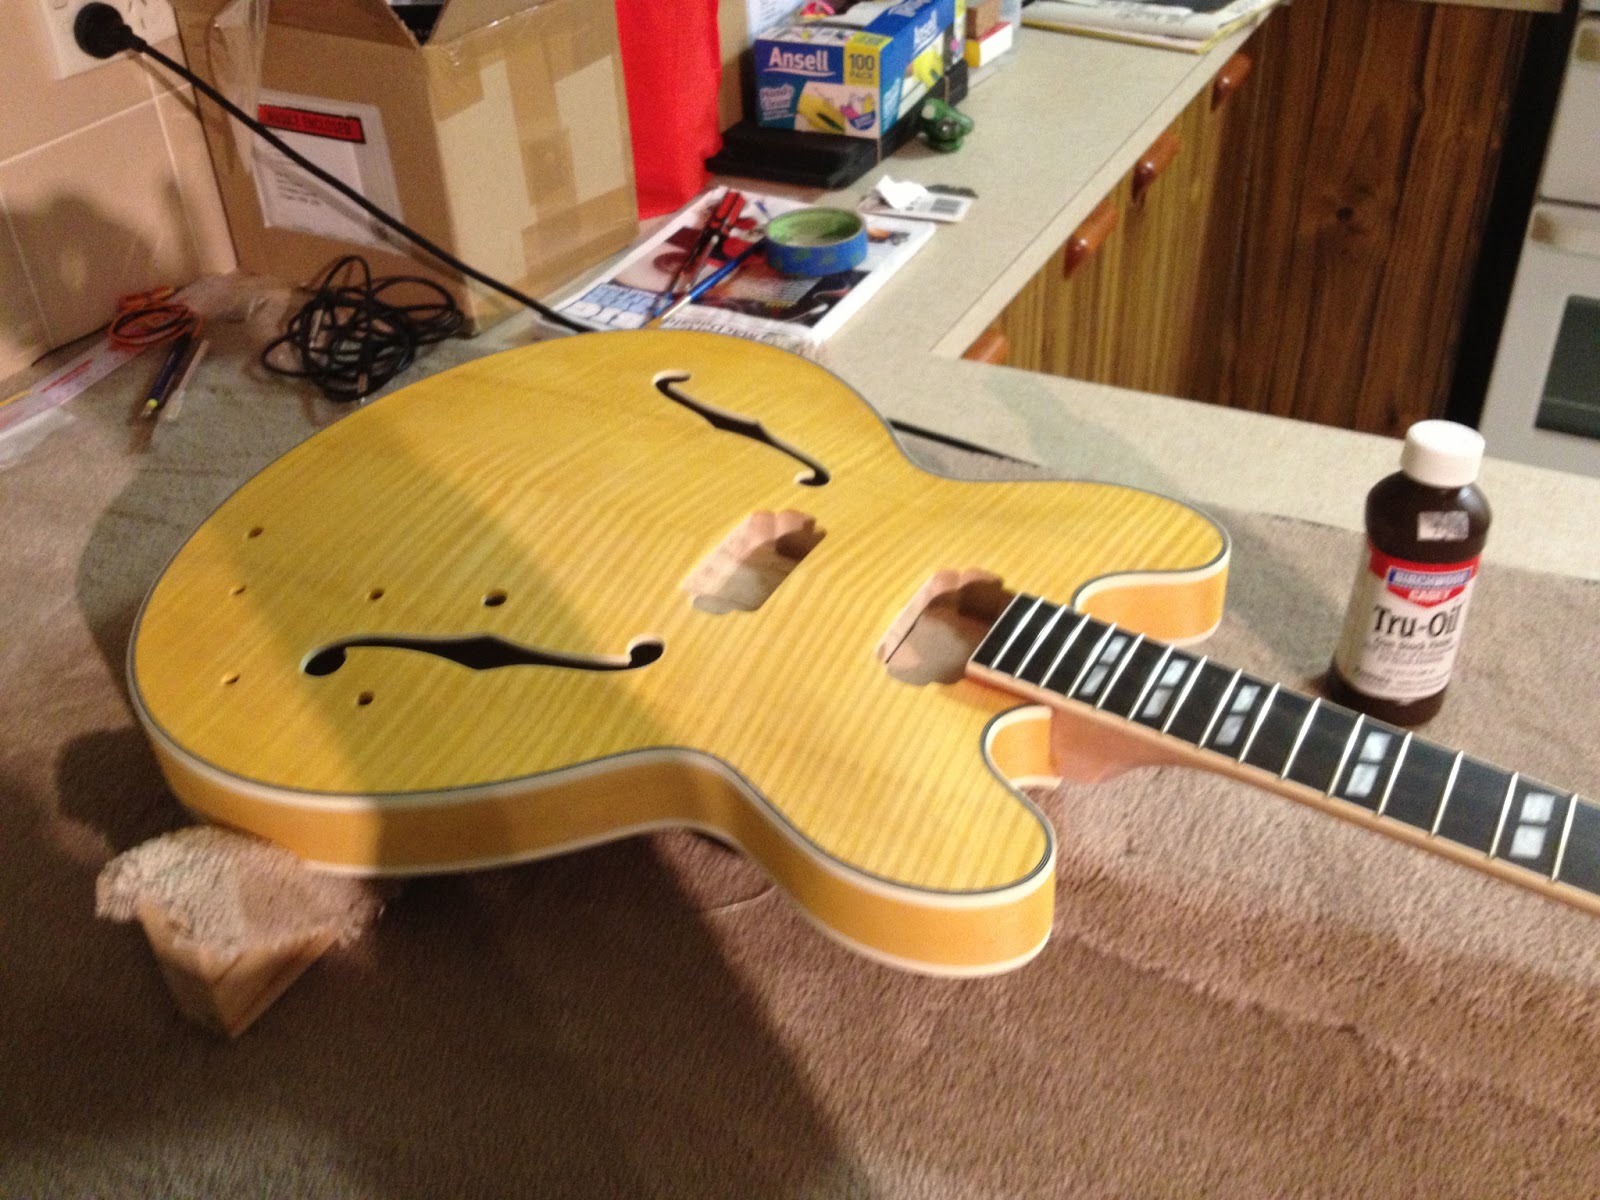
Those of you with a keen eye will notice a glue spot on the heel of the guitar. There are several small glue spots around the sides. After I have applied some Tru-Oil to the front and back to lock in the dye, I'll go back over the sides with the sanding block to get rid of these glue spots. It's a small price to pay for such a perfect kit on the front and back!!

Tuesday, 18 March 2014

335 Semi-hollow Bass: Unboxing & Test Fit

It's been sitting on my shelf since November waiting for the right time to start, but now I'm excited about the 335 bass guitar kit that I've snagged from Pitbull Guitars.


It's an ESB-4 kit with a semi-hollow body, flame maple cap and maple back. (identical in most respects to the ES-1G/ES-1GT 6-string kit). The front of the body has 3-ply binding whilst the back has singe ply. Pretty standard for this style of guitar. It was on the basis of an enquiry from yours truly that Pitbull decided to stock this particular kit. I've been trying to source such a kit for a while, and Adam from Pitbull came through for me. It's a testament to their truly amazing customer service.


Since it was the first of ts kind, the version that I received was the very first production run from the chinese factory. As such there were bound to be a few issues - and there are - but nothing that can't be handled with a little patience.  Firstly the neck pocket isn't really finished, and when positioned in the pocket, a sizable gap exists between the neck heel and the base of the pocket. Nothing a little filing won't fix.


And in the end, that's all it took - a few minutes work with my bastard file to flatten the inside floor of the neck pocket and the neck fit was pretty well perfect. Come gluing time, there will be no issues there.


With the neck pocket fixed, the rest of the mock-up process went reasonably smoothly. The neck alignment was perfect right out of the box, with strings from the bridge sitting straight along the neck.


The second unfortunate teething issue with the kit concerns the fit of the tuning pegs in the headstock. Unfortunately the headstock has been made just a touch too small for the large tuners that were supplied (and which are a signature for this style instrument). With the reduced size headstock, the pegs touch in the middle and cannot sit straight.


There are two possible fixes to this problem: a) to grind a little of the shaft off each peg so that they can straight sit opposite each other, or b) to fill the current tuner holes with dowel and redrill new holes for smaller tuning pegs. I'm leaning towards option a) because it means no complicated woodworking to attempt. The tuning peg shafts won't look as nice this way, but if I don't take too much off no-one will be any the wiser.

So, I think I will see to the tuners before I do anything else, just to make sure the grinding actually solves the problem and the pegs can be screwed into their final position. After that's done the finishing can start! Should be a great build.

Tuesday, 27 August 2013

12 String 335 - It's a Thing of Beauty!

The 335 is finally finished. All agree that the Colortone Amber stain + Tru-oil looks spectacular, as does my choice of tailpiece and GFS Surf-90 pickups. You be the judge!


12 String 335 - Wiring It Up

Finally got to installing the wiring harness on my 12 string 335 today, and let me tell you it was a mammoth effort. Anyone who has tried to do this will tell you that it's a bugger of a job to get a set of connected pots through the F-hole and into place with anything less than a childish tantrum or two.


In the end I sucessfully used the "fish-tank 5mm pipe" method to complete the task. This involves threading pipe through the holes and onto the tops of the pots (and output jack) and then drawing them carefully through the body until they are seated and can be affixed. It takes alot of fiddling as the wires can easily become tangled or trapped between pots and the guitar body, and the pipe can be easily detached from the pots, but finally after 5 attepts and re-starts the components were seated and finger-tightened - job done!


All that was left to do was to add the glorious gold top-hat knobs from Stewmac and then it was off to the ball Cinderella.

Friday, 9 August 2013

12 String 335 - Polishing and Shielding

Great progress today - i *finally* got the polishing finished on my 335 12 string, and I also managed to shield the pickup cavities ready to receive their glorious GFS Surf 90s!

I started the polishing process after having wet-sanding with 1500 grit paper and applying a final coat of tru-oil thinned to 50% with turps. Polishing proceeded in 4 stages, with the first stage being a wet-sand with 2000 grit wet-and-dry using boiled linseed oil as the lubricant. I wet-sanded until the surface felt smooth and sanding marks covered the majority of the surface. The surface wasn't as dull as it probably should have been, but this wasn't unexpected given that I didn't leave all my wet-sanding until the last coat of Tru-oil was applied.

After the 2000 grade wet-sand, I then applied sucessive Stewmac polishing compounds - starting with Medium, then moving to Fine and Swirl Remover to remove the sanding scratches and bring out the shine.


I applied each successive compound using my electric drill and some small (3cm) foam polishing pads I purchased from Aussie site polish-up.com.au.  The shine that resulted was surprising, with the Tru-oil displaying a satisfyingly reflective gloss finish, and a deep translucency that unfortunately shows up every little mistake I made when applying each layer of oil. The flame maple has really popped, and the 3d or "chatoyance" effect as you move around the guitar is fantastic. In short, I'm very happy with how the finish has turned out!


With polishing complete, it was time to turn my attention to preparing the guitar for wiring - notably, shielding the pickup cavities with some dual-sided conductive copper foil. This stuff is great - it comes with stickum on the back and simply lays down like tape (if a little harder to handle). Each strip lays over the strip next to it and the whole thing forms a wonderfully conductive sheet (resistance is effectively negligable).


"chatoyance"
You can even solder onto it! I was able to easily solder wire from the neck cavity to the bridge cavity without any trouble at all. When the bridge is finally installed, i will be able to solder the bridge ground wire to the shielding around the bridge pickup,  and then run another wire from the shielding out to the wiring harness. Exciting times ahead!

Thursday, 8 August 2013

12 String 335 - Vintage 50s Wiring Harness

I got the wiring harness for the 335 wired up today based on the "Vintage 50s Wiring" scheme used by Gibson in the (unsurprisingly) 50s and 60s. This wiring scheme attaches the tone capacitor (and therefore tone pot) to the output of the volume pot rather than the input as is the case for so-called "Gibson Modern Wiring" that is used in all 335, Les Pauls and SGs today.


I'm hoping that this wiring scheme, in combination with my GFS Surf-90 pickups, will lend the guitar a very 50s jangly sound.

Everything went together fairly easily using 500K CTS pots and 0.022 uF orange caps from Stewmac. Because my push-pull CTS pots wont fit through the f-hole in the 335 body, my planned series/parallel and coil tap modifications had to be scrapped for this build. Hopefully in a later build I will be able to explore the plethora of wiring modification possibilities.


At present I satisfied myself with a simple modification to the 50s Vintage wiring scheme to allow the volume pots to operate independently. The problem with both 50s Vintage and Modern wiring is that when both pickups are selected, turning one one of the pickup volume pots to zero grounds out the entire signal from the 3-way switch (including any signal generated from the other pickup). A simple modification swaps the volume pot input and output lugs, placing the pickup input wire onto the pot's swing arm.  When the pot is turned to zero, only the hot wire from the pickup in question is grounded rather than the whole circuit, allowing the other pickup to continue to supply signal to the 3-way switch as normal.

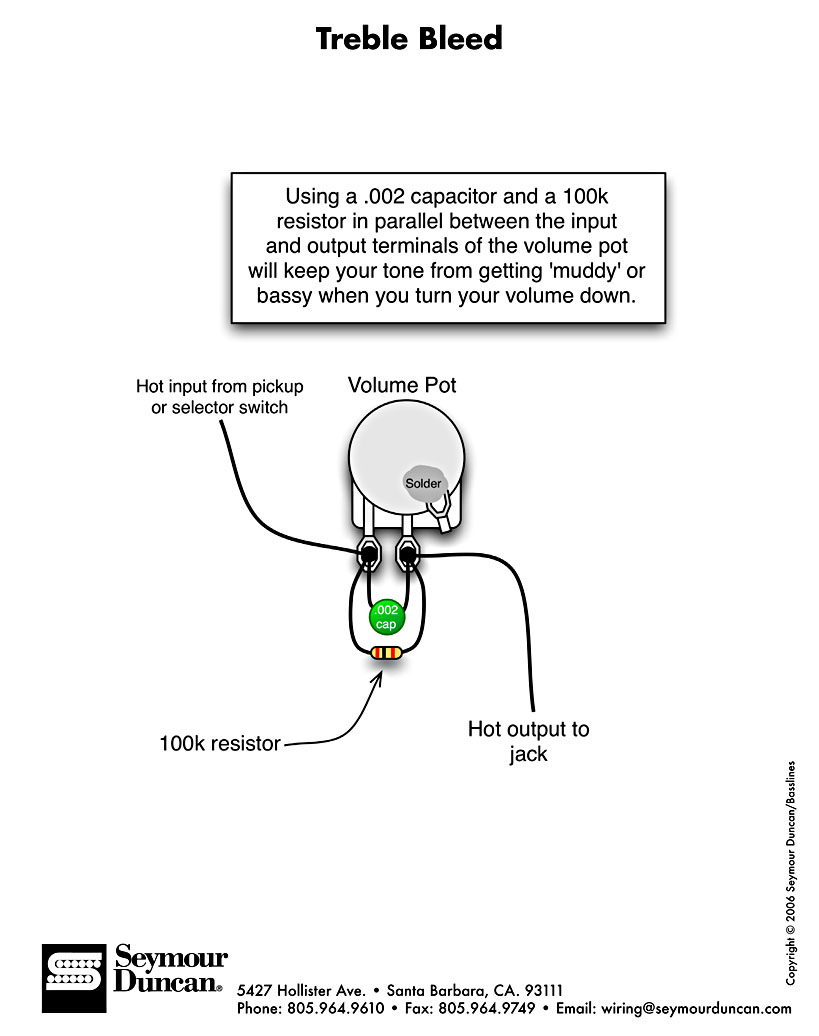
A second simple modification I am considering is the addition of a "treble-bleed" circuit to each of the volume pots so that the high-end jangle is not muddied as the volume is turned down. This simple circuit involves a resistor and capacitor wired in parallel across the volume pot "hot path" to allow high signal frequencies to bypass the increasing resistance as the volume is turned down.


As the pot is turned and the resistance increases, the resulting signal, while attentuated for the majority of the frequency range, is not reduced for the higher frequencies. These higher frequencies stay in the signal and the resulting output retains the high jangly tones even as the volume is rolled off.

Monday, 15 July 2013

12 String 335 - The Hardware has Arrived!

My hardware arrived for the 335 build today; pickups, solid metal humbucker mounting rings, and a trapeze tailpiece all in beautiful shiny chromey goodness.


The pickups are Surf 90's from Guitarfetish (GFS). These have received rave reviews from all quarters, and I'm expecting them to really bring the jangle. These pickups were specifically recommended for a 12 string application by the guys at GFS. Suffice to say I have high hopes for the sound. The humbucker mounting rings are also from GFS, and will require some bending to fit the archtop of the guitar. I love the low profile look to them much better than the bulk of the regular humbucker rings, and it's always better to have real metal rather than chrome plated plastic. I'm going to use them on all my builds in the future!


The 12 string trapeze tailpiece is from Allparts and completes the setup. It's not the flashiest tailpiece around, but it was really hard to find any 12 string tailpieces at all! I do like the simple lines it provides however - it compliments the lines of the flamed maple finish. It's going to look awesome with the strings on.

Once I complete the True-Oil finish (only a final wet sand and a polish to go now!), I have only to drill the holes for the bridge posts, and then all these badboys will find themselves installed. I have ordered a set of Brad-Point drill bits from StewMac, so hopefully they will arrive soon. This build is really nearing the finishing line now, and excitement is growing!

Monday, 10 June 2013

12 String 335 - Wet Sanding Tru-Oil

So, I'm 6 coats of Tru-Oil in and the guitar body and neck are really starting to look nice. The Tru-Oil has darkened the vintage amber (phew!) and is enhancing the flamed figure in the maple very nicely indeed. Seems that I have followed the directions from Bill at Canadianbreed pretty well, and I'm really happy with the results I'm seeing so far.


Only trouble is, as you may remember, I only sanded my guitar top to 360 grit before the dye and oil went on. As a result, the top and bottom of the guitar really don't feel smooth at all yet, despite a slowly building layer of Tru-Oil. Seems wet-sanding is called for, and plenty of it!

And so, it's Youtube to rescue again. Here you will find is a plethora of advice dispensed on the subject of wet-sanding oil finishes, and Tru-Oil in particular. I hesitate however. Every Youtube article I can find concerning wet sanding Tru-Oil, refers to cases involving natural (ie. undyed) guitar bodies. I was worried that the wet-sanding techniques themselves were somehow smoothing the wood underneath as well as the layers of oil when applied to the guitar. If applied to a dyed guitar body, could they damage the underlying dye job?

Nothing for it but to bite the bullet and plunge on! My first step was to wet-sand to 400 grit (with wet-sanding also planned at 600, 800 and 1200 grits). The process involves a copious amount of oil being applied to the body and to the wet/dry sandpaper and then sanding as per standard established wet-sanding techniques (small circular movements, not staying too long in one place). The difference is that you don't have to keep wetting/rinsing your paper; it just keeps ploughing through the oily slurry that is built up on the surface of the guitar. You sand until this slurry becomes rather too thick to be manageable, and then you wipe the whole guitar clean with a soft cloth.


The results of my first foray into this art were pretty satisfactory. Most importantly, the underlying dye was not disturbed by the sanding and the surfaces feel much, much smoother than before (which is great). Holding the surfaces up to the light, however, I can notice a few marks in the finish  which I think I have caused by not using a block to sand. Looks like the grinding of the sand paper edge (at those moments when the paper got a mind of its own) has made some marks. Fortunately, a subsequent coat of oil seems to cover these. Next time I'll be sure and use a sanding block.

Now for further coats of oil to allow for finer and finer wet-sanding. I'm being rather cautious as I absolutely don't want to sand through at this stage. Although the wet-sanding is done using the oil itself (and you would therefore think that the whole process may actually build the finish rather than taking it away) I am going to assume that the wet-sanding process has taken away most of the build that I started with. Consequently, I'll be applying another 5-6 coats at least before I wet-sand with 600 grit. That's another week of oil application folks!