Showing posts with label bass. Show all posts

Wednesday, 25 November 2015

Ricky 4001 Bass: Unboxing & Mock Build

Got a cool birthday present in the mail today - a spanking new RC-4 kit from Pitbull Guitars. I've been coveting one of these bad boys ever since the day Adam & co. announced they were stocking them, and I'm very happy to say that I'm finally in possession of one.

Unboxing the kit from Pitbull Guitars.
As usual, the kit itself arrived from Pitbull in great shape. The three piece body sports some nice grain, has no dents and while there's a couple of tiny glue marks on the front face, it's nothing a little Goof-off and some elbow grease won't fix. There's also a small knot up on the top horn, and while this won't be a hassle if I choose a solid colour, it may resist stain if I go that way.

Three piece basswood body has some killer grain happening.
The cavity and neck routes all look great, and the neck pocket fit is good and tight. The neck itself is nice and straight, and the grain on the rosewood fretboard looks amazing! All in all I'm very happy with the fit and finish from Pitbull.

The grain on the rosewood fretboard is also really awesome.
The mock build went together reasonably painlessly, with only the location of the bridge still giving me a few headaches. This time around the Stewmac fret position calculator was of minimal help because of the non-standard bridge type on this kit. I think in the end I'll take a guess at the position given the bridge's similarity to the standard Fender bass bridge.

Mock build without the bridge is just a neck.
Ever since I planned the Stone Roses Tribute build based on a Pitbull Guitars RC-1, what I *really* wanted to do was a bass. It was Manny's Rickenbacker 4005 that was the original inspiration for the tribute build, so yes - a 4001 Pollocked bass is something I've dreamt about for some time.

Mani's Pollocked Rickenbacker 4005.
Thing is, now that I see this kit and the amazing grain on the body, I'm very conflicted. Should I really cover all that lovely grain up with paint? I've always loved the 4001 Fireglo and blue burst models and would kill to own one, so the idea of doing a burst on this kit is very appealing to me.

A Blue-burst Rickenbacker 4001. A Beauty to Behold.
What a hard choice! It's something I will ponder in the days to come. I may well try the blue burst at first, with the Pollock as a good fallback option if I don't like the result. Hmm, choices...

Saturday, 21 November 2015

Jazz Bass: Unboxing and Mock Build

Another day, and another new build - this time from my stack (that never seems to get any smaller ;) ). It's a Pitbull Guitars JB-1 styled on the Fender Jazz bass - a kit i picked up during the birthday sale way back in September 2014!

Finally cracking the box open, the kit looks in good shape, apart from a split at the heel of the body where two of the basswood pieces have joined. It's quite possible that this may have resulted from the kit's long stay in the stack.

Unboxing the Pitbull Guitars JB-1 kit.
A split in the heel at the body join
Far from a game changer, the split will be easily filled. What it may mean though, is that this kit is destined for a solid colour. To be honest I was leaning towards a solid colour anyway. There's little to no grain on show here and besides, I've also got an ash JBA-1 in the stack and that will be much better for stain!

As with all Fender-style kits, the mock build went together very quickly. The only hassle was finding the correct position and angle for the bridge. The problem was I couldn't use the outside tuners to hold the strings down the neck, owing to not wanting to push the tuner bushings into the headstock this early in the game. Without the tuners, I had to resort to a clamp on the headstock, and that made getting the string lengths equal (and therefore a straight bridge) very difficult. In the end I made it, as you can probably imagine since the photo below doesn't show a smouldering mess.

Mock build complete, bridge placed correctly, and ready for sanding.
In all honesty, if I was to voice a personal preference out of the various Fender solid body bass models, I would go for the P-Bass. It's the model Dee Dee Ramone used after all, and the kooky control plate on the jazz bass just always threw me for a loop. I know it's a styling choice carried over from the Jaguar, Mustang, even the Jazzmaster and it's ilk, but I like the P-Bass continuation of the scratch plate much better. Having said that, now that the mock build is together I'm pretty pleased with how it looks. I still haven't decided on colours - both body or scratchplate  (I'm even tossing up whether a black control plate would look good) - so that decision can be mulled over while I get the sanding done.

Next job though - shaping the headstock!

Monday, 23 June 2014

335 Semi-hollow Bass: She's a Stunner!

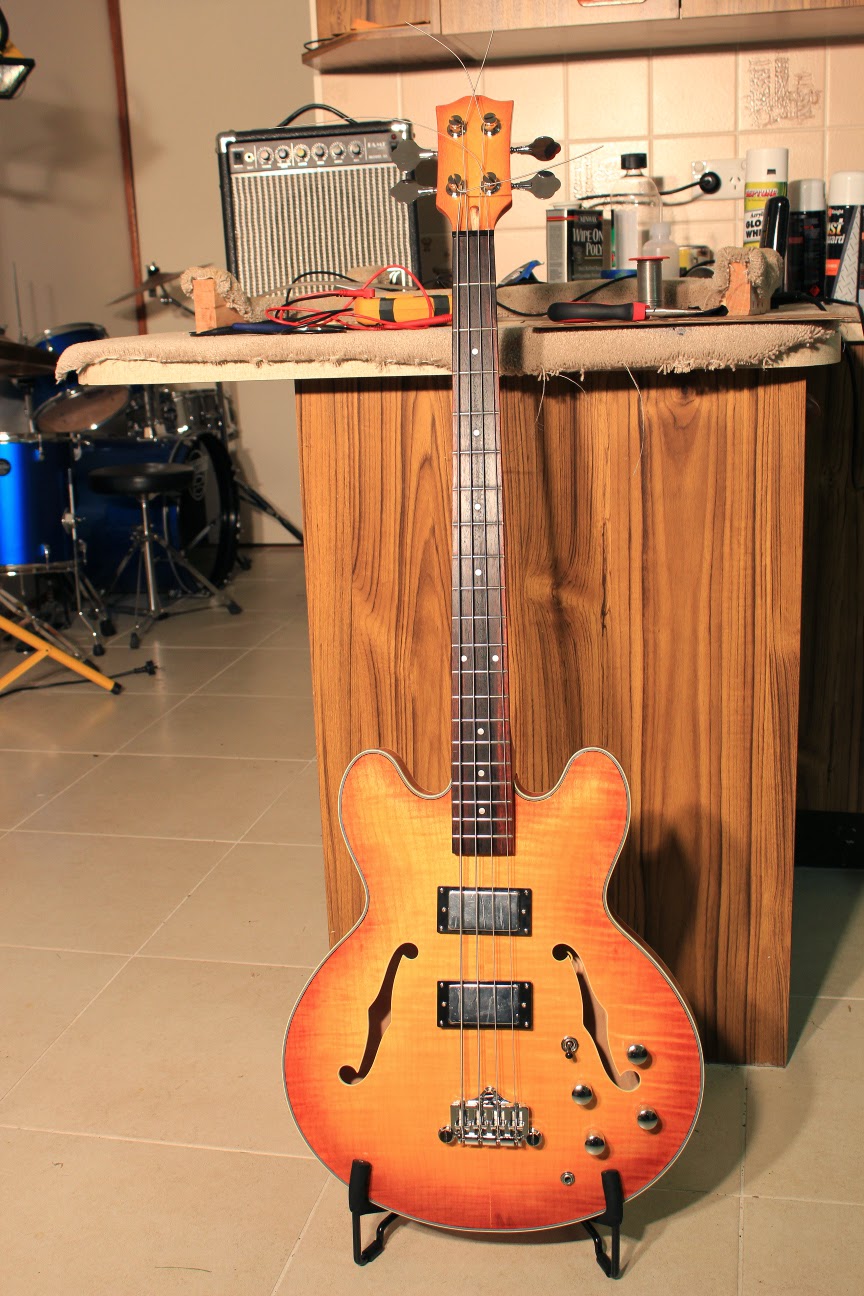
The 335 bass is now officially complete. The headstock decal went on this morning, and she finally got a fret level and re-dress. Nothing short of amazing now to play. What started out as an ESB-4 kit from Pitbull Guitars is now a rockin' instrument. Now all I have to do is learn a few more bass riffs!


I am so happy with how this kit came out, and oh-so happy with how she feels to play. So much so,  that I am seriously considering building another one. I can see this beauty in trans-black hanging on my wall. Sounds good doesn't it??

Postscript 8th July 2014:
I've just been informed by the good folks at Pitbull guitars that this little beastie has taken out Pitbull Guitar of the Month for July. Woohoo! Thanks guys!

Wednesday, 18 June 2014

335 Semi-hollow Bass: Sound Demo

OK, so for those of you interested in how this semi-hollow beast sounds, I have done a quick sound demo. Please excuse the crap playing. The bass is being played through a Fender Deluxe 112 guitar amplifier with no additional pedals or effects other than a bit of reverb provided by the amp itself.


I'm certainly no bass player, but I gotta say, I love the way this baby sounds. Deep and booming, yet very clear and crisp. It looks so awesome, and sounds so good, I'm sorely tempted to make myself another one! I never knew how much fun playing the bass could be.

I've still got the headstock decal to go before I call this one finished, so hopefully that will all be done and dusted by the weekend!

Tuesday, 17 June 2014

335 Semi-hollow Bass: All wired up

OK the wiring harness went in without a hitch today. It took all of 20 minutes to get the pots, output jack and 3-way switch into the body and the nuts tightened down. It's a new record! Third time building a semi-hollow has sure honed my skills.


Anyway she's looking really nice now and she sounds amazing through my solid-state Fender guitar amp. All that is left to do on this baby now is a fret level and re-crown, create a suitably awesome custom truss-rod cover, and stick my headstock decal on.

Saturday, 14 June 2014

335 Semi-hollow Bass: 50s Vintage Wiring - Tweaked!

In the process of creating my wiring harness for the 335 bass, I have re-examined how to go about laying out the wiring harness for a semi-hollow build so that it is both simple, and will survive the installation process. For my other semi-hollow builds (the 12 String 335 and the Les Paul Florentine) I used the following circuit. It's a Gibson 50s Vintage wiring scheme, with the independent volume mod added for good measure.


While this orientation is perfect for wiring those big arse oil-caps into small Les Paul control cavities, when you are talking about mounting in a semi-hollow body those capacitors wired "inline" between the volume and tone pots are devilishly hard to secure. You end up attaching wires to one or both ends of the capacitor legs, and then lashing this to another of the joining wires for stability. All in all, it's a hack at best!

Instead, there is actually no reason why the capacitors couldn't be mounted to the back of the tone pots instead. You see this orientation very often in Fender wiring schemes, and in other single volume / single tone configurations. It's actually a very convenient way of mounting the tone capacitors, especially for semi-hollows! Taking the wiring diagram above, it's a simple matter of shifting the capacitor from before the variable resistance in the tone circuit to "after" it instead. The result is electrically equivalent and much easier to secure and install.


In this configuration we need only piggyback the tone caps to the back of the tone pots. No additional wires need be soldered to the capacitor legs, and no lashing is required to secure the capacitor in place. It's so simple and elegant, why the hell didn't I think of it before??

Anyway, the sucker is wired up. With the volume pots at the top and tones at the bottom the wiring harness is surprisingly neat.