It's crunch time for Jeremy's Les Paul build - today's the day that the front veneer receives its colour. After weeks of sanding, from 180 through 240, 320 and 400 grits, the body is finally ready to be dyed with Colortone dye. Before the dye could go on though, the grain had to be raised, and that meant several applications of a wet rag to swell the fibres followed by a light sand with 400 grit to cut them off again flat. All in all it took 4 such cycles to get the surface nice and smooth.
With that out of the way, the Colortone dye could be applied with impunity. I started by wetting down the whole surface of the guitar. This makes the first dye pass go on much more evenly; reducing the risk of the dreaded tide-lines forming. This was closely followed by the colour layer - Colortone Lemon Yellow. My god it was bright!
 |
| Layer 1 - Colortone Lemon Yellow. |
I made a few passes with the Yellow to maximise the amount of pop from the flame maple figure. Despite my best efforts, including using a clean wet rag to try and drag colour out of the surface grains to maximise contrast, the flame figure was still only subtle at this stage. The next colour to go on, and the start of the burst proper, was Colortone Vintage Amber. In the beginning the contrast between Yellow and Vintage Amber was again very subtle, but the Amber did help to enhance the contrast with the flame even more.
 |
| Layer 2 - A subtle burst of Colortone Vintage Amber. |
Next came the Colortone Red Mahogany layer. Using a combination of Vintage Amber and clean rags to blend the Mahogany into the previous layers, the results were really starting to take shape. Particularly pleasing was the way the flame figure took on the darker tones of the Mahogany when the colour was applied in an area and then taken off again during the 'merge'.
 |
| Layer 3 - Colortone Red Mahogany. |
Lastly came a little Colortone Tobacco Brown to darken up the edges. To be honest the Tobacco didn't have as much of an impact as I was expecting, but I think by this stage the veneer was well and truly saturated and was refusing to take any more colour.
 |
| Layer 4 - Colortone Tobacco Brown, but to little effect. |
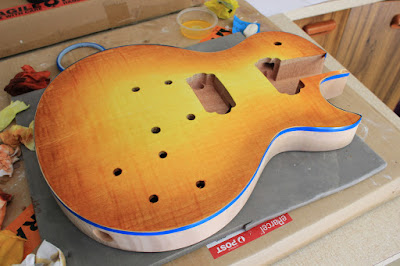
All in all a pretty satisfactory burst. Except, that is, for the fucking glue marks along the top edge that made their sudden appearance half-way through the Red Mahogany layer. I could have cried when I saw them materialise out of thin air. At the time there was nothing for it but to finish the burst and leave the problem to be fixed later.
 |
| Glue spots. Where the fuck did they spring from?? |
So what to do? Well apart from weeping into my after-lunch coffee, I let the surface dry under the fan and pondered my next steps. Armed with some friendly and poignant advice from the forumites at the
BuildYourOwnGuitar forum, I grabbed my wire brushes, mixed up a 50:50 concoction of Vintage Amber and Red Mahogany and carefully set to the glue spots. The idea was to scratch each spot with the wire brush, pop some dye over the spot, and then blend it in with the rest of the burst. After 3 passes of this process, the burst had darkened substantially but the glue marks were a lot less obvious then previously.
 |
| Mischief managed. Wire brush an extra dye to the rescue. |
If you know where to look you can still see the glue spots faintly lurking behind the finish. But really it's a hell of a lot better than when I started. I'm tempted to stop here and call it a day. No point tempting fate too far! I'll see how I feel tomorrow when I colour the rest of the body, but I'm pretty happy with how she looks right now.


No comments:
Post a Comment