Showing posts with label Guitar Builder Store. Show all posts

Wednesday, 26 November 2014

Surf Monster Telecaster: Done and Twangin

Well here she is - the Seafoam Green Telecaster! I put the finishing touches on this build today and I couldn't be happier with how she's turned out. The finish, composed of MTN94 spray colour and auto acrylic clear coats, looks about as close to a showroom job as I think I am capable of. I think she looks amazing. The Montana Colors MTN94 "R-6027: Luminouse Green" is just a perfect interpretation of Seafoam - I just love it. A big shout out to Harry Aznavoorian for steering me onto this colour in the first place!


I went with a standard white pickguard to give the whole thing as much of a vintage feel as I could. The neck and headstock is finished in clear Wudtone neck finish and feels nice and smooth to the touch. It's beautiful and playable. On the fretboard I've got Dr Ducks Axe Wax and nothing else. I added a set of roller string trees too. I really like the look of them, and hopefully they will lead to fewer string breakages.


The GFS Professional Series Vintage '63 pickups sound really nice. I went with the "Vintage Wound" bridge pickup, and I think I made the right decision. The question everyone is asking though, is do the GFS Professional '63s sound better than the Toneriders Hot Classics that I used in the Ash Telecaster? Well they both sound really great, and both completely different! The Toneriders are hotter and rockier, whilst these GFS baby's are twangier and surfier (if that makes sense). They actually sound perfect for what I wanted for this guitar! I'll try to get a sound comparison of the two posted soon so that you can decide for yourself.
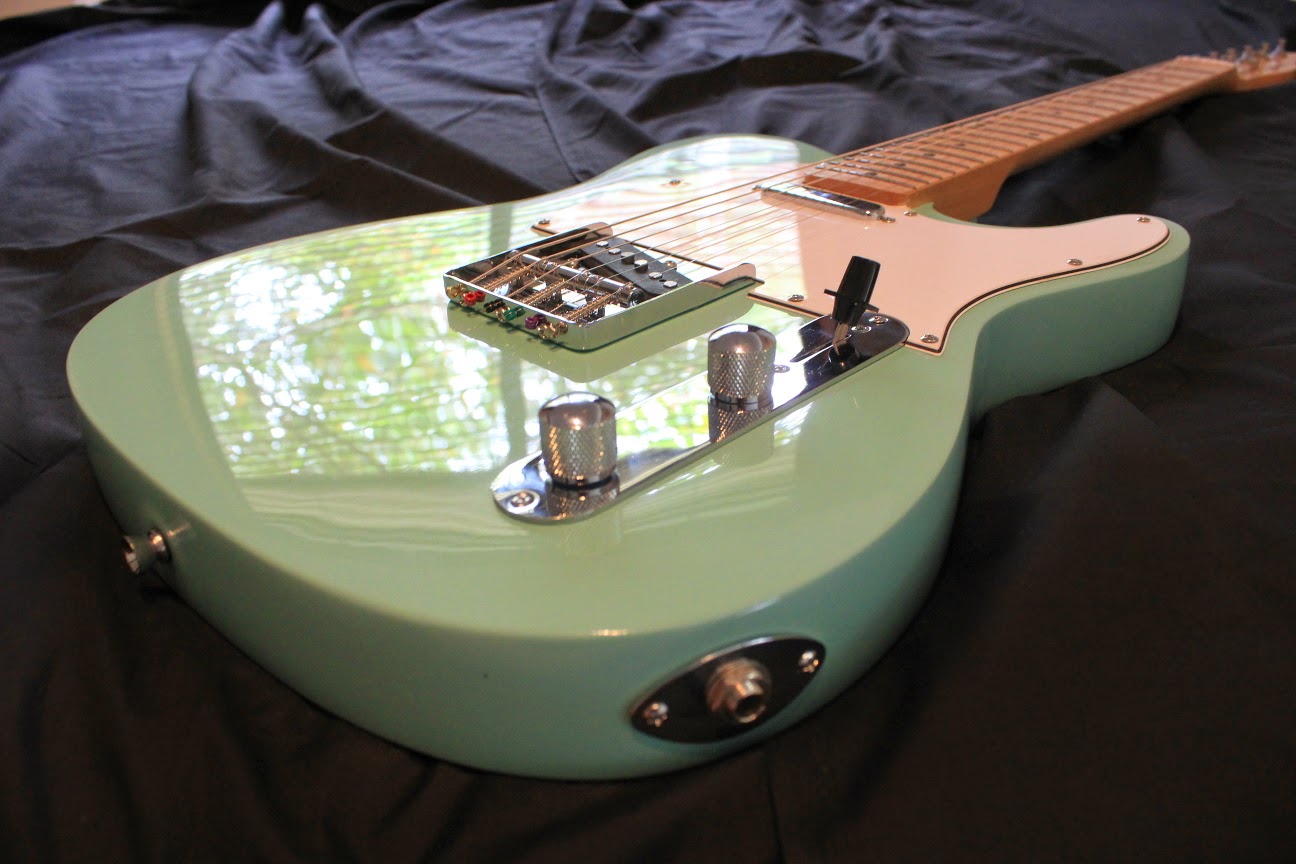


All in all an amazing result given my limited skill set. I'm really loving these painted finishes at the monent. First the Johnny Ramone Mosrite and now the Surf Telecaster - and both look amazing. I'm already planning my next solid colour finish. Surely it is time for some more hot rod flames?

Monday, 24 November 2014

Surf Monster Telecaster: Polishing

After the longest finishing time ever, my seafoam green Telecaster got its final wet-sand and polish today. First, I started with 600 grit and wet-sanded the surface down to remove the majority of the orange peel. Then it was on to the 1500 grit and the 2000 grit to complete the job. With the wet sanding done, it was on to the Meguiars polish.

I apply the polish with a square of t-shirt material, and then take it off again with a clean piece.  I began with two rounds of Meguiars Ultimate Compound, and then followed this up with a final round of Meguiars Scratch-X 2.0. Couldn't be simpler.


As usual, the results are just awesome (if I do say so myself ;) ). My arms were aching by the end of it, but I love how the Meguiars brings up the acrylic clear coats. Now with just the shielding and the electrics to go, I should be rocking on this bad boy by the end of the week. I'm excited to hear how those GFS 63' Vintage pickups sound!!

Postscript 24/11/2014
In a fit of further productivity, I also got the shielding completed. Gotta love that "Slugga" tape from Masters :). Nothing stopping me from wiring this sucker up now :).


Thursday, 16 October 2014

Surf Monster Telecaster: Clear Coats

Well, for the last few weeks I've been meaning to get back to the seafoam green telecaster. I'm in the process of applying acrylic clear coats over the MTN 94 colour coats, but there was the Mosrite to get finished, and then my holiday. I've had two coats of acrylic clear on the body for quite some time now, but today I finally got the chance for a third coat.


I'm really liking the way it's looking. Take it from me, it looks much better in the sunlight - the photo is a little dark. I'll try to post a better picture in the next update.

Anyway, after this clear coat hardens, I'll level it with some 800 grit wet and dry, then give it a final coat ready for cutting and polishing. I'm loving my outdoor heater turned clear coats curer, It makes a tedious job very easy. I never managed the patience required to let the acrylic clear coats cure on their own...

Friday, 8 August 2014

Surf Monster Telecaster: Colour Coats Take #4

Well, yet another clear coat fail on the Surf Monster Telecaster. That makes 3 attempts so far, although the blue dye job can't really be classed as a "fail". The first coat of acrylic clear onto the Linz Iceberg didn't crack this time, but it did discolour the paint. Damn you to a fiery hell! The verdict on these Ironlak spray paints? They are total fucking shite! Don't use them, don't buy them, don't even mention them in polite conversation. You will be dissapointed - that's an Ironlak guarantee.

And so, it was with a heavy heart and aching arms that I yet again sanded back the basswood telecaster body, applied primer and was ready for colour. On the back of a comment from Sydney luthier Harry Aznavoorian, I decided to give the Montana Colors MTN94 range a try. Given that Harry has had similar problems with the Ironlak (Linz Iceberg too as it turns out!), and has reported good success with the MTN94, the choice was a no-brainer in the end. Thanks Harry!


And so, 2 cans of Montana's finest arrived on my doorstep this morning. I ordered the same colour as Harry (he too is doing a "Seafoam Green" build) - the MTN94 "R-6027: Luminouse Green". The colour looked great on the top of the can, so there was nothing for it but to get the colour on to the body and see how it looked!

The spray cans are advertised as low pressure - and they certainly are. The paint comes out nice and easy and there are no volume issues to worry about. I'll need to do several coats (probably 3 coats at current reckoning) but that's better than the paint going on too thick like that Ironlak shit did.The paint is matt, and actually looks really nice sitting on the body!


All in all I think the new colour looks really great - closer in fact to the original colour that I envisaged for this build. It isn't "Teal" like the Ironlak turned out to be, and it's much closer to the traditional "Seafoam" colour of the 50s and 60s Strats and Teles. Another couple of coats and everything will be great. The photo, unfortunately, does not do the colour justice - these blue/green hues are notoriously difficult to photograph.

Now let's cross our fingers and hope the clear coats go on without incident! I'm having good success with the Johnny Ramone Mosrite clear coats, so let's hope everything will be fine...

Sunday, 8 June 2014

Surf Monster Telecaster: Seafoam v2.0

The first coat of seafoam green went on to the Surf Monster Telecaster v3.0 today. The primer levelled out nicely with 800 grit sandpaper and the first coat of seafoam green (in truth Ironlak 'Linz Iceberg' from Ozgraff) went on without a hitch. Looking at it now I'm really glad I went back to my original vision for this Tele.


This time around the Ironlak didn't splutter and drip like last time and I was able to lay down a nice thin, even coat. The secret was a finer spray nozzle - also courtesy of Ozgraff. The original supplied nozzle on all the Ironlak cans was ridiculously high volume, and I believe that this led to the coats being way too thick the first time around. I guess a high volume jet is just what the hoodies down by the train tracks need to realise their singular works of art, but it's not so good for creating nice even guitar colour (at least in my hands).

I've just about convinced myself that the the cracks in my first clear attempt was due to the paint underneath being way too thick (and therefore not dry or hard enough). I could be wrong (I'm certainly no expert) but this time around everything feels more normal; more like previous builds. I guess we'll see how it finishes up, but I'm quietly confident everything will turn out well. Famous last words!!

Wednesday, 4 June 2014

Surf Monster Telecaster: Rebirth

Well, what can I say? After two sleepless nights contemplating the direction my Surf Monster Telecaster had taken, I have reconsidered my choice of a blue-burst Colortone finish, and have instead flipped back to the original inspiration: seafoam green all the way. There was nothing wrong with the blue dye job, per se. But the longer I stared at it, the more I realised that it just wasn't what I wanted for this build. What I wanted was a vintage inspired surf guitar!

And so, without further ado, out came the sandpaper to smooth  the existing layers of acrylic clear and on went the primer again. Hmmm, primer over lacquer I hear you say?? Will that be OK? Well, people use lacquer as a sealer all the time. So, um, yeah what the hell - I'm sure it will be fine! In for a penny and all that, right?


I got two coats of primer on today and I'll wait for this to cure for a day or two before I sand it down with 800 grit and give it a final coat.

Looking at the white body again, I know I've made the right decision. I really liked the original seafoam paint colour, and it was only in a fit of pique over my massive clear coat fail that I decided to change directions with the finish. Well, I'm putting that fail well and truly behind me! Now it's onwards to luthier glory...

Wednesday, 21 May 2014

Surf Monster Telecaster: 3rd Coat of Acrylic Clear

The acrylic clear coats are slowly building up on the blue telecaster now and she is looking better and better with each coat. I have now completed 3 coats (with 3 passes each) over the last 3 days. The colour is looking great! It's just about time for the first sand back to level up all the surfaces in preparation for a final coat.


I'm going to try and wait the full 30 days on this one before I attempt to wet sand and polish the acrylic finish. I've never been able to wait the required curing time in the past, whether it be for lacquer, Tru-Oil, or poly finishes, but I must have more patience. Yes I must!! It really helps the finish the more curing time you give it. Here's hoping I don't get too bored in the coming month...

Friday, 16 May 2014

Surf Monster Telecaster: Get's a New Look

Well, the Surf Monster Telecaster is no more. After a rather epic clear coat fail that also claimed the solid paint job underneath, it was time to re-think. I decided to go with Blue Colortone dye with a darker burst. The grain on this body really is too good to hide under a layer of paint.

I sanded the body back to bare wood and went up through the grits to 400. I filled the pores with Timbermate and then sanded to 600 grit. The dye went on shortly after. Interestingly, there are a few places where the underlying grain didn't want to take much colour. Maybe the sanding to 600 was responsible. I'm not sure, but I like the look a lot.


The photos show the finish after the first coat of Acrylic clear. The colour is not really tru-to-life. The blue is a little darker and fuller, but still looks pretty damn good here. I think it's going to come up nicely. I might be tempted to add some blue dye to a few of the clear coats to add a little more colour. I'm not sure yet. We'll see how it is looking after a couple more clear coats.

Wednesday, 30 April 2014

Surf Monster Telecaster: Paint Going On!

The Surf Monster Telecaster is really looking like something now. I sanded the body down to 400 grit, filled the pores with Timbermate and then sanded again down to 800 grit. Smooth as a baby's wassname. I didn't take a photo, but the wood looked really nice with the pores filled. Some really nice grain there. Looked almost like ash or alder - if this stuff is only basswood then i'll be buggered. Very nice! I admit that I did stop for 15 minutes to debate whether to change the finish to a stain, but I decided to forge ahead with the original plan.

After the sanding I hit the body with 3 coats of white primer, wet sanding the small imperfections with 1200 grit after each coat. No spray booth here in Holgate, so unfortunately the odd small bug got stuck in the finish. At one stage I did the unthinkable and tried to get rid of the bug with my finger in the wet finish. That's a paddling...! Anyway, with the sanding between coats it eventually came up very nice and smooth.


After the primer, it was time to shoot the colour. So far I've got one coat of Ironlak 'Linz Iceberg' on there and it's looking pretty sweet. A little too much colour for a perfect seafoam green, but I'm pretty darn happy with it anyhow! Should look great with the simple plain white pickguard. Or should I swap it out now for a perloid one??


There were a few issues with the first coat. Unfortunately, the Ironlak's spray can nozzle was spitting out drips like you wouldn't believe. These will need to be sanded out before the next coat. I have some replacement nozzles here (low volume thin line ones) so I may try one of them with the next coat, although a thin line nozzle really isn't the best for this application. I'll also sit the can in warm water for 10 minutes before spraying to help with the atomization.

This week I also received a set of GFS 63 Tele Vintage Wound Professional Series Pickups for this baby from Guitarfetish. Can't wait to get them in and hear what they sound like. Before that can happen, there's acrylic clear coats, the long wait until it cures, and the hours of buffing to get through.

I've also got 52 Tele Vintage Wound Professional Series Pickups waiting to go into the Flamed Telecaster, so it will be great to hear the difference between them!

Tuesday, 1 April 2014

Surf Monster Telecaster: Shaping the Headstock

Time to shape the headstock on the Surf Monster Telecaster. Thankfully, this task is made easy by our old friend the inter-web! Many of the Fender headstock shapes can be found here: http://pdfcast.org/pdf/fender-headstocks. This pdf file contains headstock templates at a 1:1 scale. All you need to do is print out the page you need (make sure you use 1:1 scale) and off you go.

Alternately, if you are having trouble accessing pdfcast, templates can be found in a number of other places. Here are a couple of other pdf documents for Fender headstocks, both hosted by Google:

Google GuitarPlansCollection link 1
Google GuitarPlansCollection link 2

With the PDF in virtual hand, I decided to use the 'modern' Telecaster design shown below as the basis for my headstock, as it's the one from the pdf that most closely aligns with my headstock blank.


Anyway, a quick trip to the laser printer, printed at 1:1 and everything was ready to get the shape traced on to the blank. You can see that the blank doesn't quite match the traditional shape towards the bottom where it meets the neck. The best I could do was to line up the tuner holes and take it from there.


Using a clutch pencil, I carefully traced around the cutout giving a guide for the jigsaw. The corner near the lowest tuner hole (where the neck meets the headstock) will have to be rounded off some to approximate the original shape, but otherwise it looked pretty good.


And then came the east bit! Using the jigsaw I cut around the design - staying reasonably close to the line, especially in the concave sections. Why especially the concave sections? Well because I don't have a bobbin sander! Once the cut was completed, the convex portions of the headstock were easily finished off down to the line on the belt sander. Unfortunately the concave portions could suffer no such luxury and had to be finished off using a bastard file and 180 grit sandpaper.


In the end it all came out nicely and the whole neck is now ready for some sanding and some Wudtone neck finish.Still deciding whether to go with the Vintage Yellow Wudtone neck kit, or the colourless finish over Vintage Amber Colortone dye. Hmmm decisions, decisions...

Monday, 31 March 2014

Surf Monster Telecaster: Test-Fit

Today I managed to complete the test-fit for the seafoam green telecaster I'm currently building.  As you may have read in the threads for my other kit builds, it is very important to get everything on your guitar kit fitting together nicely before you start the finishing process. If you skip this step, chances are you'll reach the assembly steps of the build with some woodworking that needs to be done. When that happens, say goodbye to the pristine finish you spent weeks getting perfect!

Anyhoo, the kit from Guitar Builder Store Australia went together without a hitch using the supplied bridge, scratchplate and control cover. There was no woodworking to be done at all!


In particular, the neck fit was very good, and no work needed to be done at the bottom of the neck pocket to better fit the neck heel. Awesome! Another surprise was the scratchplate which fit snuggly around the base of the neck; again without any adjustment necessary! All-in-all I'm very, very happy with how this kit has fit together. I can't fault it - kudos to GBSA!


With the neck screwed in, it was a very simple process to position the bridge to get the high and low E strings running straight up the neck to the nut and sitting equidistant over the neck and bridge pickups. The bridge pickup in particular aligned perfectly with the E strings sitting directly over their respective pole pieces. Brilliant!

With this done, it was a simple matter of drilling all the screw holes, tightening everything down, and I was done. Nothing to do now but to shape the headstock and then get the body ready for it's coat of seafoam green gloss acrylic.

I'm staying with all stock hardware on this one, including the pickups - something I've never done before. I can't wait to see how she plays! 

Friday, 28 March 2014

Surf Monster Telecaster: Unboxing

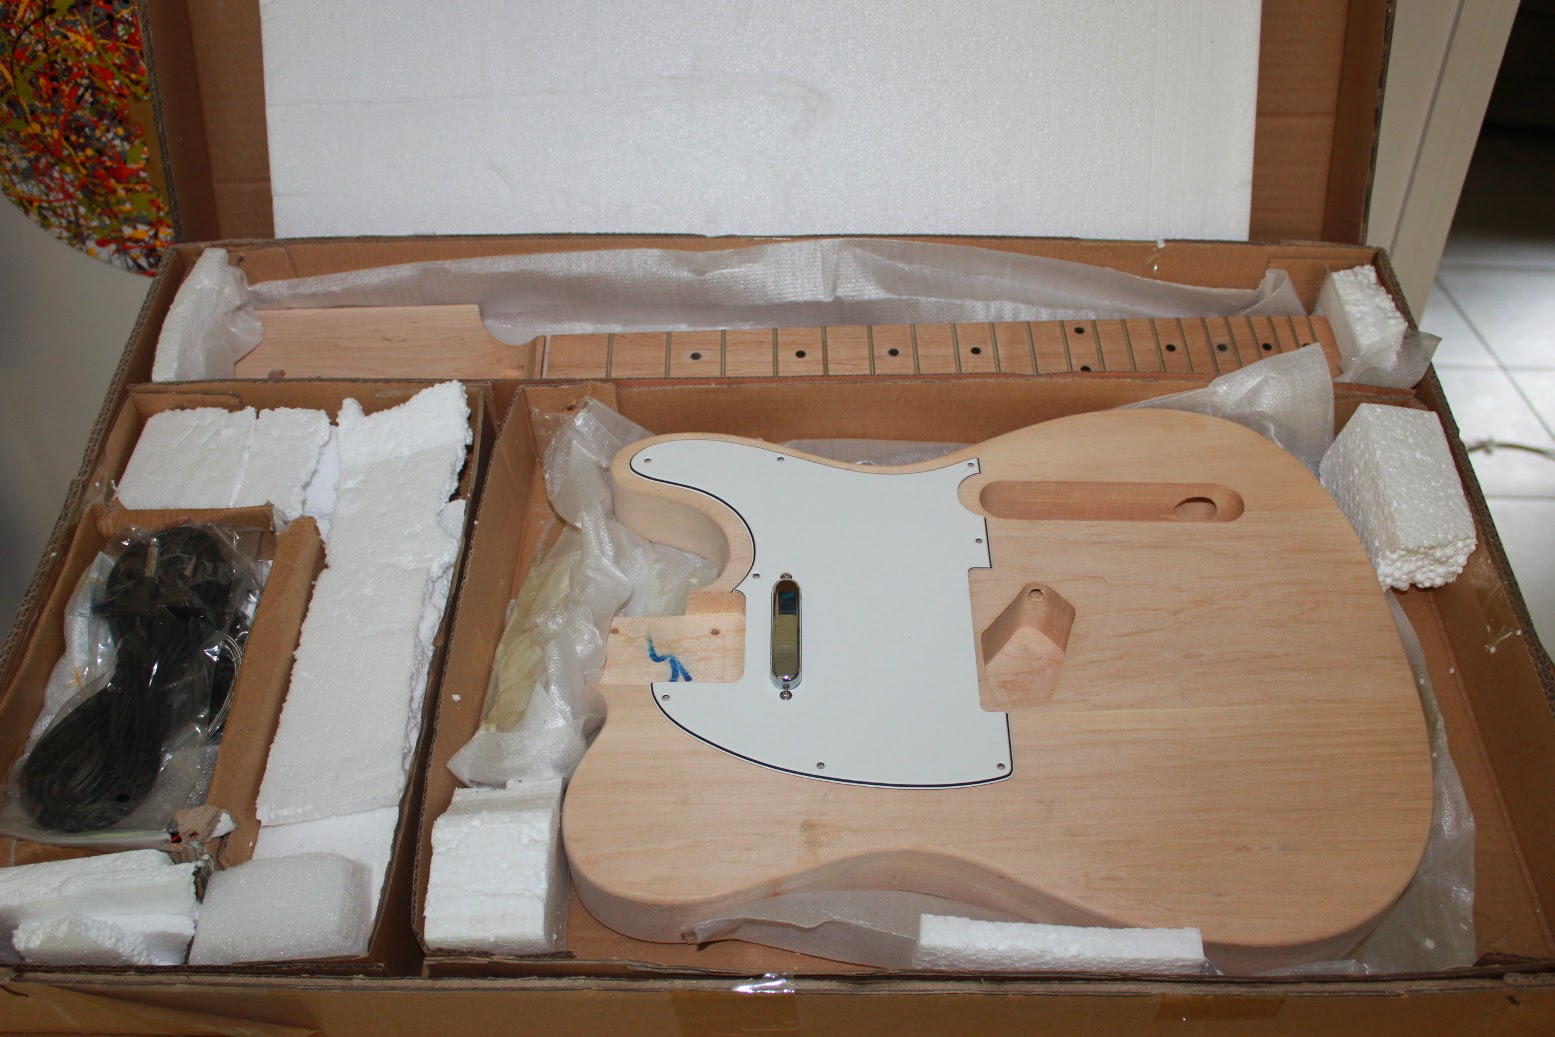
I got a nice surprise in the mail this morning - a Telecaster kit from a new Australian guitar parts site: Guitar Builder Store Australia. It is always so exciting to received new guitar kits in the mail! I got the kit at a bargain price that has subsequently been increased by $30, so I am counting myself very, very lucky to have it. I hope I didn't wipe out all the margin for the folks at Guitar Builder Store!


Out of the box the kit looks good. Overall, the packaging was excellent with tons of polystyrene packing that was taped into place. The hardware was placed in a separate cardboard box, with scratchable items (most importantly the pre-loaded control plate) wrapped in a soft covering to prevent scratching. Other much appreciated features - the neck screw holes came pre-drilled on both body and neck, and the neck came without it's nut glued in! I've never seen a kit with this before and it is a really cool way to ship, especially for Telecasters that have that annoying nut slot.


The body is 3 piece basswood with grain nicely matched and cleanly routed. This isn't much of an issue for me as I intend a solid colour for this one.


There's nice grain on the maple neck, and the maple fretboard, and no glue spots are apparent on the body (again not an issue for me this build). The fretboard is nicely finished (it feels very smooth) with no machining marks at all and nice even frets.


One tiny gripe with the packaging is that the pickguard came taped to the body. This meant that a gum stain from the tape was left on the body upon removal (it'll have to be sanded off) and the pickguard's protective covering was ripped off, no matter how much I tried to retain it. This is one thing that could definitely be improved in an otherwise excellent packing job.

I did notice that the bridge pickup route looked a little small compared to my other telecaster kit. A quick fit-test showed that the supplied pickup and bridge fitted snugly. However, when I tried my OEM bridge and GFS vintage '52 pickup that I purchased for my Flamed Telecaster build, they just didn't fit. The bridge could not be seated in line with the neck - the bridge pickup route will definitely have to be enlarged to fit the GFS pickup.

Apart from the issue with the bridge pickup route, I'm very happy with the kit. I'm planning on painting this one seafoam green - I've always wanted a surf telecaster like the example given below. Not bad for inspiration huh?


The closest spray paint I could find to Seafoam Green from Australian online retailers was "Studebaker Green" from OzGraff.


Looking at it now, the colour may be a little bluer than I was hoping for, but what the hell. Hopefully it will look good so long as it isn't held up against another seafoam guitar.