Showing posts with label Pore Filling. Show all posts

Wednesday, 17 December 2014

Ash Les Paul: More Dying and 3 Coats of Tru-Oil

With the top burst looking pretty schmick, it was time to make a decision about a colour for the back and sides of the Ash Les Paul. With the grain already nice and dark thanks to the Walnut Timbermate, I opted for a medium shade of brown for the remainder of the body. I achieved it using an initial few coats of Vintage Amber Colortone dye, and then following this up with a few more coats of Red Mahogany (while the original dye was still wet). I've used this mix before on my 335 Semi-Hollow Bass build and I really like it - especially with the darker grain peeping through. It's warm, and it glows - without being too amber, too red or too middle of the road.


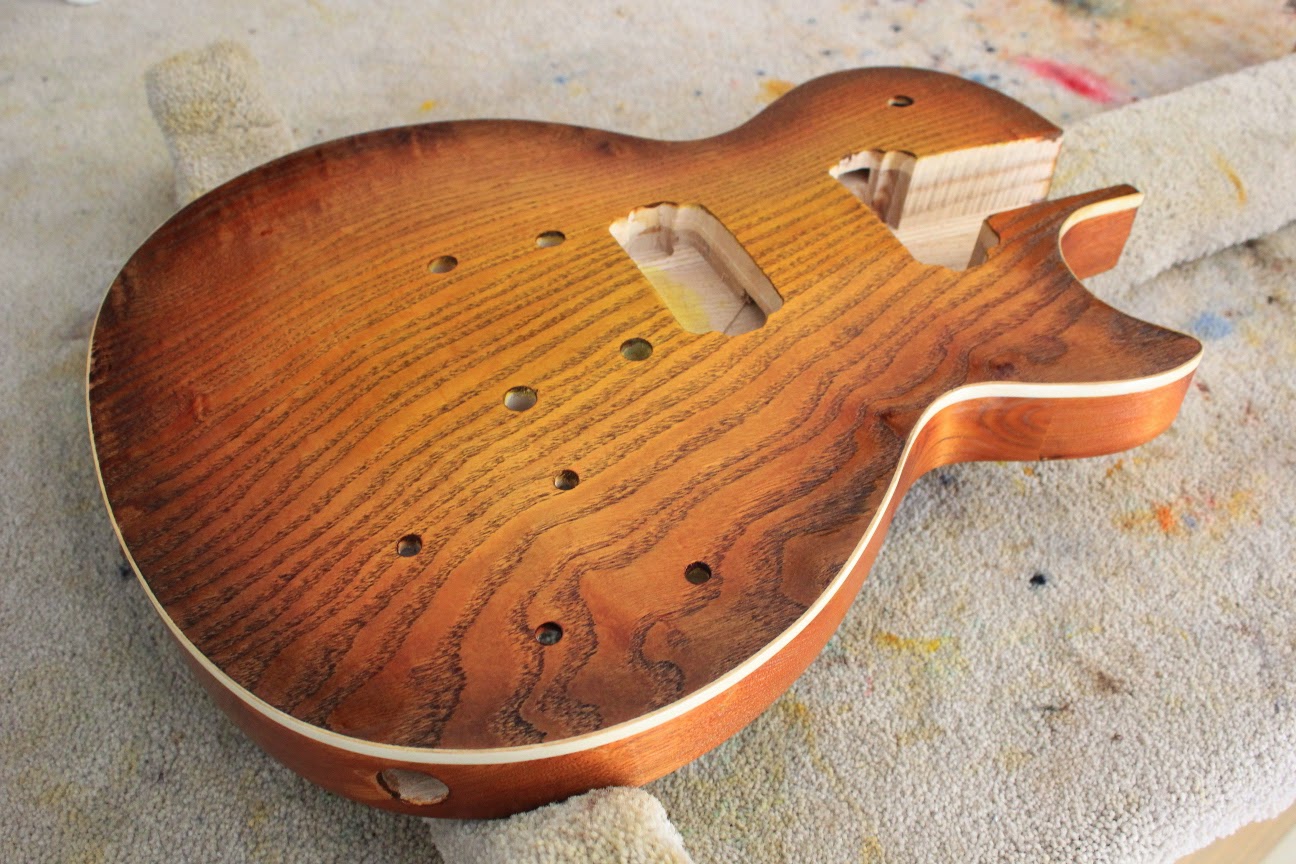
With the back dyed, it was time to move on to the Tru-Oil. After leaving the dye some hours to dry completely,  I managed to get a good soak coat of oil over the entire body before the day was done - man, this Ash body just drank the oil up! I'm always amazed just how fantastic wood looks when that first coat of Tru-Oil is on and still wet - the grain just jumps out at you. The ash grain on this top looks especially dark and wonderful now that the Tru-Oil is soaking in, almost like it's been burned. I really, really like the effect! As of this moment - now 2 days on - I have 3 coats of Tru-Oil on the top, back and sides, and the wood is finally starting to reach saturation point (it's looking a little glossy).

Third coat of Tru-Oil on the top. It's still wet in this photo.


Third coat of Tru-Oil on the back and sides. It's still wet in this photo.
Shows how nice the Ash grain is looking with the Timbermate filling combined
with Tru-Oil. Timbermate hasn't filled the grain smooth but I like it much better
this way. You can still see the grain texture.

So now it's a matter of applying coat after thin coat of Tru-Oil until the body is shiny. While that's happening, I'll be getting on to the headstock shaping and prepping the neck for dying and oiling as well. She's coming along nicely!

Monday, 15 December 2014

Ash Les Paul: Grain Filling and Dying a Burst

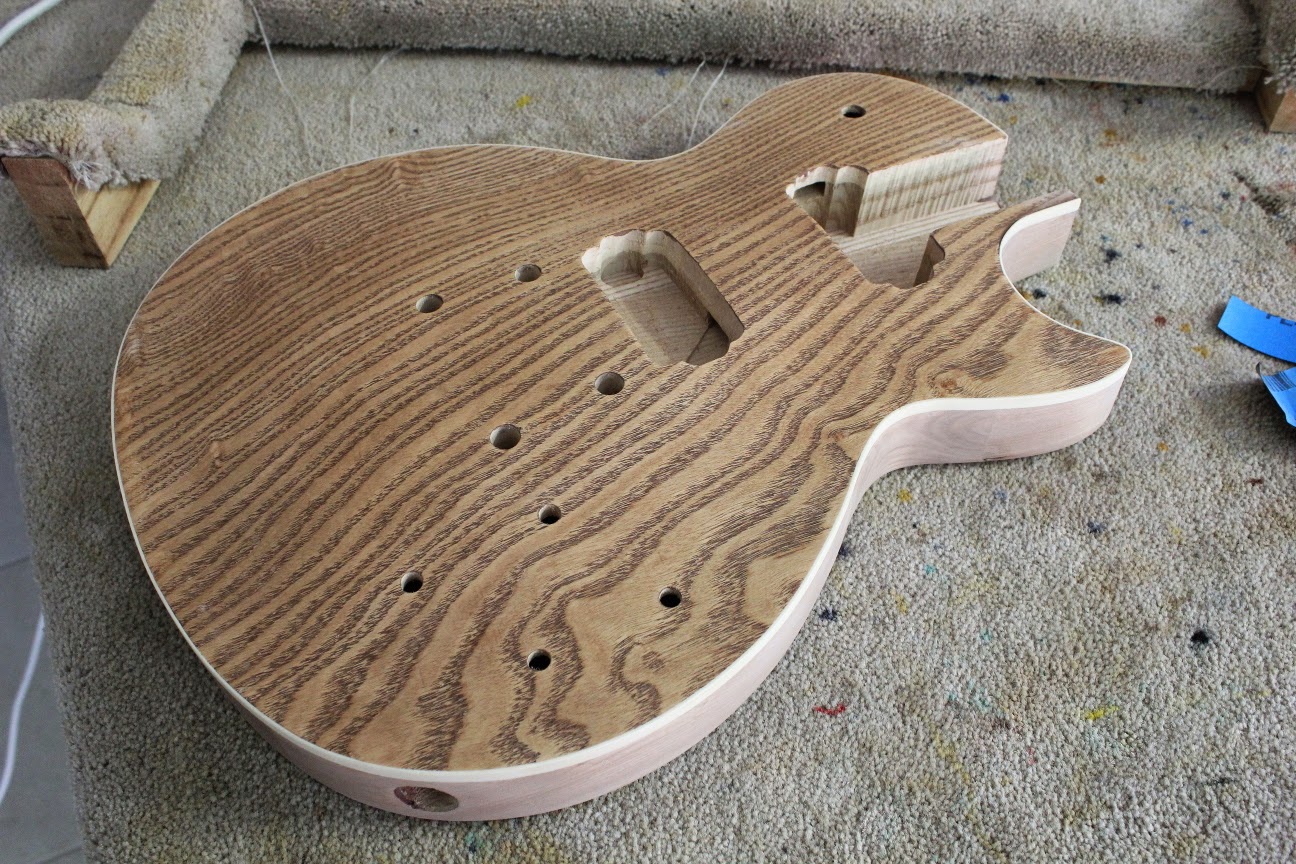
After many silly-season distractions, I managed to get some more work done on the Ash LP build today. I sanded the body with 240 and 360 grit sandpaper before grain filling both the veneer and the back/sides with a slurry of Walnut Timbermate. The Timbermate was then sanded back with 400 grit until just the filled pores remained. The walnut has certainly popped the ash grain nicely indeed! After a couple of rounds of grain raising with a little water, and then cutting back with 400 grit, the body was finally super smooth and ready for dye.

Grain filled with Walnut Timbermate and sanded back with 400.
Some water brings out the colour and allows the grains to raise.

Timbermate and grains raised on the back and sides also.

Since contemplating the sand-storm colour scheme, I've had serious second thoughts (mainly centred around my lack of skills to adequately perform the dye job) and I've reverted to a very simple burst for this build. Time for the colour to go on!

I started with Yellow Colortone as the base colour and progressed through 3 more colours - Vintage Amber, Red Mahogany and Tobacco Brown - to arrive at a burst I was happy with.

The base colour - Colortone Yellow over the grain filled Ash.
A very subtle burst with Amber Colortone to start the fade.
Red Mahogany Colortone next to continue and darken the fade.
Quite a nice "Honey Burst" at this stage.
Finally the Tobacco Brown Colortone to darken the edges,
and complete the burst.

All in all I'm extremely happy with the results. I think I'll go over the burst again tomorrow with a little more colour to try and soften the colour boundaries even more, but even as it stands, it's still looking pretty damn good! I'll have to make a video of my burst technique one of these days just in case anyone out there is interested.

The next step for this build is to decide on a stain colour for the back and sides. I want a colour that will compliment the burst top and yet not take the eye away from it. Something pretty neutral, but still with some style. Maybe some red mahogany and amber mix, but I'm still contenplating that one.

Saturday, 2 August 2014

James' Les Paul Jnr DC: Pore Filling

Jame's Les Paul Jnr Double Cut is coming along very nicely. In preparation for the Wudtone colour coats, I have now sanded the body with 180 grit and 240 grit on the front and back. Since the end-grain typically takes up more colour, I have sanded it a little more - down to 360 grit. At this stage it was time to pore fill, to even up the surface (this will pay dividends when we are looking for a glossy finish) and to pop the grain in this basswood body.

As usual, I used a slurry of Timbermate - a great Australian product - to fill the pores. This time around I used a colour called "Blackwood" to fill the basswood.


To my mind it looks much much better than the "Maple" I was previously using. The Maple tended to look more pink than anything else, while Blackwood is adding a nice caramel hue to the wood.

The Timbermate slurry was brushed onto the body, both with the grain and against it and then left to dry. The idea is to get the little particles embedded down in the grain as tightly as possible.


The Timbermate was left overnight to dry completely, and then sanded off with 360 grit sandpaper. Timbermate sands really easily, although it does get a little dusty. The effect left behind in the basswood was really satisfying - the grain has popped beautifully, with the subtle flame that you sometimes see in basswood coming to the fore. With a little metholated spirits wiped over the body to remove the remainder of the sanding dust, the grain looks really spectacular!


The caramel hues of the Blackwood Timbermate are already adding a butterscotch colour to the body, and should compliment the Wudtone very nicely. I can't wait to start getting the colour coats on!

Tuesday, 22 July 2014

Mosrite Ventures Mk II: Pore Filled Body, Oiled Neck


Today saw the 5th layer of Tru-Oil go on the neck of the Johnny Ramone Mosrite. Despite the neck ending up a tad more "yellow" than Johnny's original, I'm really digging how the neck is shaping up. The colour is bright and the Tru-Oil has produced a depth of finish that is really remarkable.


I've been giving the oil a very light steel wool in between coats, and after the 4th coat I gave it a light sand with 1500 grit wet and dry. I think I'll give it another few coats, with another lick of 1500 in between each, and see how she feels. It's already feeling smooth and looking shiny, so I don't think it will take many more coats before I am satisfied.

While the Tru-Oil has been drying, I've also been sanding the body. I started with 180 grit and gave the body two solid sessions, concentrating on the end-grain. I'm not sure I got *all* the machining marks out, but I did my best. Since I'm painting this axe a solid colour, it doesn't much matter if they all come out. Any remaining mess will be removed during pore filling.

After 180 grit I moved to 240 grit, where I again gave the body a really good work over. After 240 grit, it was on to 360 and then I pore filled the body with a slurry of Maple coloured Timbermate.


The Timbermate was sanded off with 400 grit paper. In the process of sanding it off, I dropped the body on the concrete (!!!!). There were no major shape deformations, but I did created a few small scratches and scrapes here and there. This meant going back to the Timbermate (as putty/filler this time) and patching it all up. I was not a happy boy let me tell you!

Anyway, she's patched up and sanded to 400. Shame this isn't a stained build as the Timbermate has really brought out the grain on this body. When I wet the body down with Metholated Spirits to clean the fine Timbermate dust off, I couldn't help admiring what a nice piece of basswood this is - and I don't often get to say that!


Anyway next steps are a quick sand with 600 and 800 grit paper and then on with the primer. The excitement is building!!

Sunday, 9 March 2014

Stone Roses Tribute: Video Diary #4

The fourth instalment of my video build diary for the RC-1 Stone Roses Tribute is now on YouTube. This instalment deals with sanding off the Timbermate (pore filler) and applying the primer to the body.


It's the must watch series of 2014. Ok, maybe not.

Tuesday, 4 March 2014

Stone Roses Tribute: Video Build Diary #3

The third instalment of my video build diary for the RC-1 Stone Roses Tribute is now on YouTube. This instalment deals with raising the grain and filling the pores of the Pitbull RC-1.


Self indulgent? Totally. Preachy? You betcha. But at least I didnt use the word 'trusty' this time around..

Saturday, 23 November 2013

Les Paul Jnr Double Cut: Preparing a Solid Body for Wudtone

Before adding Wudtone to my Les Paul Jnr, the wood surface must be prepared - and that means more than a few a few hours of sanding, sanding and (you guessed it) more sanding.


My standard preparation for solid body basswood guitars (without veneer or binding) is as follows:
  • A really good sand with 240 grit, taking special note of areas where there is glue (there shouldn't be much if there's no binding) and filler (bog). I usually go over the body at least three times as there is no worries about sand through and so on. What does 'go over 1 time' mean in this context? Well, I tend to sand in 'sessions'. Basically, in 1 session I keep sanding until I've had enough and walk away. This is a single 'session' and on average it consumes one regular piece of wet-and-dry, and just a little bit of my remaining sanity.
  • Move up to 360 grit sandpaper. I usually go over the body at least twice (2 sessions) with 360 grit.
  • Fill the grain pores with a slurry of Timbermate and water. Dilute the Timbermate until it is like runny custard and then brush it on with and against the grain. For basswood I usually use a 'Maple' colour. For mahogany I go with a darker 'Walnut' colour. It all depends how much you want the grain to stand out. If you love grain, then typically the darker the pore filler the better.
  •  Let the Timbermate dry completely.
  • Use 360 grit paper to sand down the Timbermate until it basically disappears from the surface of the timber. Don't worry, it's still there in the pores, but the obvious Timbermate colour is gone.
  • Switch to 400 grit paper. Give the body a light sand - not too much or you will undo all your good work with the Timbermate! The surface should be feeling very smooth by now.
  • Raise the grain of the wood using water in a damp cloth. Let the surface dry completely.
  • Sand the raised grain back down  with 400 grit paper.
This is my pre-Wudtone preparation for basswood bodies. For maple necks, I do all this, but without the pore filling step. This is as far as I go for Wudtone as more sanding makes it hard for the Wudtone to soak effectively into the surface.

Disclaimer: Many exponents of Wudtone strictly adhere to the mantra that you should only sand to 240 grit as preparation. Personally I find that sanding to 240 makes it almost impossible to achieve a high gloss finish. I've only completed one Wudtone project so far, so maybe time will out on this one. At the end of the day it is up to you!

For other finishing products, in particular Tru-Oil, it is important to sand down to at least 600 grit paper. When doing this, I repeat the last 3 steps (400 grit + grain raising) with 600 and each subsequent grit size. Typically, though it is only one more to 600 (to save my sanity more than anything else). I have read build diaries online where other builders continue to 800 an 1200 before dying and oiling. It is definitely the case that Tru-Oil finishes benefit greatly from finer sanding, as the smoother the surface is to begin with, the less wetsanding you'll have to do to get a nice smooth finish.

Tuesday, 20 August 2013

ES175 Hollowbody - New kit started from RM Olson

With the 335 12 string all but completed, I now feel justified in starting the other kit that I ordered from RM Olson Guitars (www.rmolsonguitars.com) in the USA. The kit is a full hollow body ES175 kit in flamed maple. Out of the box the kit looks well made and sports the flamed maple veneer top and bottom - a detail often overlooked by other kit makers. Like the 335, the fixed neck also came pre-assembled - something that I am very thankful of Robert (Olson) for. All in all, a great kit and I couldn't wait to get started.


I'm planning to go with an orange dye job with this one, in the hope of emulating the classic  look of the Gretsch orange hollowbody guitars. Initially, I hit the kit with the 240 and 360 grit sand paper to remove any glue and machnn marks. With these initial sandings were complete, I decided to do a trace dye - a step I was not able to complete with the 335. The aim of the trace dye is twofold. Firstly it enables you to detect any patches of glue that were missed by the initial sanding, and it also allows colour to soak deep into the figured parts of the maple veneer.


Using Colortone orange from Stewmac, the initial trace dying did indeed highlighted a couple of regions where glue had squeezed out around the bindings, and in particular where the fixed neck was attached.  I was able to concentrate on a couple of these glue spots (mainly at the top and bottom of the veneer-join) as I took the majority of the dyeoff again with 360 grit.

The trace dye seems to have done its job and the figure is standing out nicely. Now for more sanding, from 400 to 600 grit, to smooth the surfaces before the final dye job is done.

Friday, 5 July 2013

BC Rich Avenge - Sanding, Pore Filling, Grain Raising

More holiday fun yesterday as my son and I sanded the Avenge kit through successive sand paper grades from 260 through 320 to 400. This was all done primarily with the orbital sander. The old sanding block was only trundled out for the sides. It was then time to fill the pores. We used a slurry of Timbermate - a good Australian product - after the first round of 400 grit to achieve this.


The entire surface was covered with the mixture and pushed into the pores using t-shirt material rubbing in small circles against the grain. Excess was squeegeed off and allowed to dry.


A second sanding with 400 grit (now with sanding block only) returned the surface to its former glory. It was then time to continue on the sanding block to lightly go over the body first with 600 and then 800 grit. The final preparation before primer was to raise the grain using methylated spirits to soak the wood. Once dry, we rubbed the now stubbled surface against the grain with coarse weave cheese-cloth. The result was a guitar top that feels like glass :). The end-grain was a little more stubborn, requiring a lick of the 800 paper to smooth it. Can't wait to see how this baby comes up with a little colour sprayed on her!

Monday, 8 April 2013

Jackson-Style Flying V - My First Guitar Kit

I finally completed my first guitar kit build this week. I'm no woodworker or luthier. Hell, I'm not even that good with a hand-drill, but this was a great experience (and relatively simple to complete) and I encourage anyone who is contemplating putting a kit together to give it a go. Guitar kits start cheap (in Australia you can source them from Pitbull Guitars or DIYGuitars) and everything you need except for sandpaper, paint, and lacquer is supplied.

The Kit

The kit was a solid basswood kit sold on eBay and shipped in two pieces with a bolt-on neck from Guitar Kit Emporium Australia. As the kit was a present from my brother, I can't tell you what it cost. However, I've seen identical kits with basswood bodies at Pitbull Guitars and DIYGuitars, so check those guys out to get an idea.


The style of guitar is a Jackson Flying V -  not the larger Gibson V - but smaller and elegant in its own way. The electronics did not come pre-soldered, but the holes for bridge and stop bar were pre-drilled as were the holes for the bolt-on neck. The kit was routed for humbuckers and came with volume and tone pots, and a 3-way switch. The headstock came un-shaped, and some effort with a jig-saw was required to get some kind of reasonable look to the thing. I didn't waste too much energy trying to think of something cool, but here's how it turned out.


With my limited woodworking skills this could have been a disaster (and almost was), but I ended up with an OK (but not very metal!) looking shape in the end.

Sanding, Filling and Inlay

The body was sanded from 260 through 360 and 400 to 600 grit. The pores were then filled with a Timbermate slurry, rubbed in with a cotton cloth and then squeegeed off. After allowing the filler to dry completely, I lightly sanded with 600 grit paper until only the pores were filled. After filling, I drilled and set inlay for the headstock and body of the guitar using a jig and router bits purchased from Blues Creek Guitars. The inlay jig works very nicely indeed and, if handled by a professional (ahem), would have allowed for effortless inlay insertion.


As it was, I did a very average job and there were quite sizable gaps between the inlay and the surrounding wood. Not to worry - these gaps were filled with 30 minute epoxy coloured with a little black Colortone dye from Stewmac. I ended up adding Maltese Cross inlays to the headstock and the body. Setting these inlays was the start of my masking woes. The moral: Never go too hard too soon! I should have been satisfied with the simple kit and saved more complicated finishing techniques for my next projects.

Painting

After my final sanding with 600 grit, it was time to get the colour on. I went with a simple black metallic paint and gunmetal grey stripes running down the centre. This was 'Power Plus' touch up paint purchased from my local Supercheap Auto store. Simple yet effective. I still like the look every time I glance at the finished guitar. The simplest finishing (if not the most original) ideas are often the best!


The problem, of course, was what to do about the inlays now that they were epoxied in. In the end I bought a frisket sheet, stuck it down over each inlay and cut around them to mask them off. Not as easy as it sounds as the process of cutting the frisket with an Exacto blade invariably left slight marks along the edge of the inlay in the epoxy. Another lesson learned. Also, I put too many layers of paint on in the beginning (4 all up when you include primer and colour) and this made removing the frisket all but impossible without damaging/ripping/gouging the paint in one way or another. Suffice to say it took me several attempts at masking and painting before I got a satisfactory paint edge around, but not covering, each inlay. Never again!


Sealer and Lacquer

With the whole inlay + painting ordeal, at least I was through the most stressful part of the finishing process right? Wrong. Now the application of the clear coats started in earnest and unfortunately that too would prove to be a real challenge. I decided to use Nitrocellulose lacquer in rattle cans from Behlen. It's great stuff - easy to apply and providing an even finish with little fuss. I also used the Behlen vinyl sealer that is recommended for use with this lacquer. I sprayed one whole can of the sealer onto the body and neck and then assumed (quite stupidly) that this would be enough to support some wet sanding to flatten the surface prior to adding lacquer. I was wrong (!) and proceeded to sand-through within 10 minutes of starting to wet sand with 800 grit.

It was back to the paint cans for the third time to repair the damage and start clear coating again. The moral of this part of the story is that you will need 3 times as much sealer and nitro lacquer as you think you need (if you are a first timer that is) so once you think you've finished - keep spraying!

In the end I got 1 can of sealer and 2 cans of nitrocellulose lacquer on the guitar before I was kind of satisfied with the look. I could have probably used 4 cans of lacquer, but 2 was all I had. The finish I ended up with is a little too thin I think and may not stand up to day-to-day usage. Given my experiences with sanding though I didn't event try to polish the lacquer and the end result is a kind of semi-gloss. It still looks pretty darn good however with the metallic black colour underneath.

Pickups

The kit came with two generic, white, uncovered humbuckers in plastic mounting rings. After all the effort I had gone to to get the guitar finished to this stage, I wanted something a little better (but not too expensive) to power it. I had heard great things about Alan Entwistle's pickups and decided to give a set of the Entwistle Dark Stars a go. I chose these as the guitar has a metal vibe (it's a V right?) and I thought they would be in keeping with the look of the thing.


Anyway, I found a pair of zebra Dark Stars on eBay in a cream ring mount. I liked the contrast they would bring to the simple black and grey guitar top. Black pickups and rings would have been ok too, but to my eye the cream looks even better. Long story short, the Entwistle pickups sound awesome. As good as any other pickup in my collection, especially for that heavy rock lead and rhythm sound. Amazing for the price, and I recommend Alan's product to anyone in the market for a great sound.

Wiring and Hardware

With the pickups chosen and in my hot little hands, it was time to wire this bad boy up and fit all the remaining chrome hardware. With the Entwistle pickups providing  wires for coil splitting, I decided to add a micro-switch to the setup to tap the single coils of each humbucker when desired. The 3-way switch remains to select between each or both of the pickups, whether in humbucking or tapped single coil mode. The bridge earthing wire gave me some trouble as the wire was cut as I hammered in the post, but i managed to get the wire attached in the end. The setup is generating the faintest hum, but I think maybe that is because i haven't insulated the pickup or control cavity. It's something to think about in the future when I have a spare second.


Anyway, that's the build. I'm very happy with how the guitar has turned out. It looks great, plays great (even without a decent setup), and most importantly of all - with the Entwistle pickups it sounds great. I couldn't be happier with it, and I haven't put it down since i tightened up that last screw.