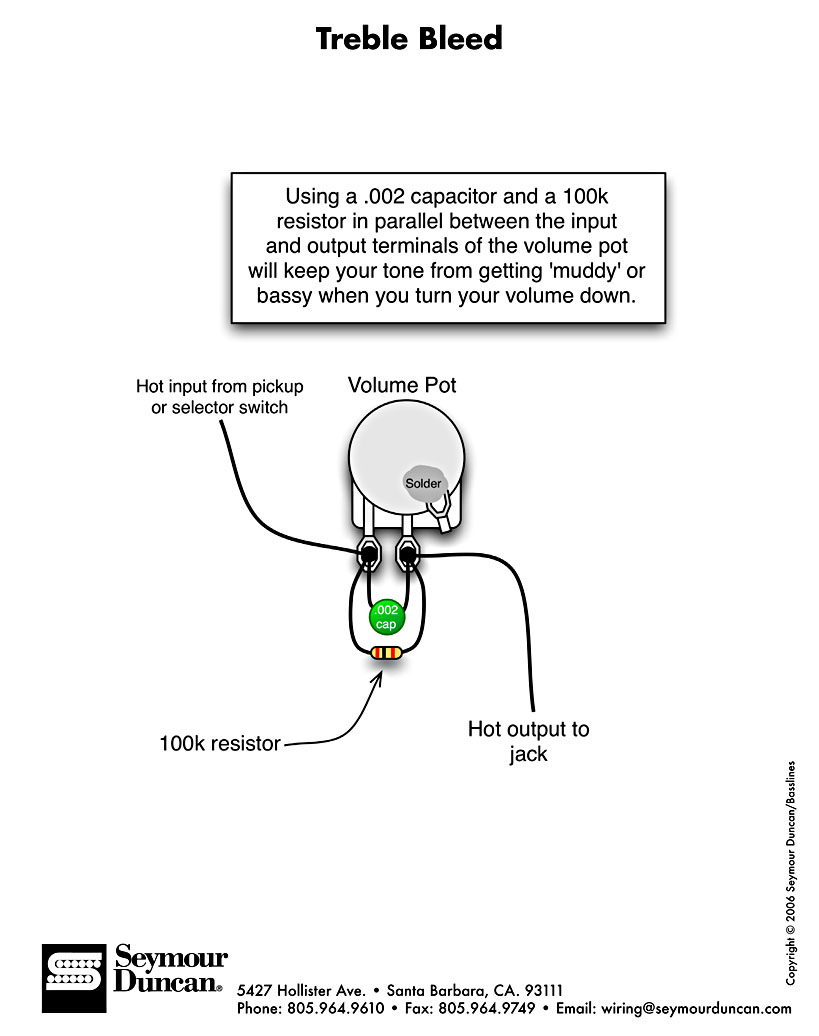
With factory-standard guitar wiring, you may have noticed that as you turn down your
guitar’s volume pot the output signal progressively loses treble.
This effect, denoted 'Treble Bleed', is due to a Passive Analog Low-Pass Filter that is created by the
combination of the increasing resistance of the volume pot (on the hot side) and the capacitance of the guitar lead. This is shown in the circuit below (the tone circuit has been removed for clarity).

In the circuit, the capacitance of the cable is marked C. As you can see, as the volume pot is turned down, the pot acts as a voltage divider with resistance to ground being gradually reduced and the resistance leading to the output (the 'Hot' Resistance) being gradually increased. It is this resistance leading to the output, in conjunction with the cable capacitance that forms the passive analog low-pass filter.
With the volume control up full, the resistance portion of the filter circuit (the 'Hot Resistance') is very small (effectively zero) and the cut-off frequency for the low pass filter is very high indeed - way above the audible frequency range. When the volume is lowered, however, this resistance is increased. The result is that the cut-off frequency dips down into the audible range - cutting audible higher frequencies from the guitar’s output signal.

In the circuit, the capacitance of the cable is marked C. As you can see, as the volume pot is turned down, the pot acts as a voltage divider with resistance to ground being gradually reduced and the resistance leading to the output (the 'Hot' Resistance) being gradually increased. It is this resistance leading to the output, in conjunction with the cable capacitance that forms the passive analog low-pass filter.
With the volume control up full, the resistance portion of the filter circuit (the 'Hot Resistance') is very small (effectively zero) and the cut-off frequency for the low pass filter is very high indeed - way above the audible frequency range. When the volume is lowered, however, this resistance is increased. The result is that the cut-off frequency dips down into the audible range - cutting audible higher frequencies from the guitar’s output signal.
Crunching the Numbers
Remember that the cutoff frequncy of a passive analog low-pass filter is calculated as follows:
The capacitance of typical guitar cable is approximately 100pF per metre, and the frequency range of human hearing is typically 20Hz – 20KHz (ignoring guitar amp related deafness). For augments sake, let’s assume a 10-metre cable - that’s an approximate cable capacitance of C = 1000pF across the guitar output. So running the numbers to find the initial resistance at which we hear an effect:
fcut-off (Hz) = 1/(2πRC)
The capacitance of typical guitar cable is approximately 100pF per metre, and the frequency range of human hearing is typically 20Hz – 20KHz (ignoring guitar amp related deafness). For augments sake, let’s assume a 10-metre cable - that’s an approximate cable capacitance of C = 1000pF across the guitar output. So running the numbers to find the initial resistance at which we hear an effect:
20000Hz = 1/(2πR0.0000000001F)
solving for R:
R = 79577.4715 Ohms or 79.5 KOhms.
So given that we can start to hear an audible effect with a 'hot' resistance at the pot of 79K, if we are using 500K linear taper volume
pots this begins to have an effect quite early on in the volume reduction
(basically just under to 90% mark). If we are using 250K pots, we start to hear it
a little later (around the 60% mark).
We'll talk about the various solutions to this problem (if indeed you are a guitarist who wants to solve this problem - and many don't) in a future post.
We'll talk about the various solutions to this problem (if indeed you are a guitarist who wants to solve this problem - and many don't) in a future post.