Showing posts with label Double Cutaway. Show all posts

Friday, 28 March 2014

Solid Body PRS: Unboxing

I scored myself a bargain today. A flamed maple PRS-style solid body kit from DIYGuitars Australia. The kit was $99AUD delivered for just the neck and body. For any kit with a nice maple cap that's a super price!!


As previously stated, the kit comes with a flamed maple cap over a body of basswood. The kit is set-neck with a nice tight neck fit - there is not one mm of movement side to side, and the end of the neck fits snugly against the bottom of the neck pickup cavity with the pickup installed. The maple cap is beautiful and will looks fantastic with some ColorTone stain and Tru-Oil.


I'm thinking about a Turquoise dye job - a 50/50 mix of ColorTone blue and green, with the flame maple popped with a darker mix. I've never attempted this colour before, so should be interesting! The kit came with nothing but the wood. This means that I will have to cut a control cavity cover myself.


I've got plenty of pickguard material around here to choose from, so no sweat there. But, it will be yet another first for this build!

Lastly, I have to choose some hardware for the build; most importantly the choice of bridge. I have several bridges here to choose from - an intonated wrap around bridge, a tune-o-matic bridge with either stop or trapeze tailpiece, or even a strat-like stop bridge. I'm leaning towards the trapeze tailpiece, but as you may have noticed from my previous builds I'm a real sucker for the trapeze!


Anyway, there are plenty of options. The pickups in the photo will probably be replaced by others. I'm not a big fan of plastic pickup rings, and I may source some flashier pickups from GFS. With so many choices to make, I'm very excited about getting this kit underway. It should be a great one, so stay tuned!!

Friday, 20 December 2013

Les Paul Jnr Double Cut: Clear Coats Complete

Finally the clear coats are finished on the double-cut Jnr. I used Minwax Wipe-on Poly - about 4 coats - to help bring up the shine and to protect the finish a little more. To tell you the truth I just wasn't happy with the amount of clear that went on from the Wudtone bottle. Just 3 very thin coats! It didn't feel to me like it would survive the first bump.

So anyway, it's done and even without applying the Colortone polishing compound the poly has  really come up nicely.


Now to let the poly cure completely and then give it a quick buff with Colortone compounds. Should look killer when all that elbow grease has been applied.

Monday, 16 December 2013

Les Paul Jnr Double Cut: Wudtone is On!

So the last coats of Wudtone colour and clear have been applied to the Les Paul Jnr. That makes 8 coats of colour and 3 coats of clear in total. I would have liked to get a  few more clear coats on there, but the bottle ran out. There could have been a little more in the bottle for mind..


Anyway, the colour has deepened well and I'm very happy with it. There's a pretty good solid colour, with just a hint of grain showing through. Should look killer with the custom Tortoiseshell Pickguard I've made. I've allowed the Wudtone to cure for a week and I've started polishing it. Currently I've rubbed my heart out with Colortone medium compound and I also plan to apply fine and swirl remover grades before I'm finished. Gotta remember not to rub too hard on those edges and start taking colour off..

Once the Wudtone polishing is done, I'll decide whether the gloss is enough to call the finish complete and go on to the assembly. Wudtone is not made to duplicate the lustrous shines achieved with Nitro or Poly, so I'll have to see. On Siena's Stratocaster I ended up with a few coats of Minwax Wipe-on Poly, but that was also for protection in addition to the shine factor. We'll see how I feel. I have a new spray gun and am planning to give the Les Paul Florentine a few coats of Vinyl lacquer. Possibly I could bring the schedule forward to include the Jnr?

Wednesday, 27 November 2013

Les Paul Jnr Double Cut: Custom Headstock Decal

The custom headstock decal went on today without a hitch. The decal was bought from best-decals.com and is the same as for previous builds. When my current supply of decals is exhausted, I'm going to be sourcing them from a company here in Australia. Here it is out in the sun to get a better idea of the colour..


Now that I look at the headstock and neck, I think I went a bit heavy with the Vintage Amber Wudtone. I honestly think 2 coats would have been more than enough, not the 4 that it finished up with. Next time I think I'll try the Vintage Yellow. It doesn't look anywhere near as dark as the Amber. Oh well, you live and learn - I thought it looked awesome on the Stratocaster build, but Fender do that don't they - dye their headstocks the same colour as the neck and fret-board. Hopefully when the tuners and strings go on it won't look as bloody orange!

Postscript: 27/11/2013:
You know, this just isn't right. The more I look at the headstock with the Vintage Amber neck colour on it, the more I think that the colour is just wrong for this build. The neck colour is fine, but the face of the headstock just doesn't match the Butterscotch body.


Basically, it looks shithouse. So, I have 2 options. Firstly, get some black spray and spray the face of the headstock. Secondly, sand off the face of the headstock and apply Butterscotch to it. One way or another this headstock is going to change. Luckily I have a spare decal to hand!

Monday, 25 November 2013

Les Paul Jnr Double Cut: Third Coat of Wudtone

Yes, you guessed it - the third coat of Wudtone went on today. The neck is pretty well finished in terms of colour. Might give it a steel wooling and see if it needs any touch ups. The body still has a few coats to go.


As always, the lighting and the flash plays havoc with the colouring of the photos. The Vintage Amber does not look as red or as golden as the photo implies, nor does the Butterscotch look as yellow. Sooner or later I'll take a photo in the sunlight to try and get a more accurate representation of actual colour. Overall, I'm pretty happy with how it is shaping up.

Sunday, 24 November 2013

Les Paul Jnr Double Cut: Second Coat of Wudtone

After a thorough steel-wooling to smooth out the surface, the second coat of Wudtone was slapped on the body and neck. All in all, the body colour seems to be filling out nicely, and the Butterscotch is slowly becoming more of a golden hue. It's hard to see any difference in the photos, but believe me it's there! In about 5 more coats it should be looking really something.


The Vintage Amber neck finish is also looking good. I took a little extra time with the steel wool to even out the first coat of Amber - especially on the edges where it seems to gather and darken. The time was well spent - it's looking quite good now! Maybe only one more coat will be required on the neck and headstock before the decal can be applied and the clear coats can go on.

Saturday, 23 November 2013

Les Paul Jnr Double Cut: First Coat of Wudtone

After preparing the surface, I was finally able to get the first coats of Wudtone onto this bad boy. I'm using Butterscotch for the body and Vintage Amber for the neck, both with high gloss clear coats. I added about a third of the bottle of White base-coat to the Butterscotch base-coat to lighten the colour a little, and to give me a little more finish to work with.

They both went on well, except for a few unfortunate patches of bog in the body that have now been highlighted rather starkly. Hmm.. I'm hoping they will disolve into the background as the colour deepens. Other than that I'm pretty happy.


Due to the Timbermate pore filling, the grain on this basswood body is standing out quite nicely. By the end of the process this will fade a little as I plan to put as many colour coats on as I possibly can, but hopefully it will still look nice.

The butterscotch colour is a little dull brown at the moment, but I'm hoping that the 'golden' colour will come to the fore as finish builds and the colour deepens. It could well be that my pore filling with Timbermate is affecting the colour. We'll have to wait and see!

Les Paul Jnr Double Cut: Preparing a Solid Body for Wudtone

Before adding Wudtone to my Les Paul Jnr, the wood surface must be prepared - and that means more than a few a few hours of sanding, sanding and (you guessed it) more sanding.


My standard preparation for solid body basswood guitars (without veneer or binding) is as follows:
  • A really good sand with 240 grit, taking special note of areas where there is glue (there shouldn't be much if there's no binding) and filler (bog). I usually go over the body at least three times as there is no worries about sand through and so on. What does 'go over 1 time' mean in this context? Well, I tend to sand in 'sessions'. Basically, in 1 session I keep sanding until I've had enough and walk away. This is a single 'session' and on average it consumes one regular piece of wet-and-dry, and just a little bit of my remaining sanity.
  • Move up to 360 grit sandpaper. I usually go over the body at least twice (2 sessions) with 360 grit.
  • Fill the grain pores with a slurry of Timbermate and water. Dilute the Timbermate until it is like runny custard and then brush it on with and against the grain. For basswood I usually use a 'Maple' colour. For mahogany I go with a darker 'Walnut' colour. It all depends how much you want the grain to stand out. If you love grain, then typically the darker the pore filler the better.
  •  Let the Timbermate dry completely.
  • Use 360 grit paper to sand down the Timbermate until it basically disappears from the surface of the timber. Don't worry, it's still there in the pores, but the obvious Timbermate colour is gone.
  • Switch to 400 grit paper. Give the body a light sand - not too much or you will undo all your good work with the Timbermate! The surface should be feeling very smooth by now.
  • Raise the grain of the wood using water in a damp cloth. Let the surface dry completely.
  • Sand the raised grain back down  with 400 grit paper.
This is my pre-Wudtone preparation for basswood bodies. For maple necks, I do all this, but without the pore filling step. This is as far as I go for Wudtone as more sanding makes it hard for the Wudtone to soak effectively into the surface.

Disclaimer: Many exponents of Wudtone strictly adhere to the mantra that you should only sand to 240 grit as preparation. Personally I find that sanding to 240 makes it almost impossible to achieve a high gloss finish. I've only completed one Wudtone project so far, so maybe time will out on this one. At the end of the day it is up to you!

For other finishing products, in particular Tru-Oil, it is important to sand down to at least 600 grit paper. When doing this, I repeat the last 3 steps (400 grit + grain raising) with 600 and each subsequent grit size. Typically, though it is only one more to 600 (to save my sanity more than anything else). I have read build diaries online where other builders continue to 800 an 1200 before dying and oiling. It is definitely the case that Tru-Oil finishes benefit greatly from finer sanding, as the smoother the surface is to begin with, the less wetsanding you'll have to do to get a nice smooth finish.

Thursday, 21 November 2013

Les Paul Jnr Double Cut: Custom Pickguard

Today I created a custom Tortoiseshell pickguard for the Les Paul Jnr using a sheet of Uncut 3-ply Pickguard Material from Guitar Fetish. Trying to find a sheet of this stuff that doesn't require a second mortgage on my house was a real challenge, but GFS finally came through.

I used the original pickguard from the kit as a template. I traced around the original, and then cut close to the line using a cheap coping saw from Bunnings. This was nowhere near as easy as I expected. There must be a knack to using a coping saw well but I don't know it. After cutting, I used a rounded bastard file to clean and trim the edges back to the tracing line. The sides were then finished off with 240 grit sand paper.

After shaping, it was time to drill the holes. Again I used the original pickguard as a guide to hole placement. I went one step further than the original and actually counter-sunk the holes! Having no experience or skills in wood-working, I took a disproportionate amount of joy in both the process and the result of the countersinking. Stupid really given the final result wont be seen under the screw heads.


I am painfully aware that the new pickguard is 3-ply where the original pickguard was only 1-ply. I became aware of this fact when it came time to screw it to the body. Since the body is shaped (it isnt flat like a Telecaster), the pickguard has to ben d to follow the curves. The 3-ply material is resisting the bend and is standing up where it curves above the pickup. I am going to try and see whether this pickguard stuff is thermo-softening. If it is I may be able to heat it up to help bend it to the correct shape. If not, I may have to add another screw.

Anyway, apart from these little details, I think the result looks pretty fucking awesome if I don't say so myself. I can't wait to see how it looks with the butterscotch Wudtone underneath! I still would like to put a bevel around the edge. I'll probably use the bastard file to achieve this, but since the pickguard looks so good as it is, I'll have to find my confidence again to attempt it (and risk spoiling what I have so far!). Stay tuned.

Postscript 22/11/2013:
I actually went ahead and put a bevel around the edge of the pickguard, and I dont like it!! Damnation. Anyway, this meant that I had to go back and cut a whole new one again. Now I have 2 to choose from - with and without bevel.


Les Paul Jnr Double Cut: Unboxing and Mock Up

I've been looking forward to starting a Double Cutaway Les Paul Jnr kit for some time now. One of the simplest kits to finish, and yet with elegant lines that just speak to me. I received a Pitbull Guitars JR-1DC as a birthday present a week ago and couldn't wait to get the box open.


The kit fits together very easily and in no time I had the wrap-around bridge fitted, the single P90 pickup seated and the neck aligned. I always use the two E strings during this process to make sure that the neck angle produces correctly positioned strings down its entire length. It's also useful to get the placement of the pickup correct so that the pole pieces are as close to directly under the strings as possible.


And that's it for the mock-up really. The one thing I haven't bothered to do is the pickguard. This is because I am planning to make my own pickguard in tortoiseshell using the original black one as a template.  Should look killer with the planned butterscotch Wudtone - quite a close match to the 'TV Yellow' that many of the original LP Jnrs sport from Gibson.


Next I'll be shaping the headstock with a traditional Les Paul design, and then it's on to sanding, pore filling and grain raising. I'll be sanding to 240, 360 and 400 grits, and pore filling using a slurry of Timbermate after the first pass with 360 grit. I'll take the excess Timbermate off with 360 grit before moving on to 400. I'll raise the grain with water several times between subsequent passes at 400 grit to make sure the surface is nice and smooth prior to applying the Wudtone. Stay tuned for more double-cut goodness!

Thursday, 8 August 2013

12 String 335 - Vintage 50s Wiring Harness

I got the wiring harness for the 335 wired up today based on the "Vintage 50s Wiring" scheme used by Gibson in the (unsurprisingly) 50s and 60s. This wiring scheme attaches the tone capacitor (and therefore tone pot) to the output of the volume pot rather than the input as is the case for so-called "Gibson Modern Wiring" that is used in all 335, Les Pauls and SGs today.


I'm hoping that this wiring scheme, in combination with my GFS Surf-90 pickups, will lend the guitar a very 50s jangly sound.

Everything went together fairly easily using 500K CTS pots and 0.022 uF orange caps from Stewmac. Because my push-pull CTS pots wont fit through the f-hole in the 335 body, my planned series/parallel and coil tap modifications had to be scrapped for this build. Hopefully in a later build I will be able to explore the plethora of wiring modification possibilities.


At present I satisfied myself with a simple modification to the 50s Vintage wiring scheme to allow the volume pots to operate independently. The problem with both 50s Vintage and Modern wiring is that when both pickups are selected, turning one one of the pickup volume pots to zero grounds out the entire signal from the 3-way switch (including any signal generated from the other pickup). A simple modification swaps the volume pot input and output lugs, placing the pickup input wire onto the pot's swing arm.  When the pot is turned to zero, only the hot wire from the pickup in question is grounded rather than the whole circuit, allowing the other pickup to continue to supply signal to the 3-way switch as normal.

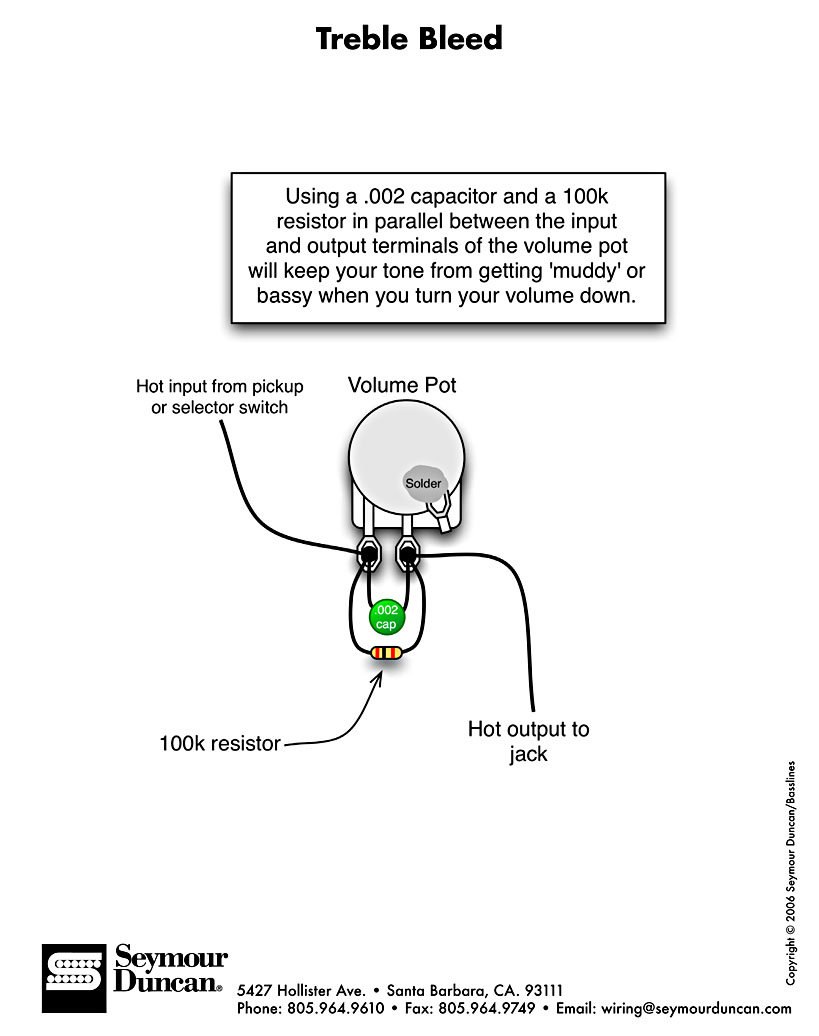
A second simple modification I am considering is the addition of a "treble-bleed" circuit to each of the volume pots so that the high-end jangle is not muddied as the volume is turned down. This simple circuit involves a resistor and capacitor wired in parallel across the volume pot "hot path" to allow high signal frequencies to bypass the increasing resistance as the volume is turned down.


As the pot is turned and the resistance increases, the resulting signal, while attentuated for the majority of the frequency range, is not reduced for the higher frequencies. These higher frequencies stay in the signal and the resulting output retains the high jangly tones even as the volume is rolled off.

Wednesday, 17 April 2013

12 String 335 - New Kit arrives from RM Olsen

After much research and much agonizing, my first semi-hollow body guitar kit arrived today from RM Olsen Guitars. The 12-string 335 kit landed here in Australia in perfect condition thanks to double boxing, bubble wrap and a metric fuck-load of squishy packing beans added to the box. Suffice to say I was very happy with the condition of the guitar.

Unboxing the Kit

The guitar came with the set-neck already installed. For me this is awesome. Setting and gluing the neck was the major worry of the only 2 worries I have with regards to finishing process. The other is the drilling of the bridge post holes, but that is some fun I can postpone to much later. One downside to not setting the neck myself, apart from not knowing whether the neck has been set correctly to allow a good setup (i can only assume it has for now, and I have no reason not to trust the abilities of Robert Olsen) is that there is some glue soaked into the neck from where the binding and ends of the cutaways merge into it. Sanding should remove most of this, but one side is a little rough. Having said all this, I have to admit that the job done in setting the neck is much better than anything I could have achieved with my limited tool-set and limited woodworking skills.


A little glue has soaked into the neck where the cutaway meets it.
In terms of the wood used, Robert Olsen is known for providing some of the best wood for his kits in the price range. Having requested flamed maple, the kit arrived with a gorgeous flamed maple veneer front and back. The veneer is flawless with a nice deep figure. It looks like it will come up beautifully when finished. The neck has trapezoidal inlays into a rosewood fretboard and could not look better. The body is finished top and bottom in multi-layer binding, and the junction between the binding and the wood has no gaps or glue squeeze out all the way round.

All in all I'm very happy with the craftsmanship offered by Robert Olsen, and I'm itching to get started on the finishing for this baby! I have only attempted one build previously, that being a solid-body Jackson-style Flying V that I received as a present. In comparison, this build will be a much more challenging undertaking and I'm looking forward it!