Showing posts with label Timbermate. Show all posts

Thursday, 31 December 2015

12 String Telecaster: Shaping the Headstock

Finally a few hours back in the man cave today after a mad Christmas and New Year season. With only a little time at my disposal I was at least able to shape the headstock on the 12-String Telecaster build and get most of the sanding done.

With the headstock chock full of tuning pegs, the kit didn't leave too much space for anything fancy in terms of shaping. I finally opted to just round off the corners to create a Fender-esque curve to the top. With a little trial and error I found that the small Timbermate container provided the perfect radius. Out came the pencil and it was quickly traced to create the corners.

The small Timbermate container has a perfect radius.
Curve drawn and ready for the jigsaw.
With the line drawn, out came the trusty jigsaw and I cut just outside my line. Unfortunately the blade on the jigsaw was a little coarse for the rock maple and some small pieces were gouged out of the edge of the cut. Wouldn't you know, they were out of the front side of the headstock not the back. Lesson learned - always draw your line and cut from the front size of the headstock. I grabbed the disc sander to bring the curve down to my line. A nice job apart from the gouges.

Jigsaw cut complete and tidied up with the disc sander.
Gouges in the front edge of the headstock, care of the poor jigsaw skills.
With the shape cut it was then on to sanding. I started with 80 grit on the top (cut) edge to remove the burn marks created by the disc sander. The 80 grit really made light work of it. If you are having trouble removing marks and burns etc on your kits then I suggest starting at a lower grit. It really is the secret to a getting the finish you want in the quickest time. I worked my way from 80 grit to 120 then 180. With the 180 grit I started on the flat faces of the headstock and the neck as well. With 180 grit complete it was then on to 240 and 320 for the whole shebang. Very nice and smooth now. I would have gone down to 400 grit, but I seem to have run out. I raised the grain once with water and knocked it down again with 320 grit.

With the gouges requiring filling, I turned to my old friend Timbermate. Of all the containers I had lying around the man cave, the Pine seemed to be a reasonably close match to the maple. I filled the holes and waited 12 hours for it to dry.

Pine Timbermate to the rescue. Hopefully it will stain the correct colour.
Finally, I got the 320 grit sand paper out and sanded off the excess Timbermate. It looks *ok*. The fills are quite obvious, but I'm hoping that with a little Amber dye they will be less so. When all is said and done I may have to paint the headstock black but I really don't want to go there if I don't have to. I do love a nice yellow maple neck with a black Telecaster.

The Timbermate sanded off. Camera is blurry, but you get the idea.
The neck is now almost ready for phase 2. I need to get my hands on some 400 grit sandpaper, raise the grain a few more times and then I cal slap on some amber dye and Tru-Oil. Still a ways to go before assembly, but getting there now!

Friday, 6 March 2015

Ash Stratocaster: Grainfill & Dye

More progress today on the Ash Stratocaster build! I finally got the body sanded to 400 grit and then went through 3 passes of raising the grain with water and sanding back down until I was happy with the smoothness.

Smooth as a baby's Wossname.
With the body smooth as a baby's unmentionables, it then was time to fill the grain. Instead of dying black and sanding back, I opted to fill the grain with dark filler in much the same way as I did with the Ash Les Paul build. For that build I used walnut Timbermate to fill the ash grain as it matched the brown hues in the burst nicely. For this build I decided to use ebony Timbermate as the black would work much better with a blue dye. I actually did a few tests with 4 different Timbermate colours against a blue background and the ebony was certainly streaks ahead of the others. Anyway, I got the Timbermate smooshed down into the grain, and a few hours later sanded it off again with 400 grit.

A slurry of timbermate pushed down into the grain and left to dry.
Timbermate sanded back with 400 grit to leave the grain filled.
Once I was happy with the amount of black left in the body (there was still a little more than I was hoping for, but it's in the grain - what can I do) it was time to start the staining. After agonising for a month over what dye to use (you've probably read the posts!), I finally decided on the Colortone blue. It's not as "brilliant" a blue as I would have liked, but with the darkness of this piece of ash, and combining that with the darkness of the ebony Timbermate, she was never going to be a "brilliant" blue anyway.

And so the dye went on for a first coat, and I gotta say, I was very pleased with the results! The blue dye combined with the ebony Timbermate resulted in a kind of "slate" blue. Very nice! It's not what I had envisioned for this build in the beginning, but I'll take it all the same! Here's a picture of the blue in the sunshine. The dye here has dried quite a bit, so the final colour will be a bit darker (a more "wet" look).

Blue dye and black grain in the sun. It's dry here so final colours will darken.

The photos give some impression of the contrast between body and grain. This will increase again when the lacquer goes on. Suffice to say I'm very happy with the way the grain pops. I think she'll look pretty good with a bit of lacquer and a brilliant shine!

And... here she is with the original white scratchplate on. Looks pretty good, but I'm now imagining a black burst around the edge and an aged cream pearloid scratchplate.

Final colour will be darker blue, but I'm also considering a black burst
What do you guys think would look best?

Wednesday, 17 December 2014

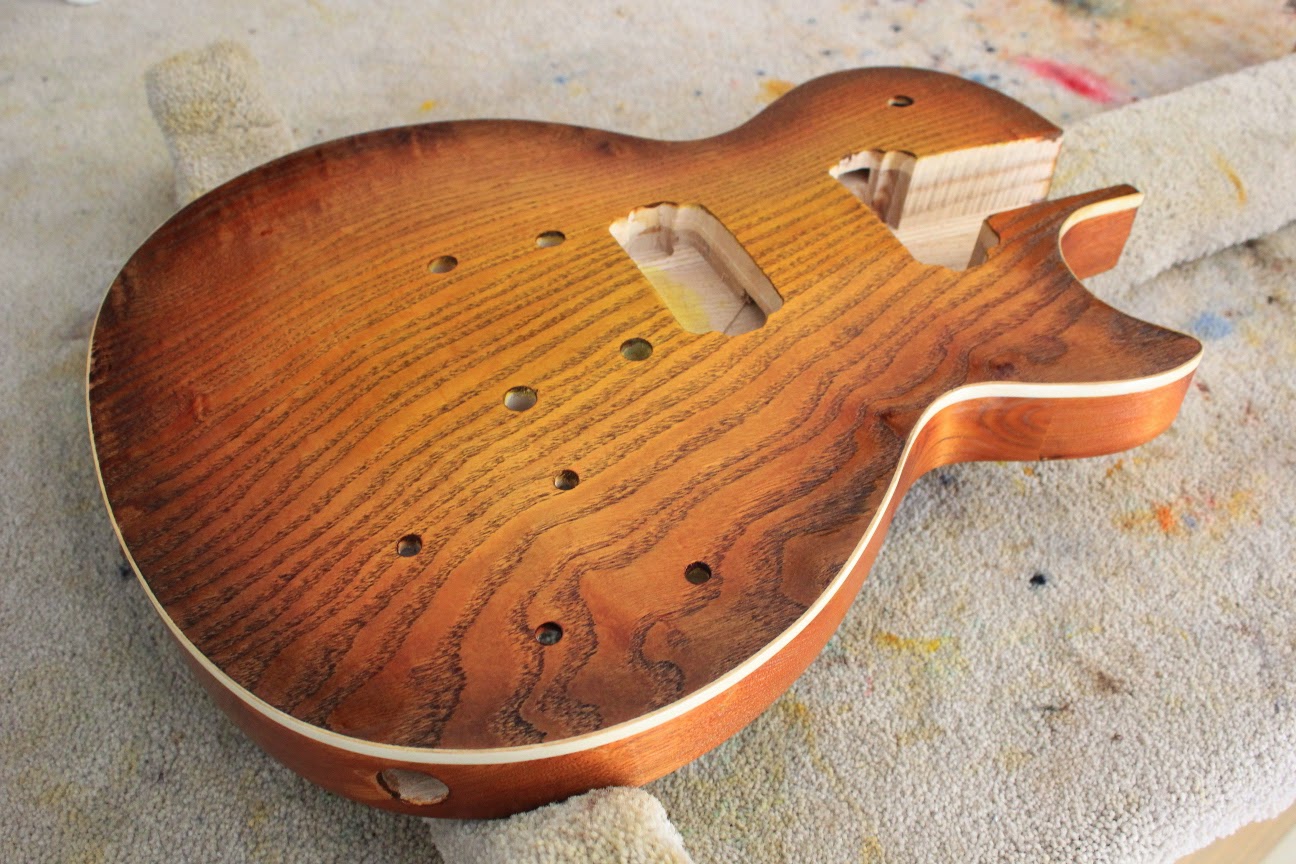
Ash Les Paul: More Dying and 3 Coats of Tru-Oil

With the top burst looking pretty schmick, it was time to make a decision about a colour for the back and sides of the Ash Les Paul. With the grain already nice and dark thanks to the Walnut Timbermate, I opted for a medium shade of brown for the remainder of the body. I achieved it using an initial few coats of Vintage Amber Colortone dye, and then following this up with a few more coats of Red Mahogany (while the original dye was still wet). I've used this mix before on my 335 Semi-Hollow Bass build and I really like it - especially with the darker grain peeping through. It's warm, and it glows - without being too amber, too red or too middle of the road.


With the back dyed, it was time to move on to the Tru-Oil. After leaving the dye some hours to dry completely,  I managed to get a good soak coat of oil over the entire body before the day was done - man, this Ash body just drank the oil up! I'm always amazed just how fantastic wood looks when that first coat of Tru-Oil is on and still wet - the grain just jumps out at you. The ash grain on this top looks especially dark and wonderful now that the Tru-Oil is soaking in, almost like it's been burned. I really, really like the effect! As of this moment - now 2 days on - I have 3 coats of Tru-Oil on the top, back and sides, and the wood is finally starting to reach saturation point (it's looking a little glossy).

Third coat of Tru-Oil on the top. It's still wet in this photo.


Third coat of Tru-Oil on the back and sides. It's still wet in this photo.
Shows how nice the Ash grain is looking with the Timbermate filling combined
with Tru-Oil. Timbermate hasn't filled the grain smooth but I like it much better
this way. You can still see the grain texture.

So now it's a matter of applying coat after thin coat of Tru-Oil until the body is shiny. While that's happening, I'll be getting on to the headstock shaping and prepping the neck for dying and oiling as well. She's coming along nicely!

Saturday, 2 August 2014

James' Les Paul Jnr DC: Pore Filling

Jame's Les Paul Jnr Double Cut is coming along very nicely. In preparation for the Wudtone colour coats, I have now sanded the body with 180 grit and 240 grit on the front and back. Since the end-grain typically takes up more colour, I have sanded it a little more - down to 360 grit. At this stage it was time to pore fill, to even up the surface (this will pay dividends when we are looking for a glossy finish) and to pop the grain in this basswood body.

As usual, I used a slurry of Timbermate - a great Australian product - to fill the pores. This time around I used a colour called "Blackwood" to fill the basswood.


To my mind it looks much much better than the "Maple" I was previously using. The Maple tended to look more pink than anything else, while Blackwood is adding a nice caramel hue to the wood.

The Timbermate slurry was brushed onto the body, both with the grain and against it and then left to dry. The idea is to get the little particles embedded down in the grain as tightly as possible.


The Timbermate was left overnight to dry completely, and then sanded off with 360 grit sandpaper. Timbermate sands really easily, although it does get a little dusty. The effect left behind in the basswood was really satisfying - the grain has popped beautifully, with the subtle flame that you sometimes see in basswood coming to the fore. With a little metholated spirits wiped over the body to remove the remainder of the sanding dust, the grain looks really spectacular!


The caramel hues of the Blackwood Timbermate are already adding a butterscotch colour to the body, and should compliment the Wudtone very nicely. I can't wait to start getting the colour coats on!