Showing posts with label 335 Semi-hollow Bass. Show all posts

Monday, 23 June 2014

335 Semi-hollow Bass: She's a Stunner!

The 335 bass is now officially complete. The headstock decal went on this morning, and she finally got a fret level and re-dress. Nothing short of amazing now to play. What started out as an ESB-4 kit from Pitbull Guitars is now a rockin' instrument. Now all I have to do is learn a few more bass riffs!


I am so happy with how this kit came out, and oh-so happy with how she feels to play. So much so,  that I am seriously considering building another one. I can see this beauty in trans-black hanging on my wall. Sounds good doesn't it??

Postscript 8th July 2014:
I've just been informed by the good folks at Pitbull guitars that this little beastie has taken out Pitbull Guitar of the Month for July. Woohoo! Thanks guys!

Wednesday, 18 June 2014

335 Semi-hollow Bass: Sound Demo

OK, so for those of you interested in how this semi-hollow beast sounds, I have done a quick sound demo. Please excuse the crap playing. The bass is being played through a Fender Deluxe 112 guitar amplifier with no additional pedals or effects other than a bit of reverb provided by the amp itself.


I'm certainly no bass player, but I gotta say, I love the way this baby sounds. Deep and booming, yet very clear and crisp. It looks so awesome, and sounds so good, I'm sorely tempted to make myself another one! I never knew how much fun playing the bass could be.

I've still got the headstock decal to go before I call this one finished, so hopefully that will all be done and dusted by the weekend!

Tuesday, 17 June 2014

335 Semi-hollow Bass: All wired up

OK the wiring harness went in without a hitch today. It took all of 20 minutes to get the pots, output jack and 3-way switch into the body and the nuts tightened down. It's a new record! Third time building a semi-hollow has sure honed my skills.


Anyway she's looking really nice now and she sounds amazing through my solid-state Fender guitar amp. All that is left to do on this baby now is a fret level and re-crown, create a suitably awesome custom truss-rod cover, and stick my headstock decal on.

Saturday, 14 June 2014

335 Semi-hollow Bass: 50s Vintage Wiring - Tweaked!

In the process of creating my wiring harness for the 335 bass, I have re-examined how to go about laying out the wiring harness for a semi-hollow build so that it is both simple, and will survive the installation process. For my other semi-hollow builds (the 12 String 335 and the Les Paul Florentine) I used the following circuit. It's a Gibson 50s Vintage wiring scheme, with the independent volume mod added for good measure.


While this orientation is perfect for wiring those big arse oil-caps into small Les Paul control cavities, when you are talking about mounting in a semi-hollow body those capacitors wired "inline" between the volume and tone pots are devilishly hard to secure. You end up attaching wires to one or both ends of the capacitor legs, and then lashing this to another of the joining wires for stability. All in all, it's a hack at best!

Instead, there is actually no reason why the capacitors couldn't be mounted to the back of the tone pots instead. You see this orientation very often in Fender wiring schemes, and in other single volume / single tone configurations. It's actually a very convenient way of mounting the tone capacitors, especially for semi-hollows! Taking the wiring diagram above, it's a simple matter of shifting the capacitor from before the variable resistance in the tone circuit to "after" it instead. The result is electrically equivalent and much easier to secure and install.


In this configuration we need only piggyback the tone caps to the back of the tone pots. No additional wires need be soldered to the capacitor legs, and no lashing is required to secure the capacitor in place. It's so simple and elegant, why the hell didn't I think of it before??

Anyway, the sucker is wired up. With the volume pots at the top and tones at the bottom the wiring harness is surprisingly neat.

Friday, 13 June 2014

335 Semi-hollow Bass: Strings!

The clamps came off the set-neck this afternoon and the strings went on for an acoustic test of the semi-hollow 335 bass. While the action is a little high, I'm really loving how the finish has come out. She looks so awesome - if I do say so myself ;).


Suffice to say, there was more than a little bit of acoustic dum-dum-dumming here in the man-cave once she was all tuned up. I so wish I could play bass! Now it's just the electronics to go. Did I say *just* ? I'm sticking with the original kit-supplied pots for this one (not the larger CTS pots or their ilk) so I'm hoping it won't be as much of a struggle getting the wiring harness into the cavity. First though, I need a wiring harness!!

Thursday, 12 June 2014

335 Semi-hollow Bass: The Neck is Set

With the clear coats finally in an acceptable state, it was time to glue the set neck onto the 335 bass. Before I could do that, I needed to drill a hole for the bridge ground wire from the front bridge post out into the cavity. This time I remembered to use a metal ruler to protect the finish from the side of the drill bit.


All was completed successfully, and the ground wire was installed by baring some of the wire, turning this downwards into the post hole and then inserting the the post into the hole. A multimeter attached to the bridge post and the end of the ground wire indicates very quickly whether the bare wire is making contact.


With the grounded bridge post installed, the other bridge posts could be pushed in and the bridge mounted to allow the outside strings to be aligned down the neck. With this looking good, it was time to get out the Titebond and slather it into the cavity and onto the neck heel. The clamp went back on (tight!) and now it is left to dry for a couple of days.


I am a little concerned that the neck could come over more towards the E string at the tuner end. The string is sitting a little too far into the fretboard down at the pickup end of the fretboard for my liking. But try as I might, I could not get the neck to twist horizontally any further. It's definitely playable as-is, and this certainly wasn't a visible issue during the mock build,so we'll have to wait and see what it looks like when the clamp comes off.

Tuesday, 29 April 2014

335 Semi-hollow Bass: Dying the Neck

Today I finally got around to putting some Colortone dye on the neck of the 335 Semi-hollowbody bass. It's been a long time coming! Next time I must do all the dying at the same time while the original colour concentrations are in the pots.


The burst on the headstock and sides of the neck turned out ok. I'm satisfied with it, and it matchs the body pretty well. I'm planning to use some Wudtone neck top-coat over the Colortone dye on the neck. I've never done this before, so to be honest I'm not even sure it will work. Dyed wood is just like raw wood right? The only thing missing is the Wudtone base coat. Should be ok right? Well, we will soon see...

Tuesday, 25 March 2014

335 Semi-hollow Bass: Amber Burst

This morning I took the plunge and attempted my second burst using ColorTone dye - a so called "poor man's burst". The target of my ministrations was my ES335 Bass (EB-4) from Pitbull Guitars. My first attempt on my Flamed Telecaster build was moderately successful, although I would have liked more distinction between colours.

I prepared the body with a light sand down of 360, 400 and 600 grits. At 600 grit I did a single pass of grain raising using Metholated Spirits, but the maple hardly need it.

This time around I didn't perform a 'trace-dye' on the wood to check for glue spots. I was instead prepared to stop dying if any glue surfaced and perform a sand back to remove it. Amazingly, this Pitbull Guitars kit exhibited no glue spots at all around the binding or veneer join. What a great kit!

The steps to produce the burst were as follows:

Step 1: I wiped clean water over the entire top. This helps the dye take up evenly across the surface and prevents and streak or wipe marks in the dye.

Step 2: Using ColorTone Vintage Amber as a base, I applied this to the entire body.

Step 3: In an attempt to pop the flame maple further, while the first pass was still wet I proceeded to lightly wipe a 70:30 mix of Vintage Amber / Red Mahogany over the top.

Step 4: I applied Red Mahogany to the edges in successive passes, using the Vintage Amber to feather the edges. Several times I used a clean rag to help feather the edges as well.

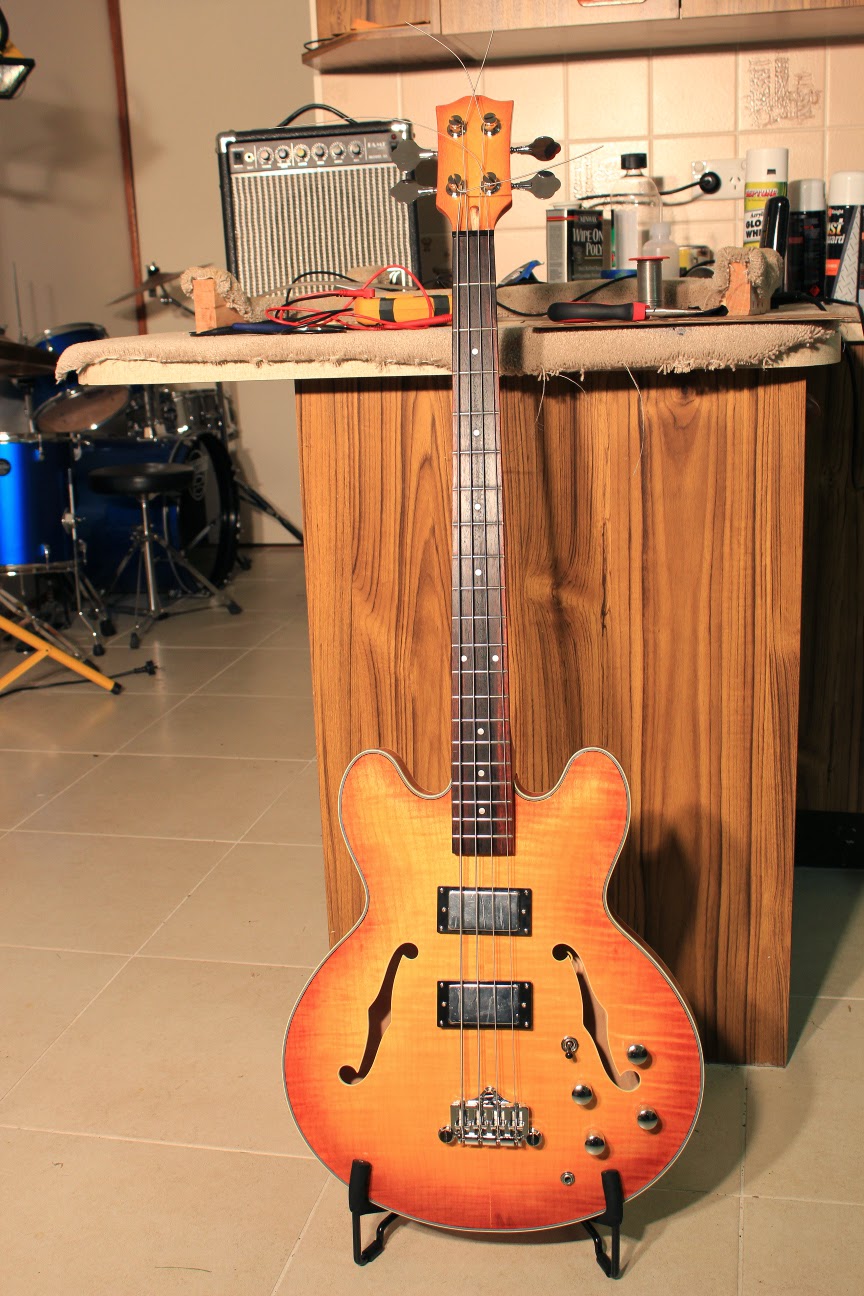
Here's the result - I'm pretty damn pleased with it!


The edges are nice and dark with the red mahogany bleeding into the flame maple as it reaches for the centre of the guitar. The centre has retained it's bright Amber hue and has not been muddied with brown. With the masking removed from the binding, you can see what a great job the 3M 471 pin-striping tape has done to keep the stain off. I love this 471 tape!!

All in all an almost perfect result - I'm right chuffed with myself. And now for the back, which was completed with much the same technique, although the lack of flame maple veneer made it a little harder to accomplish an even burst IMO. I think it came out OK though. Almost as good as the front.


Those of you with a keen eye will notice a glue spot on the heel of the guitar. There are several small glue spots around the sides. After I have applied some Tru-Oil to the front and back to lock in the dye, I'll go back over the sides with the sanding block to get rid of these glue spots. It's a small price to pay for such a perfect kit on the front and back!!

Tuesday, 18 March 2014

335 Semi-hollow Bass: Unboxing & Test Fit

It's been sitting on my shelf since November waiting for the right time to start, but now I'm excited about the 335 bass guitar kit that I've snagged from Pitbull Guitars.


It's an ESB-4 kit with a semi-hollow body, flame maple cap and maple back. (identical in most respects to the ES-1G/ES-1GT 6-string kit). The front of the body has 3-ply binding whilst the back has singe ply. Pretty standard for this style of guitar. It was on the basis of an enquiry from yours truly that Pitbull decided to stock this particular kit. I've been trying to source such a kit for a while, and Adam from Pitbull came through for me. It's a testament to their truly amazing customer service.


Since it was the first of ts kind, the version that I received was the very first production run from the chinese factory. As such there were bound to be a few issues - and there are - but nothing that can't be handled with a little patience.  Firstly the neck pocket isn't really finished, and when positioned in the pocket, a sizable gap exists between the neck heel and the base of the pocket. Nothing a little filing won't fix.


And in the end, that's all it took - a few minutes work with my bastard file to flatten the inside floor of the neck pocket and the neck fit was pretty well perfect. Come gluing time, there will be no issues there.


With the neck pocket fixed, the rest of the mock-up process went reasonably smoothly. The neck alignment was perfect right out of the box, with strings from the bridge sitting straight along the neck.


The second unfortunate teething issue with the kit concerns the fit of the tuning pegs in the headstock. Unfortunately the headstock has been made just a touch too small for the large tuners that were supplied (and which are a signature for this style instrument). With the reduced size headstock, the pegs touch in the middle and cannot sit straight.


There are two possible fixes to this problem: a) to grind a little of the shaft off each peg so that they can straight sit opposite each other, or b) to fill the current tuner holes with dowel and redrill new holes for smaller tuning pegs. I'm leaning towards option a) because it means no complicated woodworking to attempt. The tuning peg shafts won't look as nice this way, but if I don't take too much off no-one will be any the wiser.

So, I think I will see to the tuners before I do anything else, just to make sure the grinding actually solves the problem and the pegs can be screwed into their final position. After that's done the finishing can start! Should be a great build.