Showing posts with label Vintage Amber. Show all posts

Monday, 28 November 2016

Jazz Bass: Headstock Shaping and Tru-Oil for the Neck

Sorry guys, it's been a long, long time since I posted any updates on any builds to this little bloggerino. Unfortunately I've been terribly busy with work, and am finding less and less time to either build (which is utterly fucking depressing) or even to write about it. Anyway I'm hoping to address this situation in the coming weeks - with several builds close to completion, I would really like to share the results with you all.

Anyway, today's post concerns the Jazz Bass build which recently changed it's colour to Surf Green and got a few coats of acrylic clear. It's looking pretty good I dare say, and while the clear coats cure, I have finally found some time to shape the headstock and sand the neck smooth.

The standard Fender Jazz Bass headstock template.
I managed to find a bunch of Fender bass headstock templates on the TDPRI site, and hoped they would be enough to seal the deal. I decided on the stock standard jazz bass template and printed the pdf 100% scale. Problem was, the template (as usual) didn't really match the headstock blank from the factory. In the end I was forced to use the template to mark out the circular end of the headstock, and then just free-hand the curved fin along the bottom. Not really a problem - even with my shoddy drawing skills there's nothing a belt sander and drum sander can't fix right? Right. Anyway, the stars seemed to align, the jig saw did as it was told, and even the sanding disc and slap wheels didn't burn out the edges. Sweet

With the headstock shaped, I sanded the neck down to 360 grit and raised the grain a few times with water before staining. This time around I went for a weak solution of Colortone Vintage Amber (I do love those vintage tones) and did 3 passes in quick succession in an attempt to pop as much of the grain on this nice looking maple neck as I could.

Headstock shaped, Vintage Amber applied and 1st coat of Tru-Oil.
After the dye was dry, it was on with the first soak coat of Tru-Oil and the maple just drank it up. Man, I can already see that the grain on this neck is really going to pop when the oil gets in there. About another 10 coats or so to go, so patience grasshopper, patience..

Friday, 27 November 2015

Jeremy's Mahogany Les Paul: Headstock & Body Colour

Well my run of luck continued today with Jeremy's Les Paul build. Maybe rather then luck it's care and attention to detail? Hmm, doesn't sound like me. Whatever it is, Jeremy's axe is shaping up to be one of the nicest builds I've ever done touch wood. When all this is over I may have to go back and make myself one!

With the flame maple cap dyed a couple of days ago, it was time to get on and colour the rest of the guitar. Before I could dye the neck, however, I had to spray the headstock black. The reason I wanted to do this before dying the rest of the neck was so that I could use sand paper to clean up the side of the headstock where the paint meets the wood. If the dye was already on there, then sanding the edge clean would have easily ruined the dye job.

Anyway, I filled the pores of the headstock face with a Timbermate slurry and sanded it off flat with 400 grit. Straight on to this went 4 coats of black auto paint. I forwent the obligatory primer coats because I didn't want a white line around the edge where the paint meets the wood. It really wasn't necessary. After 2 coats I cleaned up the sides and then wet sanded with 600 grit. After the 4th coat I did the same this time wet sanding with 1500. What I ended up with was a nice flat paint job ready for clear coats.

Ready for clear after 4 coats of paint and two rounds of wet sanding
With the sides nice and tidy, the painters tape went back on and I laid down 4 coats of acrylic clear. The main purpose for doing this now (I reasoned) was to get a protective coat on there so that I could manhandle the neck during subsequent finishing without taking colour off.

Four coats of acrylic clear. Now I can get back to the dye.
The acrylic went on very easily, and after 4 coats I was satisfied that the face was adequately protected. I left it to cure overnight and then cleaned up the side of the headstock with 600 grit. At last I was ready to get the dye out again!

To colour the neck and body I used a 4:1 ratio of Colortone Vintage Amber and Red Mahogany. In the last stages of the burst I actually used a 1:1 mix of same, but with the mahogany neck and body being a naturally darker wood than the maple cap, considerably less red was needed to match the colour. I actually had to guess at this ratio, but managed to fluke a good match between burst and body on the first try.

The dye itself went on smoothly (preparation pays off kids!), although I do wish I had protected the dyed veneer before starting - juggling the body with a mind to not damaging the burst wasn't much fun. I made about 4 passes of dye on both pieces and hung them up to dry. The grain in both the body and the neck is pretty damn nice on this kit I must say!

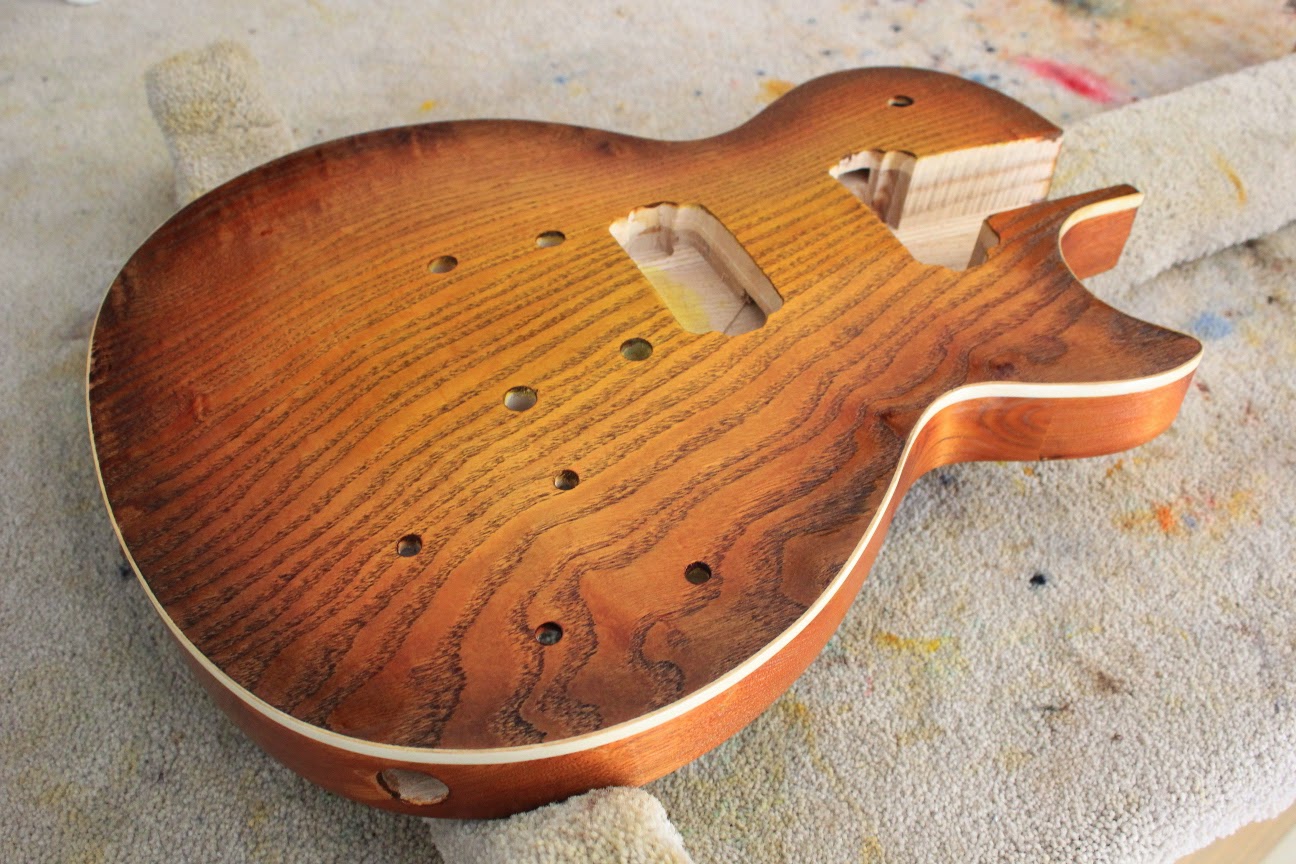
Some amazing grain in this body. Tru-Oil will get it to pop.
The colour match between the body and burst is great.


Once the body was completed I went on to do the neck. Getting the stain on to the sides of the headstock without damaging (or even disturbing) the black was a little stressful, but I got there in the end. I'm really happy with the results and, as with the body, the grain on the mahogany neck has become a thing of beauty!

Neck is now all dyed. More amazing figure.
I hung the body and neck to dry a few hours in the patented Turner drying room (our shower recess ;) to make sure the wood was completely dry. I then applied my first coat of Tru-Oil to both the neck and body. The neck is going to be finished in Tru-Oil so this is the first coat of many for it. The body on the other hand will be clear coated with acrylic. The Tru-Oil on the body is only there to help pop the grain which it does sooo well. Lacquer on its own just can't hope to emulate what the oil does in the figure. When mixing TruOil and lacquer, you just have to make sure that you don't make the surface shiny at all. For this body there will be only a few coats, and I definitely won't be sanding between coats.

First coat of Tru-Oil on the body has really popped the grain.

As the Tru-Oil went on, the grain really started to leap out from these pieces, and I'm really pleased with how the body is looking. I'd like to do the same (Tru-Oil) for the front face of the guitar as well, but I'm worried that the oil will drag some of the colour out from the glue spots I fixed earlier in the week. It definitely isn't worth the risk IMO. A couple more coats of Tru-Oil on the body, and a week or two for the smell to go completely, and the body will be ready for final clear coats. In the meantime I'll get start on the Tru-Oil coats for the neck!

Wednesday, 17 December 2014

Ash Les Paul: More Dying and 3 Coats of Tru-Oil

With the top burst looking pretty schmick, it was time to make a decision about a colour for the back and sides of the Ash Les Paul. With the grain already nice and dark thanks to the Walnut Timbermate, I opted for a medium shade of brown for the remainder of the body. I achieved it using an initial few coats of Vintage Amber Colortone dye, and then following this up with a few more coats of Red Mahogany (while the original dye was still wet). I've used this mix before on my 335 Semi-Hollow Bass build and I really like it - especially with the darker grain peeping through. It's warm, and it glows - without being too amber, too red or too middle of the road.


With the back dyed, it was time to move on to the Tru-Oil. After leaving the dye some hours to dry completely,  I managed to get a good soak coat of oil over the entire body before the day was done - man, this Ash body just drank the oil up! I'm always amazed just how fantastic wood looks when that first coat of Tru-Oil is on and still wet - the grain just jumps out at you. The ash grain on this top looks especially dark and wonderful now that the Tru-Oil is soaking in, almost like it's been burned. I really, really like the effect! As of this moment - now 2 days on - I have 3 coats of Tru-Oil on the top, back and sides, and the wood is finally starting to reach saturation point (it's looking a little glossy).

Third coat of Tru-Oil on the top. It's still wet in this photo.


Third coat of Tru-Oil on the back and sides. It's still wet in this photo.
Shows how nice the Ash grain is looking with the Timbermate filling combined
with Tru-Oil. Timbermate hasn't filled the grain smooth but I like it much better
this way. You can still see the grain texture.

So now it's a matter of applying coat after thin coat of Tru-Oil until the body is shiny. While that's happening, I'll be getting on to the headstock shaping and prepping the neck for dying and oiling as well. She's coming along nicely!

Saturday, 19 July 2014

Mosrite Ventures Mk II: Dying the Neck


Here's how I go about preparing a rock maple neck with Colortone dye, be it Strat, Tele or in this case an uber cool Mosrite Ventures II, ala Johnny Ramone. The aim is to get the neck sanded smooth and dyed to the correct shade so that it is ready for it's decal and clear coats.

For this build I'm aiming for a light yellow colour as per Johnny's original Mosrite. To achieve this I will be using Colortone Vintage Amber dye mixed with water.

Step 1. Sanding
Rock maple necks are generally machined to a high standard straight from the factory. The finish is nice and smooth from the get go. Therefore, there is no need to start sanding at very low grits. Generally I start at 360 grit and then progress to 400 and then 600. I find that's all that is required for a super silky neck. You don't want to go too low if you are going to be dying the maple - you want *some* dye to get in there, and it wont if the surface is too "polished".

Step 2. Mask off the Fretboard.
Before liquids are involved, I generally mask off the fretboard. Even if you are just using water, fretboards (especially rosewood) are often dyed themselves at the factory and you risk the dye running (on to your maple!) if water gets on there. To mask the fretboard I use 6mm 471 tape from 3M at the boundary between the maple and rosewood. This gives the fretboard good protection where it needs it most. On top of this I generally use some blue painters tape to go up and over the edge of the fretboard.


Step 3. Prepare Your Water and Stain
Get some water in one container and mix your Colortone dye with some water in another. Test the concentration of the dye on a test piece of pine or similar - it should be *lighter* than your target colour!


Step 4. Raise the Grain
Before going any further it is important to raise the grain - once the dye goes on you won't want to sand the maple again! To raise the grain, wipe the maple all over with a damp rag and wait for it to dry.


You will immediately feel that your nice smooth neck feels rough again. These are the end grains that have swollen up with the water and are now sticking out! Once the neck is dry, give it a very light lick with the 600 grit paper again to take the raised grains off. The neck should be back to its smooth self again.


It is very important that you don't over sand at this stage. You don't want to expose *new* grains, just get rid of those that have been raised. Repeat this two step process at least 1 more time.

Step 5. Dampen the Surface
Before you actually start applying the stain, dampen the whole surface of the neck again. This prevents streaks in the final dye job by allowing the maple to pre-absorb a little liquid. You'll find that your dye job is a lot more even if you pre-wet the surface!


Step 6. Apply the Dye
Now apply your dye with a cotton rag. Go easy, with only a small amount of dye on the rag at first. Wring the rag out after dipping it in the container o prevent drips and runs. Apply dye evenly over the whole neck before starting again with a second pass.

Keep going over in successive passes until the desired strength of colour is reached. Wait for the dye to dry completely and that is job done!


I haven't decided yet what I will be using as clear coats. I'm tossing up whether to use Tru-Oil or Wudtone clear neck finish. Wudtone is much less hassle, but Tru-Oil adds depth and an earthy tone to the colour. Hmmm, decisions...

Tuesday, 25 March 2014

335 Semi-hollow Bass: Amber Burst

This morning I took the plunge and attempted my second burst using ColorTone dye - a so called "poor man's burst". The target of my ministrations was my ES335 Bass (EB-4) from Pitbull Guitars. My first attempt on my Flamed Telecaster build was moderately successful, although I would have liked more distinction between colours.

I prepared the body with a light sand down of 360, 400 and 600 grits. At 600 grit I did a single pass of grain raising using Metholated Spirits, but the maple hardly need it.

This time around I didn't perform a 'trace-dye' on the wood to check for glue spots. I was instead prepared to stop dying if any glue surfaced and perform a sand back to remove it. Amazingly, this Pitbull Guitars kit exhibited no glue spots at all around the binding or veneer join. What a great kit!

The steps to produce the burst were as follows:

Step 1: I wiped clean water over the entire top. This helps the dye take up evenly across the surface and prevents and streak or wipe marks in the dye.

Step 2: Using ColorTone Vintage Amber as a base, I applied this to the entire body.

Step 3: In an attempt to pop the flame maple further, while the first pass was still wet I proceeded to lightly wipe a 70:30 mix of Vintage Amber / Red Mahogany over the top.

Step 4: I applied Red Mahogany to the edges in successive passes, using the Vintage Amber to feather the edges. Several times I used a clean rag to help feather the edges as well.

Here's the result - I'm pretty damn pleased with it!


The edges are nice and dark with the red mahogany bleeding into the flame maple as it reaches for the centre of the guitar. The centre has retained it's bright Amber hue and has not been muddied with brown. With the masking removed from the binding, you can see what a great job the 3M 471 pin-striping tape has done to keep the stain off. I love this 471 tape!!

All in all an almost perfect result - I'm right chuffed with myself. And now for the back, which was completed with much the same technique, although the lack of flame maple veneer made it a little harder to accomplish an even burst IMO. I think it came out OK though. Almost as good as the front.


Those of you with a keen eye will notice a glue spot on the heel of the guitar. There are several small glue spots around the sides. After I have applied some Tru-Oil to the front and back to lock in the dye, I'll go back over the sides with the sanding block to get rid of these glue spots. It's a small price to pay for such a perfect kit on the front and back!!

Sunday, 16 March 2014

Flamed Telecaster: 8th Coat of Tru-Oil

8 coats of Tru-Oil are now on the flame maple telecaster. Starting to look really nice. The colour is a little dark for me, and there isn't enough of a burst along the edge, but not bad for a first attempt. I can see now that the trace-dye coat I did was too dark using just Red Mahogany. A mix of Vintage Amber and Red Mahogany (maybe 70/30) would have been much better! The flame would have have been more subtle, but this would have allowed much more of the Amber colour to come to the fore in the centre of the burst. On the plus side, the Tru-Oil has soaked into the grain and enhanced the chatoyance nicely.


I am especially happy with the back of the guitar. No chatoyance here, but the pores of the mahogany filled very nicely with Timbermate and the Vintage Amber / Red Mahogany burst is more pronounced. Yes the burst could have been better, but all in all it came up nicely.


Overall I'm pretty happy with how the build is progressing. The mahogany body should sound really good with the GFS 52' professional series pickups I've bought for it, and the custom perloid pickguard also looks the business.

A couple more coats of Tru-Oil and I'll be ready to start wet sanding.

Wednesday, 12 March 2014

Flamed Telecaster: Bursting!

Today, with the trace dye completely dry, I sanded the Flamed Telecaster back with 360 and 400 grits on the orbital sander. I was in constant fear of sanding through the veneer, but thankfully I got it done without that particular catastrophe striking again.

After sanding it was time to apply the burst. I started with a weak mix of Vintage Amber Colortone dye and applied this over the whole top. I followed this up with a much darker strength Vintage Amber to help pop the grain even further. With the amber on. I started to create a burst around the edge with more Red Mahogany, alternating between Mahogany, clean and Amber rags until I was pretty satisfied with the results.


 And then it was the back's turn. I pore filled the mahogany body with a slurry of Walnut Timbermate and sanded back with 400 grit. I then applied a layer of Vintage Amber dye all over the back and sides (to match the front) and then proceeded to burst again with Red Mahogany. I made sure I got plenty of Red Mahogany on the sides to provide an even transition between the cap and the back burst.


What do you think? I reckon it's pretty sweet. The flame maple has come up a treat and there is a good deal of chatoyance to be seen. Will be even more once some coats of Tru-Oil go on. The edge could probably do with a little more red mahogany, but overall I'm stoked with the results. This is the first burst I have ever done, and my message to those out there considering trying it? GO FOR IT. It isn't as hard as you might think. If I can do it, then anyone can.

Thursday, 28 November 2013

Les Paul Florentine: First Trace Dye

Today I finished raising the grain and sanding to 360 grit on the Les Paul Florentine. Time for the first trace dye to identify any areas of glue or other issues that will ruin the final dye job. Currently, I have changed my mind about the colour - at the moment I'm considering an Amber finish with brown highlighted figure. I'm still undecided and may go back to my original plan of wine red. 

In light of this indecision, I did a trace dye with Red Mahogany Colortone dye. It's reddish brown so I still should be able to go either way when I change my mind again. To do a trace dye, firstly I wipe the whole face down with a wet rag to allow the dye to be taken up evenly. Then I move to the actual colour solution and wipe it on, quickly enough so that the wood doesn't dry out before the dye hits it. Before applying anything, I generally mask off any binding that may come into contact with the dye (as best I can). For this purpose I always use 3M 6mm vinyl tape. It's the only thing that keeps a nice edge and has any chance of keeping the dye out.

Thankfully, the operation was completed without incident/ Here's how she looks with the trace dye in place..


Surprisingly, there's still a crap-load of these spots to be dealt with. So many it's a little disappointing to tell you the truth. You can see where these pesky glue spots that have been highlighted by the trace:


God damn. I really sanded the life out of this thing! That glue must be in deep. On the positive side, there is some nice quilted figure in this maple top which should look great once the glue is dealt with. I think that Vintage Amber may well be the best choice here as wine red would definitely hide a lot of this beautiful figure.

Next step is to sand the top again, paying close attention to those areas sporting glue. When I think all the glue is gone, I'll hit it with another trace dye to find out. Fun times!

Wednesday, 27 November 2013

Les Paul Jnr Double Cut: Off With His Head!

With no question that the Vintage Amber headstock colour had to go, I decided to scrub it back to bare wood (just the face) and start applying Butterscotch Wudtone instead. With the decision made, all that was left to do was sand with 180 grit until all the colour was removed, then finish off with 240, 360 (plus grain raising) and finally 400 grits.


The Wudtone on the sides of the headstock remained unaffected, and didn't even twitch as the colour came off the top edges. This was a great relief I can tell you. I also managed to sand flat so that none of the colour was removed from the sides of the headstock at all.


The first coat of Wudtone went on thereafter (ever so carefully) and the transformation was well on its way. I am paranoid that I'll make a mess of the Butterscotch down the sides of the headstock, but I'm being as careful as I can be. Only time will tell if this step backwards has been worth it, but I already suspect that it has been. Even without 5 coats of Butterscotch, I like the new headstock sooo much better.

Les Paul Jnr Double Cut: Custom Headstock Decal

The custom headstock decal went on today without a hitch. The decal was bought from best-decals.com and is the same as for previous builds. When my current supply of decals is exhausted, I'm going to be sourcing them from a company here in Australia. Here it is out in the sun to get a better idea of the colour..


Now that I look at the headstock and neck, I think I went a bit heavy with the Vintage Amber Wudtone. I honestly think 2 coats would have been more than enough, not the 4 that it finished up with. Next time I think I'll try the Vintage Yellow. It doesn't look anywhere near as dark as the Amber. Oh well, you live and learn - I thought it looked awesome on the Stratocaster build, but Fender do that don't they - dye their headstocks the same colour as the neck and fret-board. Hopefully when the tuners and strings go on it won't look as bloody orange!

Postscript: 27/11/2013:
You know, this just isn't right. The more I look at the headstock with the Vintage Amber neck colour on it, the more I think that the colour is just wrong for this build. The neck colour is fine, but the face of the headstock just doesn't match the Butterscotch body.


Basically, it looks shithouse. So, I have 2 options. Firstly, get some black spray and spray the face of the headstock. Secondly, sand off the face of the headstock and apply Butterscotch to it. One way or another this headstock is going to change. Luckily I have a spare decal to hand!

Tuesday, 26 November 2013

Les Paul Jnr Double Cut: Fourth Coat of Wudtone

Well the fourth coats of Butterscotch and Vintage Amber Wudtone went on today. That will be all for the headstock and neck - it is now ready for the decal and clear coats. The colour on the body is deepening slowly every day. It really isn't as golden as I expected, but it is looking nice all the same. I reckon 2 or 3 more coats will see it finished. Here is a look at it out in the sun to try and get an accurate representation of the colour.


Pretty nice all in all. Should look great with the tortoiseshell pick-guard.

Monday, 25 November 2013

Les Paul Jnr Double Cut: Third Coat of Wudtone

Yes, you guessed it - the third coat of Wudtone went on today. The neck is pretty well finished in terms of colour. Might give it a steel wooling and see if it needs any touch ups. The body still has a few coats to go.


As always, the lighting and the flash plays havoc with the colouring of the photos. The Vintage Amber does not look as red or as golden as the photo implies, nor does the Butterscotch look as yellow. Sooner or later I'll take a photo in the sunlight to try and get a more accurate representation of actual colour. Overall, I'm pretty happy with how it is shaping up.

Sunday, 24 November 2013

Les Paul Jnr Double Cut: Second Coat of Wudtone

After a thorough steel-wooling to smooth out the surface, the second coat of Wudtone was slapped on the body and neck. All in all, the body colour seems to be filling out nicely, and the Butterscotch is slowly becoming more of a golden hue. It's hard to see any difference in the photos, but believe me it's there! In about 5 more coats it should be looking really something.


The Vintage Amber neck finish is also looking good. I took a little extra time with the steel wool to even out the first coat of Amber - especially on the edges where it seems to gather and darken. The time was well spent - it's looking quite good now! Maybe only one more coat will be required on the neck and headstock before the decal can be applied and the clear coats can go on.

Saturday, 23 November 2013

Les Paul Jnr Double Cut: First Coat of Wudtone

After preparing the surface, I was finally able to get the first coats of Wudtone onto this bad boy. I'm using Butterscotch for the body and Vintage Amber for the neck, both with high gloss clear coats. I added about a third of the bottle of White base-coat to the Butterscotch base-coat to lighten the colour a little, and to give me a little more finish to work with.

They both went on well, except for a few unfortunate patches of bog in the body that have now been highlighted rather starkly. Hmm.. I'm hoping they will disolve into the background as the colour deepens. Other than that I'm pretty happy.


Due to the Timbermate pore filling, the grain on this basswood body is standing out quite nicely. By the end of the process this will fade a little as I plan to put as many colour coats on as I possibly can, but hopefully it will still look nice.

The butterscotch colour is a little dull brown at the moment, but I'm hoping that the 'golden' colour will come to the fore as finish builds and the colour deepens. It could well be that my pore filling with Timbermate is affecting the colour. We'll have to wait and see!

Friday, 20 September 2013

Siena's Stratocaster - Two Coats of Vintage Amber Wudtone

Got the second coat of Vintage Amber Wudtone on the neck today. Before I started, I rubbed the neck down with 0000 steel wool. With a little persperation I was able to take off quite a bit of finish from the places where the colour was uneven. As a result, the starting finish was a lot more uniform when it came time to apply the second coat.

The Wudtone went on even easier this second time around without the thirsty wood to grab hold of it. Using long brush strokes with the grain, I was able to create quite an even finish across the entire length of the neck and the front of the headstock. The amber is already now quite dark, so I dont think I'll be applying a third coat. To be honest, one coat would have been perfect if I could just have managed something resembling even.


Anyway, I'm qute satisfied with the result and can't wait to see how she looks with the top coat on!

Thursday, 19 September 2013

Siena's Stratocaster - Wudtone Neck Kit: Vintage Amber

I got my first coat of Vintage Amber Wudtone on the stratocaster neck today. It's an oil based finish so it goes on nice and smooth. Unlike oil paint though, it doesnt streak and soaks into the wood very nicely. For necks, the base colour is brushed on with a fine hair brush. The guidelines say that you should apply several very thin coats.


I think I may have overdone it a little on this first coat - the colour on the front of the headstock is a little uneven. Oh well, I am hoping that the colour will even out with subsequent coats..

Tuesday, 27 August 2013

12 String 335 - Wiring It Up

Finally got to installing the wiring harness on my 12 string 335 today, and let me tell you it was a mammoth effort. Anyone who has tried to do this will tell you that it's a bugger of a job to get a set of connected pots through the F-hole and into place with anything less than a childish tantrum or two.


In the end I sucessfully used the "fish-tank 5mm pipe" method to complete the task. This involves threading pipe through the holes and onto the tops of the pots (and output jack) and then drawing them carefully through the body until they are seated and can be affixed. It takes alot of fiddling as the wires can easily become tangled or trapped between pots and the guitar body, and the pipe can be easily detached from the pots, but finally after 5 attepts and re-starts the components were seated and finger-tightened - job done!


All that was left to do was to add the glorious gold top-hat knobs from Stewmac and then it was off to the ball Cinderella.