Showing posts with label Mosrite Ventures Mk II. Show all posts

Friday, 8 April 2016

Ash Mosrite: Complete

The Ash Mosrite build was finally completed today, and I'm very, very happy with the results. I am now the proud owner of two DIY Mosrite copies!
 
Twins. What father could ask for more?
The wood tones of the subtle burst combined with the black single ply pickguard give this new Mosrite a real vintage feel. The whole look has steered right away from the Ventures II look, but I'm very happy about that. It's more along the lines of Mosrite's other models, with its tummy and arm cuts, as well as the soapbar P90s. It just looks so awesome hanging there in front of a Ramones t-shirt ;).

Geez, whose gut *is* that anyway?
Even with the cuts it's heavier than the Johnny Ramone Tribute build (that one is Basswood), but really feels very nice in the hands and against the body - all in all a very comfortable guitar to play. Thanks to the Tru-Oil finish, the neck is nice and slick, and the 0th fret has allowed the action to come right down. The acrylic gloss coats came out really nicely in the end although, as usual, the Ash grain was a real pig to work with. Sooo many pinholes to deal with!

Anyhoo, enough about those pesky, pinholes. Let's see some glamour shots of the finished guitar and I can wrap this build up and get on to the next one. My stack of unfinished kits isn't getting any smaller!

Glossy, Vintagey, P90-enriched goodness.
So far as the sound is concerned, all the hardware is stock except for the set of Entwistle X90s. Boy do those boys growl! This guitar sounds like a beast. Plenty of middle and low end, with an edgy attach and real punch when over-driven. It's the perfect sound for me and my, ahem, *minimalist* playing style. Hey, if it was good enough for Johnny....

Wednesday, 10 February 2016

Ash Mosrite: Polishing & Wiring

Big strides forward on the Ash Mosrite build the last couple of days, with the body finally cured and the polishing completed. To get the clear coats to their final state is a 4 step process. Firstly the body is wet sanded all over with 1500 grit. At the end of this step the body is completely level once more with no shiny spots at all. The surface is completely matte and ready to shine!

Then comes the 2000 grit wet sanding to remove all the scratches left behind from the 1500 grit. As the 2000 grit is applied, the surface slowly becomes more and more shiny. With the 2000 grit complete, the third and fourth steps are the application of cutting compounds - specifically Meguiars Ultimate Compound and then Meguiars Scratch X2.0 to complete the job.

Meguiars Ultimate Compound does it again.
After all four rounds the surface was as shiny as it was ever likely to get, and that's very shiny indeed! With the polishing done, I set the body aside and let the surface rest; concentrating instead on wiring the pickguard. I do love these builds with all the wiring on the back of the guard. So straightforward!!

I began by shielding the back of the pickguard using copper tape - specifically "Slugga" slug control tape from Bunnings. It's cheap and it works perfectly for shielding. With the pickguard shielded I added back all the components and soon had the simple 2PUP, 1Vol 1Tone 3-way switch circuit (one of the simplest) all soldered up.

1Vol 1Tone, 3way switch circuit.
Pickguard shielded and the 1V1T wiring complete.
With the pickguard completed, I went straight on to inserting the earth wire into the bridge post and shielding the control cavity. Slugga also made short work of this task, and I quickly had the bridge ground wire soldered to the shielding, and from the shielding to the back of the volume pot.

Cavity shielded and grounded to the bridge.
With the shielding and circuit grounded, It was time to assemble the guitar, screwing the neck and pickguard to the body. It was here that I came across a stupid mistake that I made during clear coating. Having attached my hanger using neck bolts in the usual way, I neglected to mask off the inside of the neck cavity. Although the hangar protected much of the cavity, about 1/4 of the pocket at the heel end was covered in acrylic clear. In effect these clear coats creating a neck shim and threw the whole balance of the neck and bridge out.

With a razor blade I set to scraping the clear coats back out of the pocket and with a little patience the problem was solved (phew).  The neck is now sitting nicely in the pocket and the assembly can continue.

Pickguard and neck screwed into place.
With the neck and wiring complete, the guitar makes noise and can be played. The action is still not so nice, and the whole thing desperately needs a fret level/re-crown to start playing nicely. The neck has a 0th fret, so although I don't need to make a new bone nut, I do need to file down the existing nut slots so that the 0th fret can come into play. That's the last step in this build and I can't wait to get her finished! Stay tuned for the final chapter.

Saturday, 6 February 2016

Ash Mosrite: P90 Pickguard Mounts

A little more work today on the Ash Mosrite build. I have decided to create adjustable pickguard mounts for the P90s. A bit late in the game for such changes but hey it's been that kind of build. I got some 20mm x 3mm aluminium bar and made some mounting plates, with holes drilled in the position of the existing P90 mounting screws (the holes near the centre). 

Mounts cut and drilled from 20mmx3mm aluminium bar.
Mounts added to P90s using the existing mount holes.
A couple of more holes in the ends of the bar and the P90s are now able mount like humbuckers to the underside of a scratchplate. I really am a fan of easily adjustable pickups, so for me this was a pretty important modification - if only I had thought of it sooner!

Mounted onto the pickguard with adjustment springs.
Looks great, with all the magic hidden behind the scenes.
The only problem now is that the pickup routes will need to be extended about 5mm on the left hand side to accommodate the new mounting plates. It's a bit of a bugger given the nice gloss finish I have created.

Original routes are not quite wide enough now.
I think some cardboard taped down over the finish will be good for the router to slide on, and should give enough protection from scratches. There's only one way to find out, so let's get routing!

Sunday, 3 January 2016

Ash Mosrite: Clear Coats

It's first weekend of the new year and today (Sunday) was definitely a day for levelling and clear coating, with my Ash Mosrite joining the 12 String Telecaster build in getting its final finish laid down. With about 12 layers of White Knight acrylic clear on the body total, it was time to get out the 600 git sandpaper and wet sand it flat. It took about half and hour of careful wet sanding (no sand-trhough whew!) and the orange peel was finally removed to create a uniform matt finish. On went a final 3 coats of clear - a nice smooth finish to start cutting and polishing.

Levelled with 600 grit and final clear coats applied.
Before the polishing can begin, I need to allow these final coats to cure. That should take about a month (or less if the heat lamps are brought out) with the sniff test being the final decider. It's time I got on to the neck anyway. It has languished all these weeks still in the box because I couldn't quite face sanding again, but now is the time. With no headstock shaping required, I should be able to get it sanded and dyed ready for Tru-Oil coats in the next few days.

Monday, 30 November 2015

Ash Mosrite: Black it is!

I finally got a new pickguard in the mail today from my mate Craig (pablopepper) on the Buildyourownguitar forum. This time it's a black guard to replace the garish white one that I had previously ordered from him. And (queue the fanfare) - I think we finally have a winner!!

A new black custom pickguard and it's all coming together.
Although the subtle burst that I've ended up with on this guitar is not what I originally envisioned for it, I am really coming around to the distinctly vintage feel to this one. With the black guard and the cream soapbar P90s she's just oozing retro cool. I'm thinking now that a black gloss headstock will match the pickguard very nicely indeed, paired with a Fender yellow neck for more uber Vintagey goodness.

The body now has many, many coats of acrylic lacquer applied. All that is left to get her looking swish is to smooth the surface down with some 600 grit, slap on a couple more layers of lacquer, and then polish the christ out of it. I tell you, I'm really looking forward to playing this one. Those Entwistle X90s are going to sound soooo good!!

Sunday, 22 November 2015

Ash Mosrite: Tobacco Burst and Tru-Oil

Finally some progress on the Ash Mosrite. I filled the deep ash grain with some Walnut Timbermate and then got to work on the creation of a subtle tobacco burst. The burst is a combination of Vintage Amber, Red Mahogany and Tobacco Brown Colortone dyes.  I'm pretty happy with it, although it could have been a little darker on the edges. I probably should have used some black as the last step, but I'm not going to go messing with it now!

With the Colortone dye applied, I got out the Tru-Oil and slapped a couple of coats on to try and pop the grain as much as possible. The ash just soaked it right up, enhancing the grain nicely, and with no noticeable addition of shine.

Successful tobacco burst. The 2 coats of Tru-Oil have helped pop the grain.
In the end, I'm going to add gloss Acrylic clear coats to this sucker. I'm hoping that the Tru-Oil will fill the pores and create a barrier between the wood and the acrylic, without stopping the acrylic clear from bonding to the timber. I did have a few pinhole problems with the acrylic clear coats on the Ash Stratocaster build, so I'm hoping that maybe this is the answer. I guess we'll have to wait and see if it works.

With the Tru-Oil dry I could finally get a feel for the final look with my P90 scratchplate installed. You can see it in all its whiteness in the photo below.

My custom white scratchplate over the burst.
Unfortunately my first impression of the white with the brown is not too positive. The white just jumps out way too much for the subtle body colour. In stark contrast, the original black scratchplate looks much better.

The original black scratchplate.
It looks like black is a winner! Looks like I'll have to go back and get a black version of the P90 scratchplate made. I might even have to swap out the cream soap bar covers with black ones, but I'll wait and see how the cream looks with the black scratchplate before I make that decision. Time to get the White Knight Gloss Acrylic cans out and get spraying!

Wednesday, 26 August 2015

Ash Mosrite: Arm Rest & Tummy Cut

I gained a few spare, precious minutes today while my work laptop restored from backup, and that gave me the chance to finally get back to some guitar building - if only briefly. With the increase in weight that the Ash body of my new MKA-2 Mosrite build has gained over the original basswood, I have been mulling over a few simple body cuts. At the risk of turning the MK-2 into a strat (well almost) one obvious solution was to add a tummy cut and an arm rest to the signature Ventures Mk II shape.

Not having ever attempted something like this before, I was a little hesitant, but really how hard could it be? With my trusty rasp and half-round bastard file I decided to find out. After free-handing the cuts with a pencil (using a ruler only for the edge of the arm rest on the front face of the guitar) it was in at the deep end with the rasp. The wood came away easily (a little too easily!) and soon I had the shapes I was after. It was then on to the file to clean up the rather deep gauges left by the rasp.

The file cleaned these up fairly well, and also allowed me to smooth over all the transitions. Lastly it was on to the 80 grit sandpaper to finish everything off and remove the remainder of the rasp and file marks. Man, I do love a good piece of 80 grit paper! The solution to all life's problems.

My first ever tummy cut
With an arm rest to go along with it. It still 'aint a strat, is it??
All in all I'm very happy with the results. In the end it was a very painless exercise, even for someone as inept at woodworking as myself (yes really).  I'm hoping that this guitar will be even nicer to play than my original Johnny Ramone tribute build! Now to get some serious sanding done so I can get on and stain this beautiful Ash body. Stay tuned!

Friday, 26 June 2015

Ash Mosrite: P90s and a New Scratchplate

A little more progress on the Ash Mosrite today, with the arrival of a new scratchplate from my mate Craig - Pablopepper on the BuildYourOwnGuitar forum. The plan is to change the stock pickups to a pair of Entwistle X90s, and so a new scratchplate was required with P90 routes. The new scratchplate arrived yesterday and it looks great.

I had to route out a little of the body to accommodate the larger bridge pickup. I also cut some rubber floor matting to be placed under the pickups. This allows the pickups to sit higher, and allows some height adjustment if needed.

Rubber matting brings the P90s up and allows height adjustment if needed.
The scratchplate went straight on without any sizing issue of any kind (great work Craig!!) and the resulting P90 setup looks really killer. I always wanted a Jazzmaster with this setup, but I reckon the Mosrite shape is going to look even better!

Even without the scratchplate covering she is looking fantastic.
P90 routes are perfectly placed and sized for my Entwistle X90s.
I should really do a mock build with the new pickups in place just to make sure that the strings pass correctly over the pole pieces, but just sizing it up by eye it all looks good to me. I'm itching to get the mock build out of the way so that I can start finishing. I'm planning a tobacco burst, with walnut Timbermate to pop the grain. Should look awesome with the white scratchplate!

Wednesday, 4 March 2015

Ash Mosrite: Unboxing

Well, the postie has been and gone this morning and left a spanking new kit on my doorstep. A special order from Adam and the lads at Pitbull Guitars, it's an MKA-2 - the version of their popular MK-2 Mosrite kit with a 2-piece ash body. I ordered this bad boy the minute I opened up my original basswood MK-2 kit, and although it has taken a couple of months to arrive, it has been well worth the wait!

Unboxing time - I'm still like a kid in a candy store!
The kit comes complete with a solid ash body, a 23-fret rock maple neck (with the important zeroth fret and Mosrite headstock shape), and an authentically shaped pickguard. The stock configuration is powered by a single coil at the bridge position, and a Chinese mini-hum at the neck position. Exactly the same as the MK-2 kit.

With the box open, I could get a good look at the slabs of wood that I had purchased. The body is made up of a couple of nice pieces of ash with a subtle vertical grain pattern. To be honest, I wouldn't have said no to a little more of that beautiful ash grain - but hey, that's the luck of the draw.

The body is a two piece, subtly grained slab of ash.
The neck on the other hand has the most grain I think I have ever seen in a piece of rock maple, with many vertical grain lines to be seen all over the headstock

Now that's some grain for a rock maple neck!
The craftsmanship on both the body and the neck are spot on with no nicks, dents or even glue spots in evidence. That's great news since I am planning a tobacco burst for this sucker. The neck fit is also nice and tight which will give me maximum sustain once this baby is bolted together.

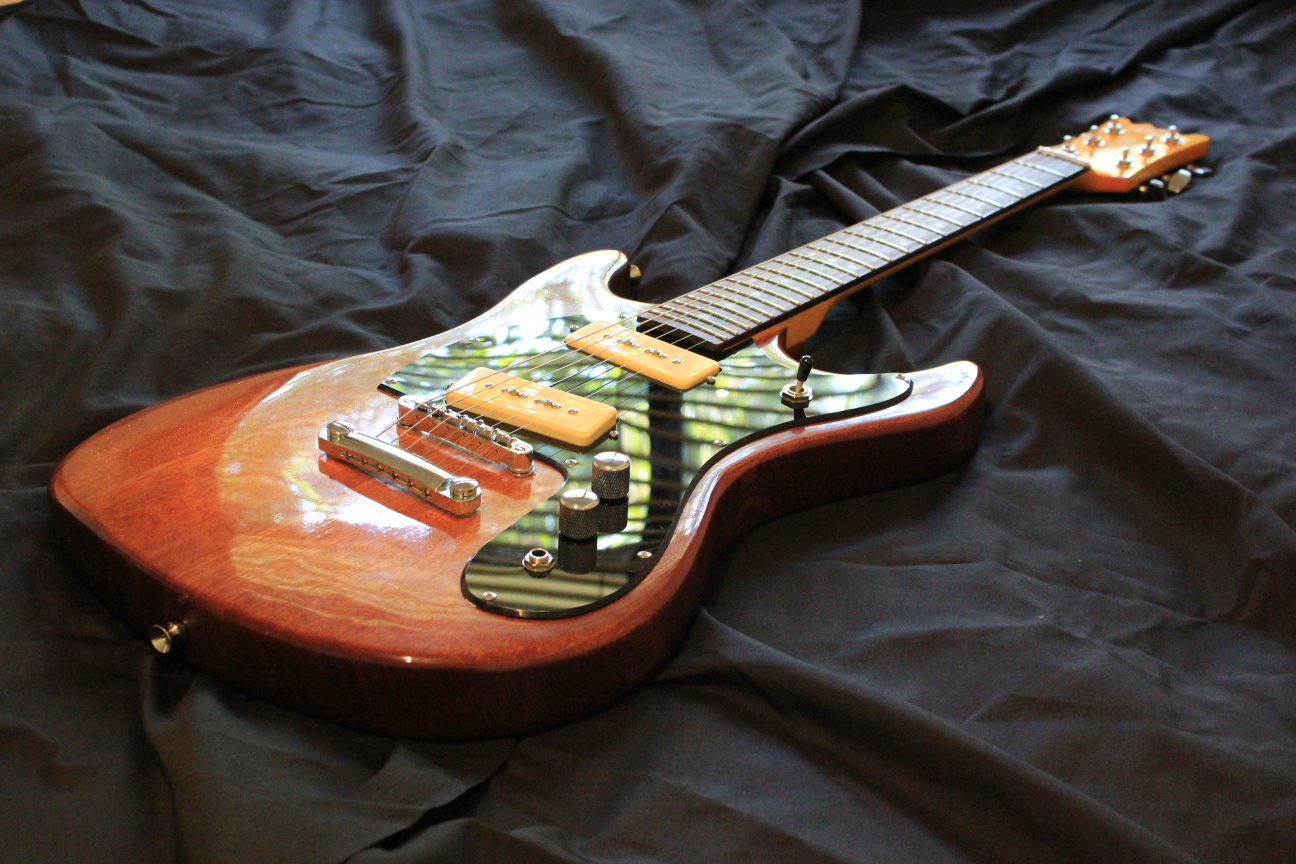
You might remember that I recently purchased a roller bridge and Xtrem tremolo system for my Thinline Cabronita build. I would dearly love to get a tremolo onto this build too - it would just look so damn good. Here is a mockup with the Xtrem and roller bridge in place. It looks awesome if I do say so myself.

Xtrem tremolo and roller bridge positioned on the Mosrite body - cool as!
Unfortunately there is a problem with that plan. The problem is that the post holes for the stop-bar have come pre-drilled. I was hoping that these holes would be such that the tremolo would hide them - all I would have to do is fill them with dowel and finish right over them. Unfortunately no such luck with the Xtrem. The holes are too far apart for the tremolo to hide them completely. On a stained finish they are going to look awful.

Another option is a Bigsby B5/V5 combination. This will attach straight into the stop bar post holes perfectly, but at around $200 AUD a set (and then some) I'm still considering my options. I may have to finish the guitar sans tremolo (using the original stop bar for now) and purchase the B5/V5 when I have the cash.

Anyway, I'll keep my eye out for other tremolo options while I complete the mock build. For this kit that really only amounts to bolting the neck in place, so in no time at all I will be sanding this beast. Fun times!

Saturday, 6 September 2014

Johnny Ramone Mosrite: She's Ready to (Punk) Rock

Well the Johnny Ramone Mosrite Ventures MkII is finally finished and she looks totally awesome. The stark white finish is a dead ringer for Johnny's signature model (without the relic'ing) and the acrylic clear coats have really brought the shine. Whilst it isn't my first choice for other guitars, I think it works very nicely here.


I think I also did a good job with the neck. The Vintage Amber Colortone dye has resulted in a fairly deep yellow but it works well against the rosewood fretboard and the white body. Overall I'm so fucking happy with this axe. It just begs to be thrashed, and I'm just the kind of under-skilled player to do it! The DiMarzio FS-1 DP110 - the same bridge pickup that Johnny used throughout his career - is over-wound and really packs a punch. I'm hoping to have a sound demo posted soon, so stay tuned for that!

Thursday, 4 September 2014

Johnny Ramone Mosrite: DiMarzio FS-1

Well, I've been waiting, erm, patiently? for my DiMarzio FS-1 DP110 bridge pickup to arrive in the mail. Today it unexpectedly popped out of the Australian postal service and on to my front door mat! Nice.


I wasted no time in getting the little bugger mounted in the pickguard and wired into the 3-way switch. A quick tap-test revealed that this thing is over-wound out the wazzoo, so I can't wait to crank her up and take her for a spin.

With the wiring finally complete, It was a simple process to get the remainder of the shielding done (adding copper foil around the lip of the shielded cavity) and to get the pickguard screwed into place. Before I drilled the screw holes for the pickguard I added the E strings to make sure the pickups were in the correct place with respect to the bridge. In no time the beast was assembled!


All that is left to do now is to level the frets and lower the nut slots so that the strings are sitting on the 0th fret. I am tempted to take her out for a spin as-is, but I'm trying to resist. Much better to wait until the action is nice and low!

Wednesday, 3 September 2014

Johnny Ramone Mosrite: Shielding & Wiring


With the body all polished up it was time to consider all things electrical. And even though I still have to wait for my DiMarzio FS-1 to arrive, there's a shitload I can do in the meantime! First thing was the shielding - both the entire cavity and the back of the pickguard.


It's a huge swimming pool of a cavity and it took a great deal of copper tape to shield, but hopefully the results will be worth it. I still have to run a thin strip of copper tape along the top entire edge of the cavity so that the walls make contact with the back of the pickguard. I'll do that just before final assembly as I might want to hit the body with a little more polish between now and then.

With the shielding done, it was time to look at the wiring. I love wiring these simple 1 Volume, 1 Tone kits, especially with all the electronics mounted there on the pickguard. There's nothing to stress about, just whack it together. Two pickups enter the switch, one wire leaves and it's straight shooting to the output jack from then on. In no time I had the neck pickup wired in and could do a tap-test to check the volume and tone circuits.


Tappity-tap - volume, tone, it all works perfectly! Now just waiting on that awesome bridge pickup and everthing will be sweet. She's already looking cool, just one little hole to fill.


Next up is a fret level. I'm in a quandry about how to deal with the 0th fret. My options are to level it with all the rest or to leave it a little higher than the others. I'm leaning towards leaving it a little higher just like a nut would be. Still some thinking to do there..