Showing posts with label Acrylic Clear Coats. Show all posts

Friday, 24 June 2016

Jazz Bass: Surf Green it is

Well, another basswood build, another dye attempt, and another clear-coat fail. There seems to be a curse on the Holgate man-cave. This build has now become the second (or is it third?) dyed basswood body to receive dye and then end up being a solid colour. The black was looking good for a while, but in my haste pre-coffee one morning I didn't look too closely at the can and sprayed a jet of white primer over the body instead of clear vinyl. Complete noob mistake and a bloody shame.

Anyway, after a few tears I threw my hands up in the air, sanded what I had flat again, and set about covering the whole thing in primer. Looking at what MTN94 colours I had in the cupboard, I decided on a surf-green finish (a bit of a default for me it must be said). The MTN94 Bali Green was dutifully extracted and a couple of coats applied. This is how she ended up.

Bass gets two coats of MTN94 Bali Green
I must say, I do like the colour, and it'll look great under some gloss clear. Once the colour has had tie to cure I'll start back on the clean vinyl in earnest. Fingers crossed.

Monday, 14 March 2016

Jeremy's Mahogany Les Paul: Clear Coats and Pin Holes

Jeremy's Les Paul has finally cured to the point where I can start looking at it again. Unfortunately, after flattening the clear with 600 grit I noticed that the acrylic clear coats have dried over the mahogany and left several annoying pin holes in the finish. Nothing for it but to drop fill them from the can. It's pretty straightforward - just spray come finish into the lid and use a bamboo skewer to put a drop of clear on top of each hole.

Lid from the Acrylic Spray and a Bamboo Skewer

Pin Holes filled. Now to let them set and then level off.
With each hole covered by a drop of clear, it's then a matter of time to let these drops dry sufficiently before they can again be leveled off with paper. In this case, with the help of my trusty outdoor heater the back was cured again in a week and ready for sanding down with 1500 grit. Having done this, and liking what I saw, I went straight on to the 2000 grit and Meguiars Ultimate Compound. The results are pretty great if I do say so myself.


A great deal of shininess is now on show. The next step is to get the neck glued on and the hardware installed. I'm getting pretty excited about this build now!

Wednesday, 10 February 2016

Ash Mosrite: Polishing & Wiring

Big strides forward on the Ash Mosrite build the last couple of days, with the body finally cured and the polishing completed. To get the clear coats to their final state is a 4 step process. Firstly the body is wet sanded all over with 1500 grit. At the end of this step the body is completely level once more with no shiny spots at all. The surface is completely matte and ready to shine!

Then comes the 2000 grit wet sanding to remove all the scratches left behind from the 1500 grit. As the 2000 grit is applied, the surface slowly becomes more and more shiny. With the 2000 grit complete, the third and fourth steps are the application of cutting compounds - specifically Meguiars Ultimate Compound and then Meguiars Scratch X2.0 to complete the job.

Meguiars Ultimate Compound does it again.
After all four rounds the surface was as shiny as it was ever likely to get, and that's very shiny indeed! With the polishing done, I set the body aside and let the surface rest; concentrating instead on wiring the pickguard. I do love these builds with all the wiring on the back of the guard. So straightforward!!

I began by shielding the back of the pickguard using copper tape - specifically "Slugga" slug control tape from Bunnings. It's cheap and it works perfectly for shielding. With the pickguard shielded I added back all the components and soon had the simple 2PUP, 1Vol 1Tone 3-way switch circuit (one of the simplest) all soldered up.

1Vol 1Tone, 3way switch circuit.
Pickguard shielded and the 1V1T wiring complete.
With the pickguard completed, I went straight on to inserting the earth wire into the bridge post and shielding the control cavity. Slugga also made short work of this task, and I quickly had the bridge ground wire soldered to the shielding, and from the shielding to the back of the volume pot.

Cavity shielded and grounded to the bridge.
With the shielding and circuit grounded, It was time to assemble the guitar, screwing the neck and pickguard to the body. It was here that I came across a stupid mistake that I made during clear coating. Having attached my hanger using neck bolts in the usual way, I neglected to mask off the inside of the neck cavity. Although the hangar protected much of the cavity, about 1/4 of the pocket at the heel end was covered in acrylic clear. In effect these clear coats creating a neck shim and threw the whole balance of the neck and bridge out.

With a razor blade I set to scraping the clear coats back out of the pocket and with a little patience the problem was solved (phew).  The neck is now sitting nicely in the pocket and the assembly can continue.

Pickguard and neck screwed into place.
With the neck and wiring complete, the guitar makes noise and can be played. The action is still not so nice, and the whole thing desperately needs a fret level/re-crown to start playing nicely. The neck has a 0th fret, so although I don't need to make a new bone nut, I do need to file down the existing nut slots so that the 0th fret can come into play. That's the last step in this build and I can't wait to get her finished! Stay tuned for the final chapter.

Friday, 29 January 2016

Jazz Bass: None More Black

There's not much happening in the man cave at the moment, what with 3 builds hanging with un-cured Acrylic clear coats. Luckily there is still another build that can progress while I patiently wait.

Over the last week I sanded the body of the JB-1 Jazz Bass build down to 400 grit and applied a trans-black dye job using Black Colortone stain. To pop the grain this time around, I didn't sand back the first coats to remove most of the colour. Instead, while the dye was still wet, I used a clean wet rag to literally drag the colour out of the surface; leaving the deeper grain still coloured. I repeated this several times, re-applying the black and dragging it back out, until I was happy with the overall effect. It's not a technique that will work if you want grain popped in another colour (eg black under blue etc) but for the same colour pop it works extremely well.


Trans-black finish shows the grain nicely

With the dye on, I was able to begin the clear coats on this bad boy as well. Make that 4 builds now hanging in the drying room (ie my shower recess). But at least this one needs plenty more coats.

In terms of assessories etc. I'm currently considering an all black look - black pickguard and black control plate cover. It may be a little over the top, so I'm reserving judgement for the moment. I'm also considering a custom 3-ply black pickguard that also covers the control plate area. Something like this:

An interesting pickguard option. Seriously considering!
Not sure I'm up for the fiddly edging required but again it's on the list for consideration.

Thursday, 14 January 2016

Jeremy's Mahogny Les Paul: Final Clear Coats & Tru-Oil

Some more progress on Jeremy's Les Paul today. With the acrylic clear coats having hung for a month of more drying, it was high time I flattened them in preparation for final coats and polishing. With some 600 grit sand paper, I wet sanded the White Knight acrylic finish until all the orange peel had been removed and the entire surface took on an even matt finish. Soooo smooth!

Acrylic flattened with 600 grit ready for final coats
The body was then ready for two more acrylic coats, in preparation for a month of curing. She's looking nice and glossy at the moment - I'm very interested to see how she looks after the final polish.

Last clear coats on and now ready to cure.
With the body hanging to cure, I was also able to get another coat of Tru-Oil on the neck. There are over 15 coats on there now, and today I started wet sanding it with 600 grit. From now on I'll be applying coats of Tru-Oil thinned 1:1 with Minural Turps. You know when it's time to start thinning the Tru-Oil as you start to see streaks in the finish, and this tends to coincide with the first round of wet sanding.

Wet sanding with 600 grit and thinned Tru-Oil coats have begun on the neck.
About 5 more coats of Tru-Oil, with successively finer wet sanding, and the neck should be ready for a final polish. The neck is feeling really nice and smooth now, so she should give the final axe a really nice feel.

Sunday, 3 January 2016

Ash Mosrite: Clear Coats

It's first weekend of the new year and today (Sunday) was definitely a day for levelling and clear coating, with my Ash Mosrite joining the 12 String Telecaster build in getting its final finish laid down. With about 12 layers of White Knight acrylic clear on the body total, it was time to get out the 600 git sandpaper and wet sand it flat. It took about half and hour of careful wet sanding (no sand-trhough whew!) and the orange peel was finally removed to create a uniform matt finish. On went a final 3 coats of clear - a nice smooth finish to start cutting and polishing.

Levelled with 600 grit and final clear coats applied.
Before the polishing can begin, I need to allow these final coats to cure. That should take about a month (or less if the heat lamps are brought out) with the sniff test being the final decider. It's time I got on to the neck anyway. It has languished all these weeks still in the box because I couldn't quite face sanding again, but now is the time. With no headstock shaping required, I should be able to get it sanded and dyed ready for Tru-Oil coats in the next few days.

12 String Telecaster - Clear Coats

After 3 days worth of clear coats with White Knight gloss acrylic (3 coats per day), the 12 String Telecaster was ready for a couple of weeks hanging over the Christmas period. Now with its builder sporting a rather rotund post-holiday visage, the acrylic has cured sufficiently (just a slight lingering smell) to allow the clear to be flattened with 600 grit. With the orange peel removed and the surface brought down to an even matt finish, I was able to spray the final 3 coats of clear.

Acrylic levelled with 600 grit an final coats applied.
Time now to let this baby hang for a month or so to let the clear coats fully cure. It will then be time for the final cut and polish. In the meantime, I have to get started on the neck finish. I still have to get some 400 grit paper to finish the sanding, then a grain fill, amber dye job and copious layers of Tru-Oil.

With hindsight, I'm not sure that the choice of a trans-black finish was the best for this build. I think that in the end the dye job was too heavy and that the flame maple figure is lost in all that black. I definitely applied too many dye coats, and I should have stopped when the body was more of a "grey" tint with the flames standing out. Oh well, lesson learned. It's still gonna be a nice black Tele.

Friday, 4 December 2015

Jeremy's Mahogany Les Paul: Clear Coats!

A week has past since my last post on Jeremy's Mahogany Les Paul build. In the intervening days, the body has been receiving regular coats of White Knight Gloss Acrylic, and Tru-Oil has been slowly building on the neck. This is the first time I've sprayed acrylic clear directly onto a dyed flame-maple top and I gotta say that I'm pretty bloody happy with the results! I wasn't sure how much the flame maple would pop without a bit of oil soaked into the figure, but I needn't have worried. The flame maple is looking really really great! There's even a crap-load of chatoyance visible in the grain, and I really didn't expect that! I think Jeremy's gonna be pretty pleased with how she's looking.

Acrylic clear coats building nicely and popping that flame figure.
The thin coats of Tru-Oil are building much more slowly on the neck, but already the grain is looking really nice here too. I'm giving it a smooth down with 0000 steel wool every 3 coats or so, so after another hundred or so coats she'll be feeling really nice indeed :). After 3 or 4 more coats of acrylic I'll give the body a smooth down with 600 grit, bung on a couple of top coats and leave it to cure.

Monday, 30 November 2015

Ash Mosrite: Black it is!

I finally got a new pickguard in the mail today from my mate Craig (pablopepper) on the Buildyourownguitar forum. This time it's a black guard to replace the garish white one that I had previously ordered from him. And (queue the fanfare) - I think we finally have a winner!!

A new black custom pickguard and it's all coming together.
Although the subtle burst that I've ended up with on this guitar is not what I originally envisioned for it, I am really coming around to the distinctly vintage feel to this one. With the black guard and the cream soapbar P90s she's just oozing retro cool. I'm thinking now that a black gloss headstock will match the pickguard very nicely indeed, paired with a Fender yellow neck for more uber Vintagey goodness.

The body now has many, many coats of acrylic lacquer applied. All that is left to get her looking swish is to smooth the surface down with some 600 grit, slap on a couple more layers of lacquer, and then polish the christ out of it. I tell you, I'm really looking forward to playing this one. Those Entwistle X90s are going to sound soooo good!!

Thursday, 12 November 2015

Burley 335: New Hardware & Clear Coats

Was finally able to get back into a little building today. With travel for work followed by a couple of weeks holiday OS, there 's been precious little time for building of late. It's great to be back in the man cave, even if it is just finishing up some long overdue projects.

On the table today is my 335 kit with Ash Burl veneer that has been bumming around the man cave for about 12 months. In between bouts of coding the last few months, I've been able to get some White Knight acrylic clear coats on her, and my OS trip gave the coats plenty of time to cure. Today I rolled up my sleeves and with some 1500 grit, 2000 grit and Meguiars Ultimate Compound, polished the crap out of it. Pretty happy with the results - that White Knight sure is the easiest way to clear coat a build, and the results can't be argued with. Yes, it's a bit cheaper using you own spray equipment, but with no mixing and no cleanup I'm happy to spend a few extra bucks on the cans.

Acrylic clear coats. Very happy with the results.
I immediately followed up with the hardware. This time around I'm rocking a GFS xTrem similar to the one I used on the Thinline Cabronita build. To this I added a roller bridge and a set of GFS Mean 180s. I was very happy with their sound on the Les Paul Florentine build, so thought I'd use them again here for a little extra chrome, and a little extra punch. I gotta say, I'm very happy with how she's looking!

GFS hardware installed. Now for the electrics.
Just the electronics to go now. That's no simple task (at least the insertion) but hopefully I'm an old hand at it by this point. She's going to look really sweet hanging with my other 335s! I think I'll get back to Jeremy's Les Paul first though - that's a build that's long overdue (sorry Jeremy!) and the thought of getting the fish tank tubing out again is giving me the willies.

Tuesday, 5 May 2015

Thinline Cabronita: Wired and Making Noise!

Well, she's finally finished - the Ash Surf-abilly Thinline Cabronita. I'm very, very happy with the final results - much better than I ever imagined that they would be. The seafoam green flames over the Bali green base work really nicely, and give a nod to the rockabilly set. All that chrome hardware from GFS also works nicely too, as does the retro Cabronita pickguard.


The seafoam and Bali greens are very difficult to photograph. Depending on the light, the photo you end up with is either a washed out olive green, or a light blue like the photos below. You'll just have to take my word for it - this baby looks seafoam in the flesh. That is to say, really bloody awesome!


As usual, the acrylic clear coats came up beautifully. The White King spray cans of gloss acrylic really are the easiest way to get a beautiful gloss finish on your axe - I cannot recommend them highly enough.


While the Thinline retains the classic lines of the Telecaster, the semi-hollow body removes most of the weight, resulting in a guitar that is very easy to handle. The body resonates really nicely too and you can almost play it like a hollow body (almost). Certainly there's a deal more noise coming from the guitar than a straight solid body Ash Telecaster.
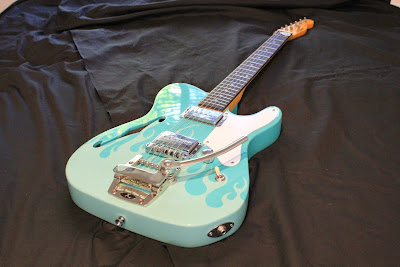


All in all, I'd have to say that the Thinline Cabronita is very nearly the perfect guitar. Doing away with the control plate, it's got super-cool looks, it feels nice and light in the hands while remaining balanced on the strap, and it sounds really great unplugged. And with a couple of GFS Mean 90s on board, the package is even better!

These pickups sound really nice in clean mode - delivering just enough single coil twang for surf and rockabilly riffs. When you crank up the distortion, the pickups meet the challenge head on and really live up to their "mean" moniker. These babies rocks as hard as the best of them! So too, the xTrem tremolo from GFS is a really nice addition. It has a nice fluid feel, and combined with the roller bridge and roller string trees, doesn't seem to create any tuning stability problems. All in all a great little package that I'm having a hard time putting down!

Saturday, 25 April 2015

Cabronita Thinline: Clear Coats & Assembly

After a few sessions baking under the IR lamp, the chemical smell has finally gone from the White King Acrylic clear coats and my Surf-abilly Thinline Cabronita is finally ready for its final cut and polish! As usual I started the process with a good wet-sand with 1500 grit, wet and dry paper. It took a while, but finally all the orange peel was removed and the surface was nice and matte with no shiny low spots. With this complete, I moved up to 2000 grit. After all the effort required to level all the orange peel with 1500, the 2000 took no time at all and the surface really started to take on a shine.

With the wet-sanding completed down to 2000 grit, it was time to cut and polish with Meguiars Ultimate Compound. This is when the shine really starts to deepen! After two passes with the compound - rubbing it in with small circular motions and then wiping it off - the surface looked amazing. There's no visible height transition between the flames and the background colour (the surface is completely flat) and the shine is awesome.


First pass with Meguiars Ultimate Compound.
With the polishing complete it was time for the long awaited assembly. The pre-drilled screw holes made it a snap to re-attach the neck and get the bridge and tremolo locked down without marring the finish at all.The pickups required a bit of finagling to get them lined up and screw holes drilled, but it was finally managed.

Hardware went back on like a dream.
Neck is still straight, with the strings running nicely from the tremolo,
over the bridge to the nut.
All that is left for me to do now to get the body finished is to cut a new pick guard out of plain white 3-ply material (the kit came with black) and to finish the wiring using shielded wire. Even with the bridge flat on the deck the strings are a good 5mm away from the 22nd fret, so the neck will need a shim before I do a fret level and complete the other setup tasks. First though - get this bad boy making noise! Can't wait to hear these GFS Mean 90s in action.

Tuesday, 17 March 2015

Ash Stratocaster: Wet-Sanding & Polishing

After a few hours on the IR lamp, and with no discernible smell of chemicals coming off the surface, I guessed that the acrylic lacquer on the Ash Stratocaster was ready for polishing. I started with 1500 grit wet/dry paper, and wet-sanded until all the low (shiny) spots were removed from the surface. There were one or two pinholes in the finish, unfortunately caused by the ash grain and my own inexperience lacquering bare wood, so this is something to look out for next time.

With the surface nice and matt from the 1500 grit, it was time for the 2000 grit. After a good wet-sanding with 2000 (which took much, much less time than the 1500), the matt look was beginning to be replaced with a dull shine. Time for some Meguiars Ultimate Compound! The photos below show the surface after one application of the Meguiars Ultimate.

Meguiars Ultimate Compound to bring the shine after the 2000-grit.
Nice huh? The transformation under the ministrations of the Ultimate Compound are always amazing to behold. The shine seems to just materialise out of thin air. The next step (tomorrow) is to give the surface a second application of this compound and then move on to the Meguiars ScratchX 2.0 to really complete the shine.

My gold hardware also arrived from Pitbull Guitars today, as well as a white perloid pickguard. The gold hardware really looks excellent with the blue body and the white guard, and I can't wait to get them put together. The hardware also includes gold mounting screws and all the bits and bobs, so in the end there will be plenty of bling to see on this bad boy!

Gold hardware is looking the business! White pearloid looks great too.
The neck also looks great, although a blue headstock would have been better.
All in all, this build is shaping up to be a really nice looking axe. Up until this point, I've not really been much of a Stratocaster fan to be perfectly honest. But you know what, this guitar might just be the one that converts me. I guess it will depend on how nice she is to play. Based on the initial neck profile, I'm thinking she's goinna be sweet with a little attention paid to the setup and the action.

Saturday, 14 March 2015

Ash Stratocaster: Ready for Polish

After a day of rain and no way to spray outdoors, the weather was bright and sunny today and I was able to get the can of White Knight clear acrylic out for a final coat on the Ash Stratocaster. The surface was beautiful and level after my previous ministrations, and the final coat went on like a dream. Both the front and back look really beautiful now - it's amazing how much it has helped enhance the underlying grain!

Final Clear Coat for Polishing. The Ash Grain is Looking Amazing.
Nothing for it now but to let this final coat cure for a few days under the IR lamp until the smell disappears. Patience is a virtue at times like these - or at least having a second build to be getting on with! I've learnt from previous experience that there's no point polishing until the curing is done. Disappointment is sure to follow! I am very excited to see this build put together though...

Wednesday, 11 March 2015

Ash Stratocaster: Clearing, Levelling, Rinse and Repeat..

More levelling and clear coating today on the Ash Stratocaster. Firstly, I took the acrylic clear back with 800 grit wet-sanding until both my shoulder was aching and I was stricken in terror lest I sand through to the dye. The top was *almost* level - just a few grain lines poking through - but I decided more clear wouldn't hurt.

Surface levelled with 600 grit. It's not perfect yet, but it's getting there!
After a good clean it was on with two more coats of acrylic gloss. Man, now she really shines - and the shinier she gets, the more the blue is enhanced and the grain pops. And it's just amazing how different this blue Colortone looks inside the cave versus out in the sun! Anyway, here's the new shine:

Two more coats and a bake under the IR lamp. The shine is getting there!
Looking pretty good! After these two coats nearly all of the grain has been filled. You can still see a few small grain lines that remain in the clear:

It's shiny but some grain lines remain. Back to the 800 grit!
One more round of 800 grit wet-sanding and a final coat of acrylic should remove these lines and allow one more coat of clear to complete the job. After that she'll be ready for curing and polishing. It's gonna to take a week or so to cure fully under my heat lamp (I'll basically wait until all the smell is gone from the surface). But the curing starts on Friday! More levelling to do before then. Better rest my sanding arm!