Showing posts with label Raising Grain. Show all posts

Monday, 12 June 2017

Bareknuckle Super Strat - Grain Filling & Colour

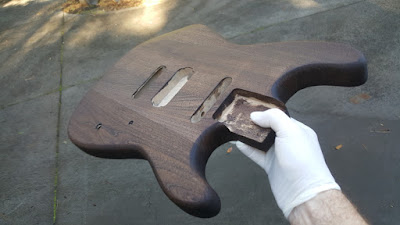
I found an hour today while the wife walked to dog to actually get some building done in a makeshift man-cave that I've set up. There's no lighting, but I've got some rubber mats and some carpet down on a temporary bench.  I got the body sanded down to 360 grit, with a few water wipes to raise the grain and 400-grit cutting back. Pretty happy with the smoothness - this is a nice piece of wood! With the surface prepared, and time running out (is that the patter of dog feet I hear?) I slapped on a slurry of ebony timbermate to fill the grain.

Ebony Timbermate applied. Just gotta let it dry completely.
Fast forwad one weekend hence, and it was time to sand the Timbermate back and get some colour on. After agonising over the flames idea, I've turfed it into the too-hard basket and decided to go with straight black stain. I sanded off the Timbermate with 400 grit, and the body is now smooth as a baby's wossname. It might be even too smooth to take colour. Hmm.

Timbermate sanded off, and grain filled nicely.
I got out the Colortone black dye and applied a first stain coat. I've been tossing around colours for the last fortnight, but trans black finally won out. I'm certainly a creature of habit! The stain is drying as I type and soon I'll be able to apply a second round. It's starting to look good, although there's a couple of spots where the dye hasn't taken as well as I'd like. Always seems to happen with black dye (well mine anyway). Too much sanding I'll wager. I may need to hit these with a stronger dye soluton, or add some Colortone to the Tru-Oil when the time comes.

First coat of Colortone Black dye

Friday, 6 March 2015

Ash Stratocaster: Grainfill & Dye

More progress today on the Ash Stratocaster build! I finally got the body sanded to 400 grit and then went through 3 passes of raising the grain with water and sanding back down until I was happy with the smoothness.

Smooth as a baby's Wossname.
With the body smooth as a baby's unmentionables, it then was time to fill the grain. Instead of dying black and sanding back, I opted to fill the grain with dark filler in much the same way as I did with the Ash Les Paul build. For that build I used walnut Timbermate to fill the ash grain as it matched the brown hues in the burst nicely. For this build I decided to use ebony Timbermate as the black would work much better with a blue dye. I actually did a few tests with 4 different Timbermate colours against a blue background and the ebony was certainly streaks ahead of the others. Anyway, I got the Timbermate smooshed down into the grain, and a few hours later sanded it off again with 400 grit.

A slurry of timbermate pushed down into the grain and left to dry.
Timbermate sanded back with 400 grit to leave the grain filled.
Once I was happy with the amount of black left in the body (there was still a little more than I was hoping for, but it's in the grain - what can I do) it was time to start the staining. After agonising for a month over what dye to use (you've probably read the posts!), I finally decided on the Colortone blue. It's not as "brilliant" a blue as I would have liked, but with the darkness of this piece of ash, and combining that with the darkness of the ebony Timbermate, she was never going to be a "brilliant" blue anyway.

And so the dye went on for a first coat, and I gotta say, I was very pleased with the results! The blue dye combined with the ebony Timbermate resulted in a kind of "slate" blue. Very nice! It's not what I had envisioned for this build in the beginning, but I'll take it all the same! Here's a picture of the blue in the sunshine. The dye here has dried quite a bit, so the final colour will be a bit darker (a more "wet" look).

Blue dye and black grain in the sun. It's dry here so final colours will darken.

The photos give some impression of the contrast between body and grain. This will increase again when the lacquer goes on. Suffice to say I'm very happy with the way the grain pops. I think she'll look pretty good with a bit of lacquer and a brilliant shine!

And... here she is with the original white scratchplate on. Looks pretty good, but I'm now imagining a black burst around the edge and an aged cream pearloid scratchplate.

Final colour will be darker blue, but I'm also considering a black burst
What do you guys think would look best?

Wednesday, 27 November 2013

Les Paul Jnr Double Cut: Off With His Head!

With no question that the Vintage Amber headstock colour had to go, I decided to scrub it back to bare wood (just the face) and start applying Butterscotch Wudtone instead. With the decision made, all that was left to do was sand with 180 grit until all the colour was removed, then finish off with 240, 360 (plus grain raising) and finally 400 grits.


The Wudtone on the sides of the headstock remained unaffected, and didn't even twitch as the colour came off the top edges. This was a great relief I can tell you. I also managed to sand flat so that none of the colour was removed from the sides of the headstock at all.


The first coat of Wudtone went on thereafter (ever so carefully) and the transformation was well on its way. I am paranoid that I'll make a mess of the Butterscotch down the sides of the headstock, but I'm being as careful as I can be. Only time will tell if this step backwards has been worth it, but I already suspect that it has been. Even without 5 coats of Butterscotch, I like the new headstock sooo much better.

Tuesday, 26 November 2013

Les Paul Florentine: Sanding & Raising the Grain

Got some sanding on the Florentine done today. Started with 180 on the sides and back to try to remove some of the original machining/sanding marks. Still not sure I got all the suckers - end grain really is a bitch.  Moved on to 240 and then finally 360. After one go round with 360 it was time to raise the grain with methylated spirits and then another pass with 360 to knock it down again.


On the front I began with 240 and then moved to 360. The grain was raised with methylated spirits here too, but I made sure that the sanding was much lighter - I really don't want to sand through the veneer! The result is pretty smooooth.

Now that I've sanded to 360, there is just 400 and 600 grits to go before the Colortone dye can be applied. For each grit I will repeat the grain raising procedure. I'm still not sure what colour combo to throw at this bad boy. My current thinking is a blue top, with a darker colour (blue, black, blue+black?) in the initial trace dyes to allow the quilted maple figure to pop as much as possible. For the sides and back the jury is still out. I'm not sure whether to go for wine red / mahogany or maybe even go for an almost natural colour - maybe just Tru-Oil to accentuate the grain. Whatever I do to the back and sides will also have to be done to the neck and headstock. Hmm decisions..

Saturday, 23 November 2013

Les Paul Jnr Double Cut: Preparing a Solid Body for Wudtone

Before adding Wudtone to my Les Paul Jnr, the wood surface must be prepared - and that means more than a few a few hours of sanding, sanding and (you guessed it) more sanding.


My standard preparation for solid body basswood guitars (without veneer or binding) is as follows:
  • A really good sand with 240 grit, taking special note of areas where there is glue (there shouldn't be much if there's no binding) and filler (bog). I usually go over the body at least three times as there is no worries about sand through and so on. What does 'go over 1 time' mean in this context? Well, I tend to sand in 'sessions'. Basically, in 1 session I keep sanding until I've had enough and walk away. This is a single 'session' and on average it consumes one regular piece of wet-and-dry, and just a little bit of my remaining sanity.
  • Move up to 360 grit sandpaper. I usually go over the body at least twice (2 sessions) with 360 grit.
  • Fill the grain pores with a slurry of Timbermate and water. Dilute the Timbermate until it is like runny custard and then brush it on with and against the grain. For basswood I usually use a 'Maple' colour. For mahogany I go with a darker 'Walnut' colour. It all depends how much you want the grain to stand out. If you love grain, then typically the darker the pore filler the better.
  •  Let the Timbermate dry completely.
  • Use 360 grit paper to sand down the Timbermate until it basically disappears from the surface of the timber. Don't worry, it's still there in the pores, but the obvious Timbermate colour is gone.
  • Switch to 400 grit paper. Give the body a light sand - not too much or you will undo all your good work with the Timbermate! The surface should be feeling very smooth by now.
  • Raise the grain of the wood using water in a damp cloth. Let the surface dry completely.
  • Sand the raised grain back down  with 400 grit paper.
This is my pre-Wudtone preparation for basswood bodies. For maple necks, I do all this, but without the pore filling step. This is as far as I go for Wudtone as more sanding makes it hard for the Wudtone to soak effectively into the surface.

Disclaimer: Many exponents of Wudtone strictly adhere to the mantra that you should only sand to 240 grit as preparation. Personally I find that sanding to 240 makes it almost impossible to achieve a high gloss finish. I've only completed one Wudtone project so far, so maybe time will out on this one. At the end of the day it is up to you!

For other finishing products, in particular Tru-Oil, it is important to sand down to at least 600 grit paper. When doing this, I repeat the last 3 steps (400 grit + grain raising) with 600 and each subsequent grit size. Typically, though it is only one more to 600 (to save my sanity more than anything else). I have read build diaries online where other builders continue to 800 an 1200 before dying and oiling. It is definitely the case that Tru-Oil finishes benefit greatly from finer sanding, as the smoother the surface is to begin with, the less wetsanding you'll have to do to get a nice smooth finish.

Tuesday, 17 September 2013

Siena's Stratocaster - Grain Raising Misadventure

I got the neck sanded today in preparation for my Vintage Amber Wudtone Neck Finish. The talk around the campfire is that you should only sand to 400 grit maximum before applying this stuff so that the oil based colour can actually soak into the wood. With this in mind, i sanded the maple neck with 240, 360 and 400 grits. I raised the grain at both 360 and 400. Hmm, I hope I didnt go overboard.

Here's a tip. When you are raising the grain on a neck with a rosewood fretboard and you plan on using methylated spirits (de-natured alchohol) to do it, be very careful. If the fretboard has any black dye on it (and most of the kit rosewood fretboards do), that alchohol will take the dye straight off. If you're unlucky, the dye laden alchohol will find its way straight onto and into your cleanly sanded maple neck.

And believe me, it's a fricken bitch to clean off again.

Friday, 5 July 2013

BC Rich Avenge - Sanding, Pore Filling, Grain Raising

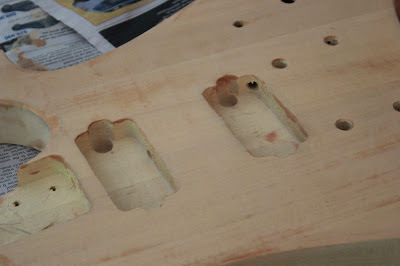
More holiday fun yesterday as my son and I sanded the Avenge kit through successive sand paper grades from 260 through 320 to 400. This was all done primarily with the orbital sander. The old sanding block was only trundled out for the sides. It was then time to fill the pores. We used a slurry of Timbermate - a good Australian product - after the first round of 400 grit to achieve this.


The entire surface was covered with the mixture and pushed into the pores using t-shirt material rubbing in small circles against the grain. Excess was squeegeed off and allowed to dry.


A second sanding with 400 grit (now with sanding block only) returned the surface to its former glory. It was then time to continue on the sanding block to lightly go over the body first with 600 and then 800 grit. The final preparation before primer was to raise the grain using methylated spirits to soak the wood. Once dry, we rubbed the now stubbled surface against the grain with coarse weave cheese-cloth. The result was a guitar top that feels like glass :). The end-grain was a little more stubborn, requiring a lick of the 800 paper to smooth it. Can't wait to see how this baby comes up with a little colour sprayed on her!