Saturday, 31 May 2014

Solid Body PRS: A Bone Nut & Ramping the Last Few Frets

Well, I've been enjoying the PRS for a week of two now. It's really nice to play, even with the standard plastic nut. The fretboard inlay stickers are staying put (I haven't even noticed they are there) and it really is a beautiful instrument under the fingers.

To improve the action still further, two more tasks remained to get this axe into silky smooth territory. Firstly, as always, new a bone nut would allow me to get the string height at the top of the fretboard down to it's absolute minimum. The nut was quickly shaped and the nut slots painstakingly filed until the correct height at the 1st fret was achieved. Open chords are now wonderful to play :).


Along with the nut, I used my new 8" sanding beam to level a "ramp" into the last 6 frets at the end of the fretboard. Kudos to Fletcher guitars and their scratch build YouTube series for tips on performing this addition to standard fret levelling. The result is a much lower string action!


Basically you lay 3 layers of tape across the 6th fret up from the end of the fretboard and then sand the remaining frets with the beam resting on the taped (raised) one. The end of the beam resting on the taped fret does not have any sand paper stuck to it so that it can glide on top of it easily. The result is a "ramp" down to the end of the fretboard, reducing buzz from these frets as the string action comes down.

She's now even more spectacular to play. The action is the lowest out of any of the guitars I have put together to date, and I really love the feel of the fretboard. A little Dr Ducks axe wax, and a new set of D'Addario extra light strings, and she's now as shredable as she's ever likely to be.

Wednesday, 21 May 2014

Surf Monster Telecaster: 3rd Coat of Acrylic Clear

The acrylic clear coats are slowly building up on the blue telecaster now and she is looking better and better with each coat. I have now completed 3 coats (with 3 passes each) over the last 3 days. The colour is looking great! It's just about time for the first sand back to level up all the surfaces in preparation for a final coat.


I'm going to try and wait the full 30 days on this one before I attempt to wet sand and polish the acrylic finish. I've never been able to wait the required curing time in the past, whether it be for lacquer, Tru-Oil, or poly finishes, but I must have more patience. Yes I must!! It really helps the finish the more curing time you give it. Here's hoping I don't get too bored in the coming month...

Friday, 16 May 2014

Surf Monster Telecaster: Get's a New Look

Well, the Surf Monster Telecaster is no more. After a rather epic clear coat fail that also claimed the solid paint job underneath, it was time to re-think. I decided to go with Blue Colortone dye with a darker burst. The grain on this body really is too good to hide under a layer of paint.

I sanded the body back to bare wood and went up through the grits to 400. I filled the pores with Timbermate and then sanded to 600 grit. The dye went on shortly after. Interestingly, there are a few places where the underlying grain didn't want to take much colour. Maybe the sanding to 600 was responsible. I'm not sure, but I like the look a lot.


The photos show the finish after the first coat of Acrylic clear. The colour is not really tru-to-life. The blue is a little darker and fuller, but still looks pretty damn good here. I think it's going to come up nicely. I might be tempted to add some blue dye to a few of the clear coats to add a little more colour. I'm not sure yet. We'll see how it is looking after a couple more clear coats.

Wednesday, 14 May 2014

Solid Body PRS: Shredder's are Go!

Well, she is all put together and she looks amazing. Today I received my CTS 500K pots and Sprague Orange Drop capacitor in the mail and they went straight into the control cavity. From there it was a relatively painless job to get the rest of the wiring soldered in and the Switchcraft jack with stylish oval jackplate installed.


I really love how this build has ended up, from the beautiful flame maple veneer to the Wudtone Vintage Yellow neck, from the art-deco trapeze tailpiece to the jet black headstock. Of course the bird inlay stickers are the icing on the cake.


I wish I was skilled enough to add *real* fretboard inlay to my bulds, but at the moment the stickers will have to do. I've done a few bends over them and they seem to be staying in place, although I haven't got any Dr Ducks Axe Wax on there yet!


Even the basswood body came up very nicely with the Colortone dye and Tru-Oil finish. I was a bit disappointed with the final colour (as the original turquoise went green under the influence of the Tru-Oil) but that's a lesson learned. With my next build I'm going to try blue Colortone dye with just Acrylic Clear over the top. We'll see how much chatoyance we achieve without the Tru-Oil..


Anyway, I've managed to get quite a low action on this baby and she plays like a dream. The GFS Surf-90 pickups sound really nice - a good vintage growl - and they sound really nice both clean and through the overdrive. It's not too heavy, and is very balanced on the strap. I'll be shredding this bad boy (if you can call what I do shredding ;) ) for the next few weeks no doubt!!

Tuesday, 13 May 2014

Solid Body PRS: Shielding and Pickups

Well the PRS is in the home straight now. I have gotten all the cavities shielded with copper shielding tape and soldered wires between them to make them electrically conductive. With the ground wire from the bridge post now soldered to the wall of the bridge pickup cavity, this means all my shielding will be nicely grounded. All I will need to do to ground the rest of the circuit come wiring time is to run a wire from the control cavity wall to the back of the tone pot. Simple, easy.


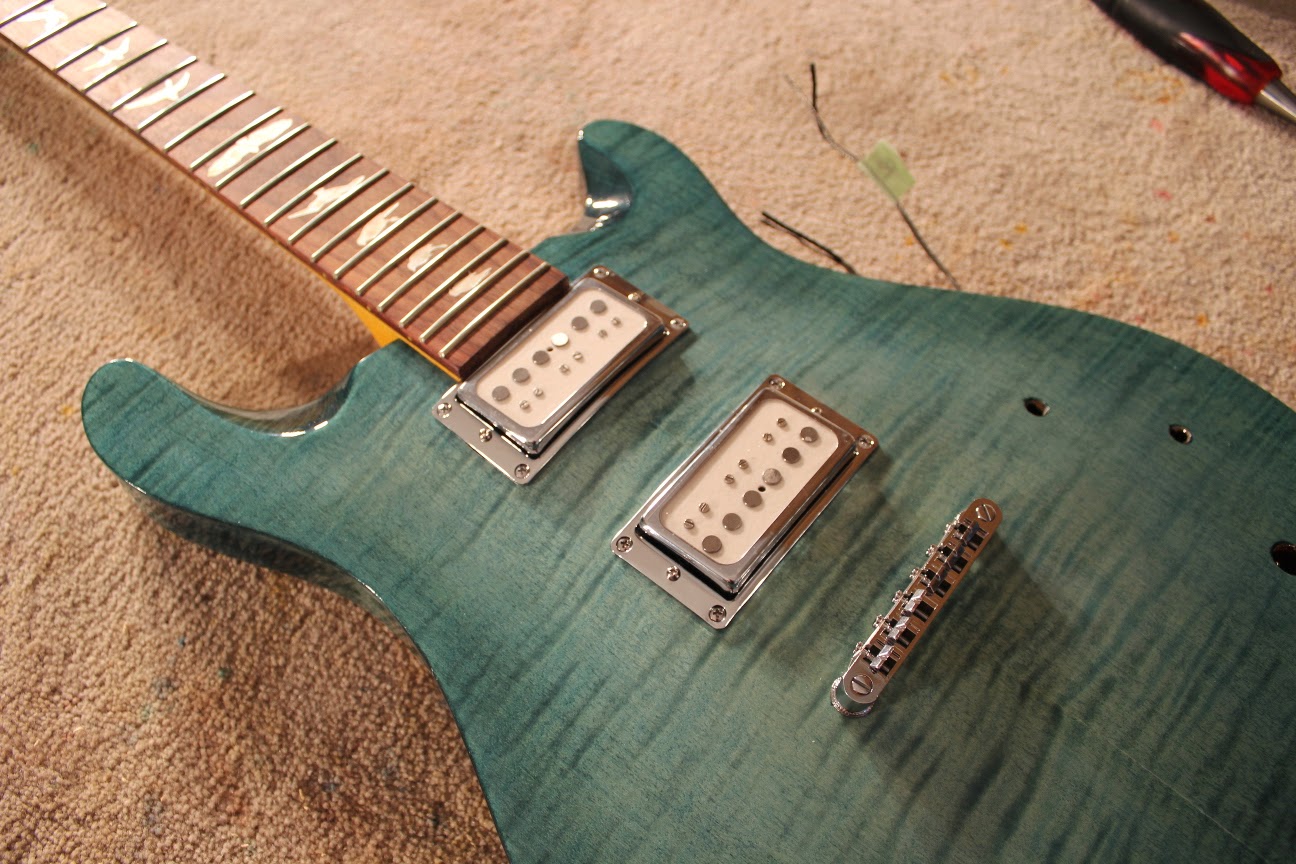
The GFS Surf-90s were next to be installed. I put a slight bend in the thin (but tough!) chrome humbucker rings using just my fingers, and it was enough to allow the screws to pull the corners of each surround all the way down to the body.


As usual, the wire conduit hole drilled from the bridge pickup into the control cavity was directly under one of the pickup mounting screws. When will kit manufacturers realise that the bottom right corner is the worst place for this conduit? I had a few stressful minutes wondering whether the pickup screw would break the wires from either the ground or the 2 humbuckers (it was getting pretty crowded in there), but a quick tap-test on the pickups after screwing down the surround seemed to suggest that everything is OK. Seems like I was able to keep the pickup wires more or less out of the way as the screw went in.


With the pickups in and the neck strung up, this baby is really starting to look like something special. I must say I wasn't that fond of the black headstock when I first did the paint job, but it really does suit ths body shape. In spite of the trapeze tailpiece (I do love a trapeze tailpiece!!) she is looking like a real shredder. With just a simple set-up I was able to achieve quite a comfortable and low action, so I can't wait to get the rest of the wiring in there and take her for a spin.

I'm waiting on CTS 500k pots and an orange drop cap before I can finish the wiring, but that should be here in the next day or so. Hopefully she'll be screaming by the end of the week!

Monday, 5 May 2014

Flamed Telecaster: She's All Done.

Well the flamed telecaster is finally complete. I probably could have waited another couple of weeks for the Acrylic Clear to cure, but I never was very patient. In a month or so I'll give her another polish and that will be that. The hardware went on easily and without incident, and the wiring was a snap -  almost as easy as wiring a Strat.


I  still have to do a full fret-level and re-crown before this baby is completely done. I started to do it, but I wasn't able to immediately straighten out the fretboard for levelling. I've given the truss-rod a bit of a turn so I'll wait a few days to see if it straightens out. Even without the fret-level, the neck plays pretty nicely, and the GFS Professional Series 52 Vintage Pickups sound pretty sweet! She's now officially a 'Vintage' series ;). I've never owned a Telecaster before, and I'm really liking how it plays!

Saturday, 3 May 2014

Solid Body PRS: Fret Birdies

Another neck and another fret-level and re-dress completed. It's pretty hard on the hands - that little "Little Bone" file of mine. I'll be feeling it for a week. Anyway it's done. And now I can get my fret-marker stickers installed. I've never used these before, but have heard good things. I got them from Jockomo and they promise that I won't be able to tell they are even there. I guess we'll have to see. I can't wait to see how she plays!


Solid Body PRS: Polishing Tru-Oil with Meguiar's

Well, the Tru-Oil coats are finally finished on the PRS. It is always a relief, I can tell you, to get to the end of the 15-20 coats required to build up a decent shine. I never feel like it is going to end, but the final few thinned coats went on pretty quickly (with wet sanding in between) and here I am. With just the thinned Tru-Oil, the shine you can produce is actually pretty good..


But to really dial in the shine you need to polish. This time around I'm taking the advice of Jarrod from the Pitbull Guitars Forum and trying Meguiar's Ultimate Compound and Meguiar's Scratch2.0 to do the polishing. In the past I have used Stewmac Colortone Compounds with good results. However it's pretty expensive by volume if you include the postage. Anyway, Jarrod (and also Sully from Sully's Guitars) uses Meguiar's compounds for acrylic clear coats, but they should be OK for Tru-Oil right? They're just an abrasives right?? Well only one way to find out..!

And so I got rubbing. After applying the Meguiar's Ultimate Compound, there was really nice shine developing. The surface definitely feels smoother, and it doesn't seem to have affected the Tru-Oil in any detrimental way that I can see.


Despite my arm feeling like lead, I immediately went on to the Meguiar's Scratch2.0. A thousand small circles later and the top was finished. It's only a subtle improvement from the Ultimate Compound to the Scratch2.0 but I *think* there's a difference. There better be given how much my arm aches ;). What do you think?


Anyway, now i need to polish the sides and back and this baby will be ready to assemble. First job will be to glue the neck and then we can get on to the electronics. Fun fun!!