Monday 31 March 2014

Stone Roses Tribute: Procrastination Over

Well, over the weekend we finally took the plunge and made a start on the pollocking of the Stone Roses Tribute guitar. Two colours down, and a shit-load more to go!


What do you think? I like how it's coming along! Very tempting to throw the clear on now and call that done! Another 2 weeks of the one-colour-a-day application process and we'll finally be done. Can't wait to see how it turns out!

Surf Monster Telecaster: Test-Fit

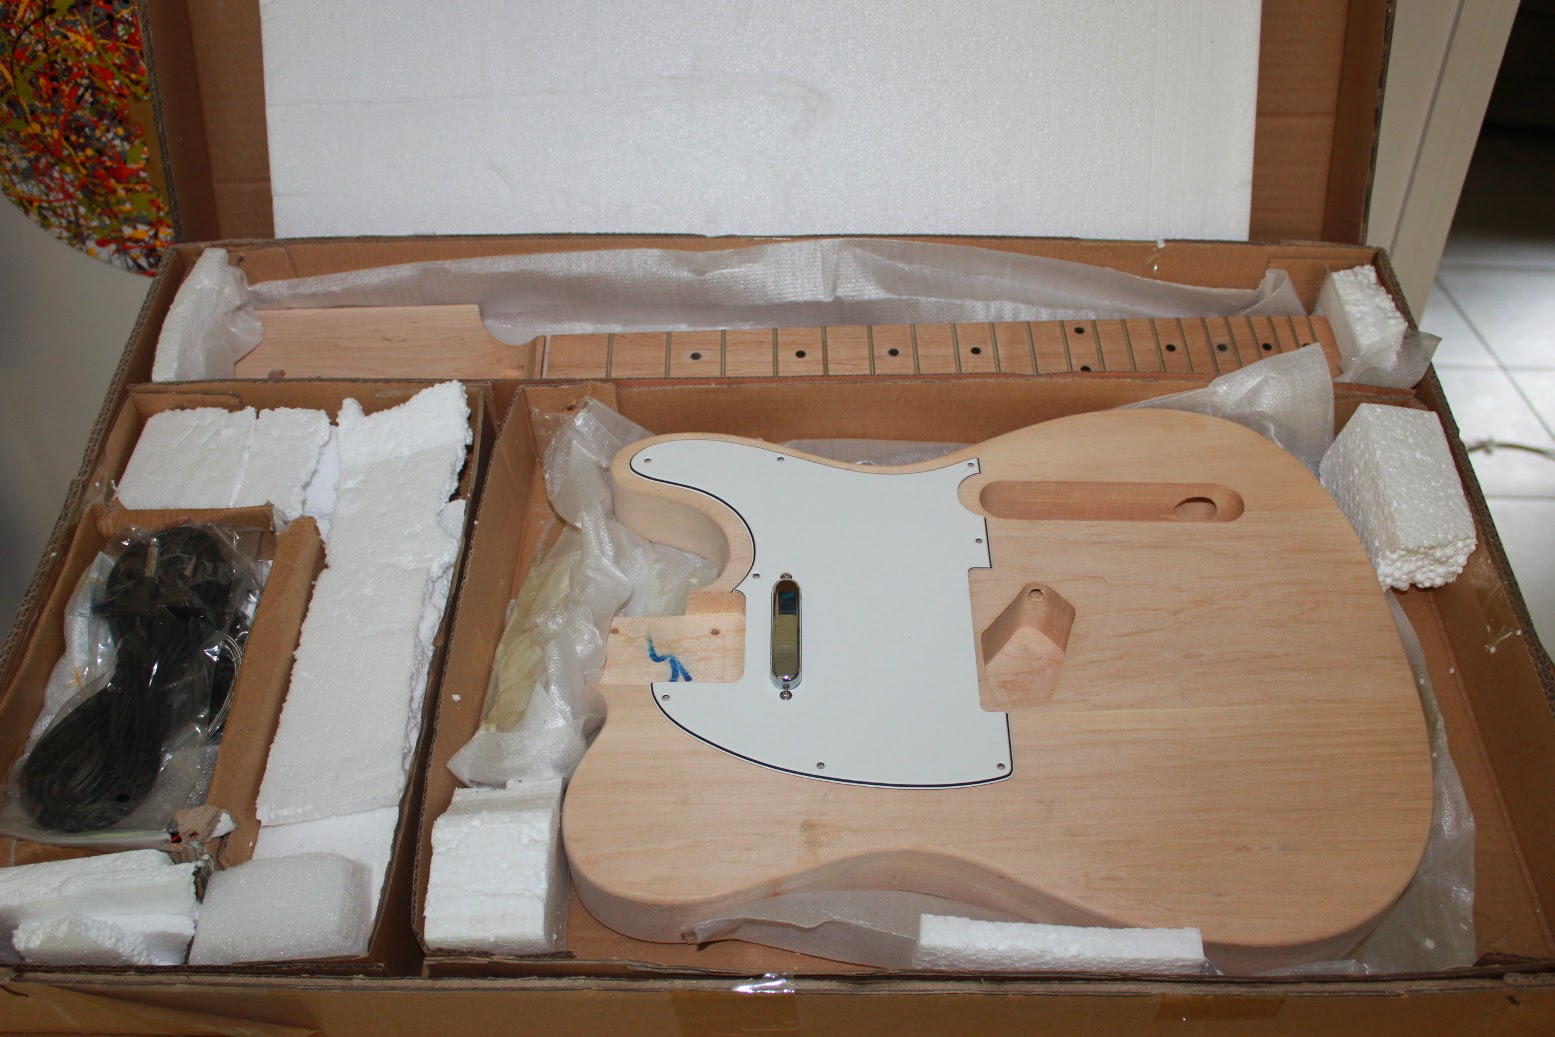
Today I managed to complete the test-fit for the seafoam green telecaster I'm currently building.  As you may have read in the threads for my other kit builds, it is very important to get everything on your guitar kit fitting together nicely before you start the finishing process. If you skip this step, chances are you'll reach the assembly steps of the build with some woodworking that needs to be done. When that happens, say goodbye to the pristine finish you spent weeks getting perfect!

Anyhoo, the kit from Guitar Builder Store Australia went together without a hitch using the supplied bridge, scratchplate and control cover. There was no woodworking to be done at all!


In particular, the neck fit was very good, and no work needed to be done at the bottom of the neck pocket to better fit the neck heel. Awesome! Another surprise was the scratchplate which fit snuggly around the base of the neck; again without any adjustment necessary! All-in-all I'm very, very happy with how this kit has fit together. I can't fault it - kudos to GBSA!


With the neck screwed in, it was a very simple process to position the bridge to get the high and low E strings running straight up the neck to the nut and sitting equidistant over the neck and bridge pickups. The bridge pickup in particular aligned perfectly with the E strings sitting directly over their respective pole pieces. Brilliant!

With this done, it was a simple matter of drilling all the screw holes, tightening everything down, and I was done. Nothing to do now but to shape the headstock and then get the body ready for it's coat of seafoam green gloss acrylic.

I'm staying with all stock hardware on this one, including the pickups - something I've never done before. I can't wait to see how she plays! 

Friday 28 March 2014

Stone Roses Tribute: Procrastination Anyone?

So, for a week or more now there's been no progress on the Stone Roses Tribute build. There's been a couple of contributing factors but the main reason, now that it comes to it, is that I'm nervous about starting. Once that paint hits the guitar there's no going back!

And so in the spirit of complete and utter procrastination, and to vet my splatter technique one last time, I built a life-size prototype of the guitar out of 6mm ply, painted it with the same primer and gloss enamel used to prep the actual guitar body, and got the kids to fling paint at it. I could have had the kids flinging paint at the actual guitar body but hey.


There was one useful outcome of the exercise. This time around I varied the amount of paint used on the guitar compared to my first prototype, with a much smaller amount of paint, and fewer paint passes used to create the effect. I had looked at my first prototype long and hard and was starting to worry that it was too busy. The result of the changes to our technique was a guitar with much more white space.

Which do you guys think looks better? The consensus from the interweb is a unanimously in favour of the initial prototype. I think I agree! And so, the procrastination has reaching it's logical termination. The only thing left to do now is to bite the bullet and start-a-splattering. Watch this space!

Surf Monster Telecaster: Unboxing

I got a nice surprise in the mail this morning - a Telecaster kit from a new Australian guitar parts site: Guitar Builder Store Australia. It is always so exciting to received new guitar kits in the mail! I got the kit at a bargain price that has subsequently been increased by $30, so I am counting myself very, very lucky to have it. I hope I didn't wipe out all the margin for the folks at Guitar Builder Store!


Out of the box the kit looks good. Overall, the packaging was excellent with tons of polystyrene packing that was taped into place. The hardware was placed in a separate cardboard box, with scratchable items (most importantly the pre-loaded control plate) wrapped in a soft covering to prevent scratching. Other much appreciated features - the neck screw holes came pre-drilled on both body and neck, and the neck came without it's nut glued in! I've never seen a kit with this before and it is a really cool way to ship, especially for Telecasters that have that annoying nut slot.


The body is 3 piece basswood with grain nicely matched and cleanly routed. This isn't much of an issue for me as I intend a solid colour for this one.


There's nice grain on the maple neck, and the maple fretboard, and no glue spots are apparent on the body (again not an issue for me this build). The fretboard is nicely finished (it feels very smooth) with no machining marks at all and nice even frets.


One tiny gripe with the packaging is that the pickguard came taped to the body. This meant that a gum stain from the tape was left on the body upon removal (it'll have to be sanded off) and the pickguard's protective covering was ripped off, no matter how much I tried to retain it. This is one thing that could definitely be improved in an otherwise excellent packing job.

I did notice that the bridge pickup route looked a little small compared to my other telecaster kit. A quick fit-test showed that the supplied pickup and bridge fitted snugly. However, when I tried my OEM bridge and GFS vintage '52 pickup that I purchased for my Flamed Telecaster build, they just didn't fit. The bridge could not be seated in line with the neck - the bridge pickup route will definitely have to be enlarged to fit the GFS pickup.

Apart from the issue with the bridge pickup route, I'm very happy with the kit. I'm planning on painting this one seafoam green - I've always wanted a surf telecaster like the example given below. Not bad for inspiration huh?


The closest spray paint I could find to Seafoam Green from Australian online retailers was "Studebaker Green" from OzGraff.


Looking at it now, the colour may be a little bluer than I was hoping for, but what the hell. Hopefully it will look good so long as it isn't held up against another seafoam guitar.

Solid Body PRS: Unboxing

I scored myself a bargain today. A flamed maple PRS-style solid body kit from DIYGuitars Australia. The kit was $99AUD delivered for just the neck and body. For any kit with a nice maple cap that's a super price!!


As previously stated, the kit comes with a flamed maple cap over a body of basswood. The kit is set-neck with a nice tight neck fit - there is not one mm of movement side to side, and the end of the neck fits snugly against the bottom of the neck pickup cavity with the pickup installed. The maple cap is beautiful and will looks fantastic with some ColorTone stain and Tru-Oil.


I'm thinking about a Turquoise dye job - a 50/50 mix of ColorTone blue and green, with the flame maple popped with a darker mix. I've never attempted this colour before, so should be interesting! The kit came with nothing but the wood. This means that I will have to cut a control cavity cover myself.


I've got plenty of pickguard material around here to choose from, so no sweat there. But, it will be yet another first for this build!

Lastly, I have to choose some hardware for the build; most importantly the choice of bridge. I have several bridges here to choose from - an intonated wrap around bridge, a tune-o-matic bridge with either stop or trapeze tailpiece, or even a strat-like stop bridge. I'm leaning towards the trapeze tailpiece, but as you may have noticed from my previous builds I'm a real sucker for the trapeze!


Anyway, there are plenty of options. The pickups in the photo will probably be replaced by others. I'm not a big fan of plastic pickup rings, and I may source some flashier pickups from GFS. With so many choices to make, I'm very excited about getting this kit underway. It should be a great one, so stay tuned!!

Tuesday 25 March 2014

335 Semi-hollow Bass: Amber Burst

This morning I took the plunge and attempted my second burst using ColorTone dye - a so called "poor man's burst". The target of my ministrations was my ES335 Bass (EB-4) from Pitbull Guitars. My first attempt on my Flamed Telecaster build was moderately successful, although I would have liked more distinction between colours.

I prepared the body with a light sand down of 360, 400 and 600 grits. At 600 grit I did a single pass of grain raising using Metholated Spirits, but the maple hardly need it.

This time around I didn't perform a 'trace-dye' on the wood to check for glue spots. I was instead prepared to stop dying if any glue surfaced and perform a sand back to remove it. Amazingly, this Pitbull Guitars kit exhibited no glue spots at all around the binding or veneer join. What a great kit!

The steps to produce the burst were as follows:

Step 1: I wiped clean water over the entire top. This helps the dye take up evenly across the surface and prevents and streak or wipe marks in the dye.

Step 2: Using ColorTone Vintage Amber as a base, I applied this to the entire body.

Step 3: In an attempt to pop the flame maple further, while the first pass was still wet I proceeded to lightly wipe a 70:30 mix of Vintage Amber / Red Mahogany over the top.

Step 4: I applied Red Mahogany to the edges in successive passes, using the Vintage Amber to feather the edges. Several times I used a clean rag to help feather the edges as well.

Here's the result - I'm pretty damn pleased with it!


The edges are nice and dark with the red mahogany bleeding into the flame maple as it reaches for the centre of the guitar. The centre has retained it's bright Amber hue and has not been muddied with brown. With the masking removed from the binding, you can see what a great job the 3M 471 pin-striping tape has done to keep the stain off. I love this 471 tape!!

All in all an almost perfect result - I'm right chuffed with myself. And now for the back, which was completed with much the same technique, although the lack of flame maple veneer made it a little harder to accomplish an even burst IMO. I think it came out OK though. Almost as good as the front.


Those of you with a keen eye will notice a glue spot on the heel of the guitar. There are several small glue spots around the sides. After I have applied some Tru-Oil to the front and back to lock in the dye, I'll go back over the sides with the sanding block to get rid of these glue spots. It's a small price to pay for such a perfect kit on the front and back!!

Tuesday 18 March 2014

335 Semi-hollow Bass: Unboxing & Test Fit

It's been sitting on my shelf since November waiting for the right time to start, but now I'm excited about the 335 bass guitar kit that I've snagged from Pitbull Guitars.


It's an ESB-4 kit with a semi-hollow body, flame maple cap and maple back. (identical in most respects to the ES-1G/ES-1GT 6-string kit). The front of the body has 3-ply binding whilst the back has singe ply. Pretty standard for this style of guitar. It was on the basis of an enquiry from yours truly that Pitbull decided to stock this particular kit. I've been trying to source such a kit for a while, and Adam from Pitbull came through for me. It's a testament to their truly amazing customer service.


Since it was the first of ts kind, the version that I received was the very first production run from the chinese factory. As such there were bound to be a few issues - and there are - but nothing that can't be handled with a little patience.  Firstly the neck pocket isn't really finished, and when positioned in the pocket, a sizable gap exists between the neck heel and the base of the pocket. Nothing a little filing won't fix.


And in the end, that's all it took - a few minutes work with my bastard file to flatten the inside floor of the neck pocket and the neck fit was pretty well perfect. Come gluing time, there will be no issues there.


With the neck pocket fixed, the rest of the mock-up process went reasonably smoothly. The neck alignment was perfect right out of the box, with strings from the bridge sitting straight along the neck.


The second unfortunate teething issue with the kit concerns the fit of the tuning pegs in the headstock. Unfortunately the headstock has been made just a touch too small for the large tuners that were supplied (and which are a signature for this style instrument). With the reduced size headstock, the pegs touch in the middle and cannot sit straight.


There are two possible fixes to this problem: a) to grind a little of the shaft off each peg so that they can straight sit opposite each other, or b) to fill the current tuner holes with dowel and redrill new holes for smaller tuning pegs. I'm leaning towards option a) because it means no complicated woodworking to attempt. The tuning peg shafts won't look as nice this way, but if I don't take too much off no-one will be any the wiser.

So, I think I will see to the tuners before I do anything else, just to make sure the grinding actually solves the problem and the pegs can be screwed into their final position. After that's done the finishing can start! Should be a great build.

Les Paul Florentine: She's Finished!

I made the finishing touches to the Florentine build today - with the custom truss rod cover being finally screwed into place. The cover still isn't as "cream" as I would have liked (I was aiming for the same colour as the Dream 180s) but in a pinch it will do.


I think that this build turned out beautifully - with that cherry quilted maple and all gold fittings really catching the eye. The Pit Bull Guitars kit (ES-2T) is a great kit - with a quality maple cap - at a very reasonable price compared to other semi-hollow kits. The guitar is very nice to play as the semi-hollow body is very light compared to your typical mahogany Les Paul. To be honest it's a revelation! The tone that the semi-hollow body it creates is warm, even without the guitar plugged in, and in conjunction with the Dream 180s it can really scream when it wants to.


All in all I couldn't be happier with this build. I'm seriously considering purchasing another one of these to finish in a different colour (tobacco-amber burst?). There's so many different kits out there to explore, but I've particularly enjoyed this one every step of the way.

Anyway, let me know what you think peoples! I think it's stunning, but how about you??

Monday 17 March 2014

Stone Roses Tribute: Video Build Diary #5

The fifth instalment of my video build diary for the RC-1 Stone Roses Tribute is now on YouTube. This instalment deals with the scraping of the edge binding, and applying the Wudtone colourless neck finish. See my new binding scrapers (made from a scrap of wood and a razor blade) in action!

Sunday 16 March 2014

Flamed Telecaster: 8th Coat of Tru-Oil

8 coats of Tru-Oil are now on the flame maple telecaster. Starting to look really nice. The colour is a little dark for me, and there isn't enough of a burst along the edge, but not bad for a first attempt. I can see now that the trace-dye coat I did was too dark using just Red Mahogany. A mix of Vintage Amber and Red Mahogany (maybe 70/30) would have been much better! The flame would have have been more subtle, but this would have allowed much more of the Amber colour to come to the fore in the centre of the burst. On the plus side, the Tru-Oil has soaked into the grain and enhanced the chatoyance nicely.


I am especially happy with the back of the guitar. No chatoyance here, but the pores of the mahogany filled very nicely with Timbermate and the Vintage Amber / Red Mahogany burst is more pronounced. Yes the burst could have been better, but all in all it came up nicely.


Overall I'm pretty happy with how the build is progressing. The mahogany body should sound really good with the GFS 52' professional series pickups I've bought for it, and the custom perloid pickguard also looks the business.

A couple more coats of Tru-Oil and I'll be ready to start wet sanding.

Saturday 15 March 2014

Les Paul Florentine: Sound Demo

OK, so for those of you interested in how this beat sounds with the semi-hollow body and the GFS Dream 180 pickups, I have done a quick sound demo. Please excuse the crap playing. The guitar is being played through a Fender Reverb amplifier with no additional pedals or effects other than those provided by the amp itself.


In addition to the Dream 180s, I have added a bone nut, switchcraft jack and 3-way switch, CTS pots and orange-drop caps. The entire demo is with the tone all the way up.

I gotta say, I love the way this baby sounds. Quite a large tonal range to play with, and the light body fells great in the hands. It looks so awesome, and sounds so good, I'm sorely tempted to make myself another one!

I've still got the custom truss-rod cover to go before I call this one completely finished. Just waiting on some supplies from eBay!! 

Wednesday 12 March 2014

Stone Roses Tribute: White Gloss Base Coats Complete

The spraying is finally complete on the Stone Roses Tribute. In the end I sprayed 3 coats of white primer, and then 3 coats of White Gloss Acrylic over the top of that. All surfaces have come up really nice and flat, and all my masking held to the last. There is a nice edge between the front headstock face and the natural back and sides, and the cavities remained clear of colour.


The only thing left to do now before I begin the Pollocking is to scrape the binding clean. I've had trouble with this in the past, and so to help me I have constructed a couple of jigs to keep my scraping blade an even distance from the edge of the guitar. This should lead to dead straight binding reveals and hopefully no wood showing - an issue that has plagued me on previous "freehand scraping" adventures.


The jigs allow the depth of a razor blade to be varied according to the size of the scrape surface required. A wing nut allows the split wood to be loosened and tightened so that once the exact width is dialed correctly it can be locked into place and not move.

Doing the 1-ply top binding is going to be a challenge as not only is it very thin, but the thickness of the binding varies depending on how hard the end grain was sanded in that area. I think I'll err on the side of caution and set the scraper to a little less than normal 1-ply binding width.

Flamed Telecaster: Bursting!

Today, with the trace dye completely dry, I sanded the Flamed Telecaster back with 360 and 400 grits on the orbital sander. I was in constant fear of sanding through the veneer, but thankfully I got it done without that particular catastrophe striking again.

After sanding it was time to apply the burst. I started with a weak mix of Vintage Amber Colortone dye and applied this over the whole top. I followed this up with a much darker strength Vintage Amber to help pop the grain even further. With the amber on. I started to create a burst around the edge with more Red Mahogany, alternating between Mahogany, clean and Amber rags until I was pretty satisfied with the results.


 And then it was the back's turn. I pore filled the mahogany body with a slurry of Walnut Timbermate and sanded back with 400 grit. I then applied a layer of Vintage Amber dye all over the back and sides (to match the front) and then proceeded to burst again with Red Mahogany. I made sure I got plenty of Red Mahogany on the sides to provide an even transition between the cap and the back burst.


What do you think? I reckon it's pretty sweet. The flame maple has come up a treat and there is a good deal of chatoyance to be seen. Will be even more once some coats of Tru-Oil go on. The edge could probably do with a little more red mahogany, but overall I'm stoked with the results. This is the first burst I have ever done, and my message to those out there considering trying it? GO FOR IT. It isn't as hard as you might think. If I can do it, then anyone can.

Tuesday 11 March 2014

Flamed Telecaster: Trace Dye

As I was worried about sanding through this flamed maple cap, I decided to get the trace-dye on their as soon as physically possible to minimize the amount of material required to be taken off it. So after sanding the cap lightly with 360 grit, on went the Red Mahogany Colortone dye. The dye went on evenly, and surprisingly there doesn't appear to be any glue spots at all!


I've gotta say, I really love this Red Mahogany colour - I never knew it looked so damn good! It's going to look awesome under the Vintage Amber and on the mahogany back and sides.

Next job: sand the top down to 400 grit (thereby taking much of the trace-dye off again) and continue sanding the rest of the the mahogany body. With the body sanded to 400 grit I will be able to fill the pores with Walnut Timbermate - the next big task!

Flamed Telecaster: Test-Fit Completed

While I'm waiting for coats of gloss white to dry on my Stone Roses Tribute build, I thought I'd get a start on my first ever Telecaster build. It's a kit that I ordered directly from China through aliexpress.com, and although there is no binding around the top (a source of some consternation on my part) it should be a great build.


The mockup went together without incident. There was a little bit of work required to get the scratchplate to fit around the heel of the neck, but with my trusty nut files this was easily overcome. Although the scratchplate is a 3rd party addition to the kit (I liked the idea of white pearloid), the plain white scratchplate that came with the kit suffered from the same issue.


I'm planning to finish this guy in a combination of Colortone dyes and Tru-oil, with a final gloss coat of clear acrylic. The flame maple top will be dyed Vintage Amber, with the figure popped with Mahogany Red. To this I am planning to add a Mahogany Red burst around the edges, and I'm hoping this will help hide the edge join between the mahogany and the maple cap.

I've never done a burst before so this will be a first for me. I'm very excited to get started on it, but first there's sanding through 600 grit and filling the mahogany body with Walnut Timbermate. Fun times!!

Sunday 9 March 2014

Stone Roses Tribute: Video Diary #4

The fourth instalment of my video build diary for the RC-1 Stone Roses Tribute is now on YouTube. This instalment deals with sanding off the Timbermate (pore filler) and applying the primer to the body.


It's the must watch series of 2014. Ok, maybe not.

Friday 7 March 2014

Stone Roses Tribute: 2 Coats of Primer

After a week of preparation I finally got the first coats of primer onto the body and headstock of the RC-1 today. I filled the pores with a slurry of Timbermate after sanding to 400 grit, and then sanded back with 400 until nothing was left on the surface. Finished it off with 600 and then 800 grit before I was finally in a position to spray.


The initial 2 coats are on and it's starting to look like something! I'm liking the way it is turning out. Now that I've removed the masking to make sure all is well on the neck and the binding, I'll be re-applying new masking and then adding a final coat of primer. There's a couple of places where the masking has been placed a little low and has covered up a little of the wood (see below).


This needs to be rectified. Also, the current coats are still a little thin on the back, so one more coat  will not go astray there.

With the last coat of primer in place, I am planning on shooting 2 coats of white gloss acrylic. The body will then be ready for the Pollock/Squire inspired splattering to begin. I can't wait!!!

Tuesday 4 March 2014

Les Paul Florentine: A New Toy for a Better Nut?

Today I worked on a new bone nut for the Florentine build. It was the first time I got to use a new toy - the Stewmac "Safe Slot Nut Guard". In the past I have found it hard to hold and bend a stack of feeler guages against the fretboard radius by hand while tracing lines on my nut blank. This little tool from Stewmac seemed to be the answer to this problem, holding gauges firmly against the fretboard and thereby leaving my hands free to wield my pencil with confidence.


Unfortunately, following Stewmac's own nut making guide, although I was able to draw the first line at fret height + 0.030, adding another 0.045 for the thickest E string for the next line meant a stack of feeler gauges that was now too fat to fit the tool's slots. Talk about disapointing!! With slots just a few microns bigger, this would have been a perfect tool. Bad luck Stewmac.

Stone Roses Tribute: Video Build Diary #3

The third instalment of my video build diary for the RC-1 Stone Roses Tribute is now on YouTube. This instalment deals with raising the grain and filling the pores of the Pitbull RC-1.


Self indulgent? Totally. Preachy? You betcha. But at least I didnt use the word 'trusty' this time around..